- “ollama” - helps us run llm on our machine directly. uses llama.cpp underneath
- we can see the different models available by here - https://ollama.com/search
- download from here - https://ollama.com/download/mac
- then, run this from your terminal -
ollama run llama3.2 - https://www.anaconda.com/download/success - install anaconda
- anaconda - helps create a full blown environment that is similar for most people
- e.g. command of creating one -
conda env create -f environment.yml - then, we run
conda activate llms to activate the environment - finally, we run
jupyter lab - i am currently using the open ai api via github, by using a github token -
openai = OpenAI(
  base_url = "https://models.inference.ai.azure.com",
  api_key = os.getenv("GITHUB_TOKEN")
)
- i believe this is the feature it is using - https://github.com/marketplace/models
- “frontier models” - expect two kinds of instruction from us - “system prompt” and “user prompt”
- “system prompt” - explains the context of the conversation
- “user prompt” - the actual conversation itself. llm responds to the user prompt based on the system prompt
- this format i believe was what openai came up with, but is now being used by all models
- e.g. of using it in python via the “completions” api -
messages = [
  {"role": "system", "content": "You are a snarky assistant"},
  {"role": "user", "content": "What is 2 + 2?"}
]

response = openai.chat.completions.create(model="gpt-4o-mini", messages=messages)
print(response.choices[0].message.content)
- “closed frontier models” - gpt from openai, claude from anthropic, gemini from google, command r from cohere
- “open source frontier models” - llama by meta paved the way for open source. then came gemma from google, phi from microsoft, qwen from alibaba cloud
- star coder - built by service now, hugging face and nvidia together
- we can use llama instead of openai, but the difference is huge - 2 billion parameters are used by llama, compared to gpt 4o preview, that has about 10 trillion parameters
- using ollama api instead - first run
ollama serve. note - i had to just open ollama from the applications on my mac to get this up and running - then, visit - http://localhost:11434/. it shows “Ollama is running”
- now, just like openai, we can interact with ollama as follows. note how the format of messages stays the same -
import ollama

response = ollama.chat(model=MODEL, messages=messages)
print(response['message']['content'])
Methods to Use LLMs
- method 1 - chat interfaces like chatgpt
- we can pay for higher limits. there are usually subscriptions that we can pay for
- method 2 - calling the apis directly like we saw above in case of openai
- note - we pay per request here, unlike the monthly subscription that we saw above
- there are frameworks like “lang chain” that provide us a single interface and abstracts away the complexities of interacting with the apis for the different models underneath
- method 2.1 - using cloud services like amazon bedrock. they are like the api above, but are well integrated into the cloud for features like security, monitoring, integration with other services of the cloud provider, etc. they also provide access to more models, unlike for e.g. the openai api above, which will only allow us to use openai’s apis
- method 3 - we get the code and the weights for the llm directly. e.g. what we do when using “hugging face”
- however, when doing this, we need high powered machines, which is why we use google colab etc
- method 3.1 - the code is made into high performance variants, e.g. ollama, the llama cpp variant which we ran earlier
- these are lightweight, so can be run on our machines, without requiring us to use colab for e.g., but have limitations
- also, they cannot be tweaked like we did when using hugging face, since this is compiled code
Comparing the Models
- the below are written in the format company and then their models
- openai - gpt, o1. chatgpt is the chat interface
- anthropic - claude. comes in three levels (smallest to largest) - haiku, sonnet, opus
- google - uses gemini. it is the successor of bard
- cohere - command r+. uses a technique called “rag” for expertise
- meta - llama. open source version called ollama. meta.ai is the chat interface
- perplexity - actually a search engine powered by llms
What LLMs Can and Cannot Do
- good at -
- synthesizing information - give us well researched, structured responses with summaries
- fleshing out a skeleton - from a couple of pointers, build out an email, a blog post, etc
- coding - the ability to write and debug code. stack overflow is now almost dead
- not so good at -
- specialized domains - however, getting close to phd levels in science, mathematics, etc. but still, would lack the domain knowledge
- recent events - would be trained upto a date, so have a cutoff
- hallucinations, confident in wrong responses
- e.g. i could see that gemini gets this wrong - “how many times does the letter ‘a’ appear in this sentence”
- this is because of how tokenization works with these llms
- however, gpt o1 preview was able to answer this as well - it uses a chain of reasoning
- note - the ‘o’ in gpt 4o is omni i.e. it can work with not only text, but audio, images, etc as well
- gpt 4o canvas uses an interactive editor for working with code
- however, claude shows these things called “artifacts”, which are not interactive, but have features like publish, versioning to allow us to go back to previous versions, etc
- apparently, anthropic has stricter policies compared to openai, and engineers who left openai built anthropic
- 2017 - google released a paper called “attention is all you need” - which included the “self attention layers”, the underlying architecture of “transformers”
- gpt 3.5 with chatgpt was released in late 2022. it was the game changer. it used “reinforcement learning from human feedback”
- then, gpt 4 came out in 2023 followed by gpt 4o in 2024
- what it actually is - that based on the huge amounts of training data it has been fed and so many weights set on it, it “predicts the next token”
- this is “emergent intelligence”, since it is imitating intelligence
- “prompt engineers” - specialized in crafting the right prompts for the response. it has fallen out now, as there are tools for doing this and enough resources to teach this
- “custom gpt” - gpt store was popular at some point. it is a little saturated now though. it has different kinds of tuned gpts
- “copilot” - github copilot etc, where human and llms collaborate. another example was gpt 4o canvas
- “agentization” - using “agentic ai” multiple agents collaborate to solve a complex problem
- “parameters” / “weights” - control the model’s outputs. these weights are set when we train an llm. it keeps adjusting these weights and keeps getting better
- the newer gpt has a few trillion parameters. compare this to the linear regression models, which have between 20 to 200 parameters
- “agents” - typically autonomous (do not involve human involvement) and task specific (specialized to do something)
- they have a sense of memory, and are more than responding to user messages, e.g. scrape the web etc
- “agent framework” - multiple agents interacting with each other, combination of traditional software and llms
- llm is more related to language, whereas the “multi modal” use cases revolve around audio, pictures, etc, and are more “generative ai”
Tokenization
- early neural networks - trained character by character. they would predict the next character
- so, number of possible “inputs” were less - only number of symbols / characters are needed
- issue - the model weights had to capture how to find the meaning behind words, which was too much to expect from the model
- then, we went to the other extreme - a dictionary / vocabulary was used for training neural networks
- the neural network used to now predict the next word instead of the next character
- issue 1 - too many words. the vocabulary can become too big
- issue 2 - how to deal with unknown words i.e. words not present in the vocabulary? this could include names of people, places, etc
- so, there is a happy medium - “tokens” or chunks of letters
- these tokens could form complete words or parts of words
- now, the model would input and output tokens
- advantage one - unknown words can now be handled by simply breaking them down into multiple tokens
- advantage two - this helps handle “word stems” i.e. word with the core lexical meaning behind a word. e.g. in runs, running, runner, etc, the word stem is run
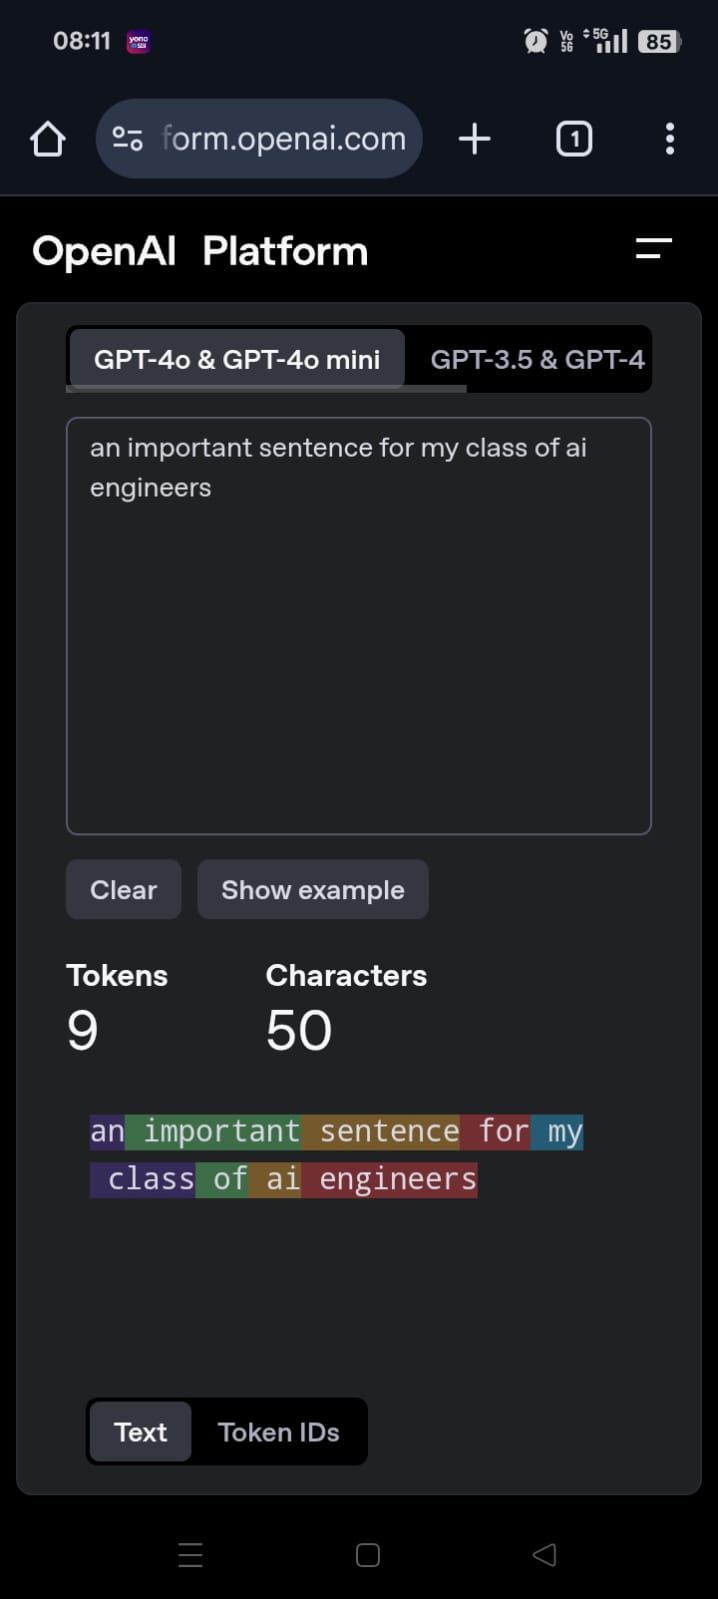
- openai provides its tokenizer to us to play with - https://platform.openai.com/tokenizer
- e.g. below - notice how the space is included as part of the token. it means that the word for e.g. begins with “important”, helping with word stems etc that we saw above
- however, notice below how the lesser known words are broken down into smaller tokens
- try typing numbers, they are broken into three digits tokens
- typically - tokens are 4 characters, and a token is typically 3/4ths of an english word
- “context window” - total number of tokens that an llm considers at a time to generate the next possible token
- this is limited due to the size of the llm, the number of parameters, etc
- we feel that chatgpt remembers the context from the discussion threads earlier. what actually happens is that it passes all of the messages every time as a long prompt. it includes all the system prompts, user prompts, the responses that it itself generated, and then decides on the next token. this is what gives us the illusion that it remembers the discussion. this also is an example of the emergent intelligence we talked about
- recall from here that we are charged based on usage, and not on a subscription model when using apis. so, we are actually charged based on input and output tokens
- https://www.vellum.ai/llm-leaderboard - e.g. here, we can see a lot of useful statistics, like llama has a context size of 10 million tokens, which would mean 7.5 million english words based on our average token size mentioned earlier. it also gives us the costs based on input and output tokens
Example Project
- we will generate a marketing brochure about a company
- we use “one shot prompting” - we provide it with one example of how to respond
- similarly, we have “zero shot prompting” and “multi shot prompting” (self explanatory)
- the more examples we add, the more robustness we add to our llm
- what we are doing here is, instead of writing some code to this, we are handing it over to gpt 4o mini to do it
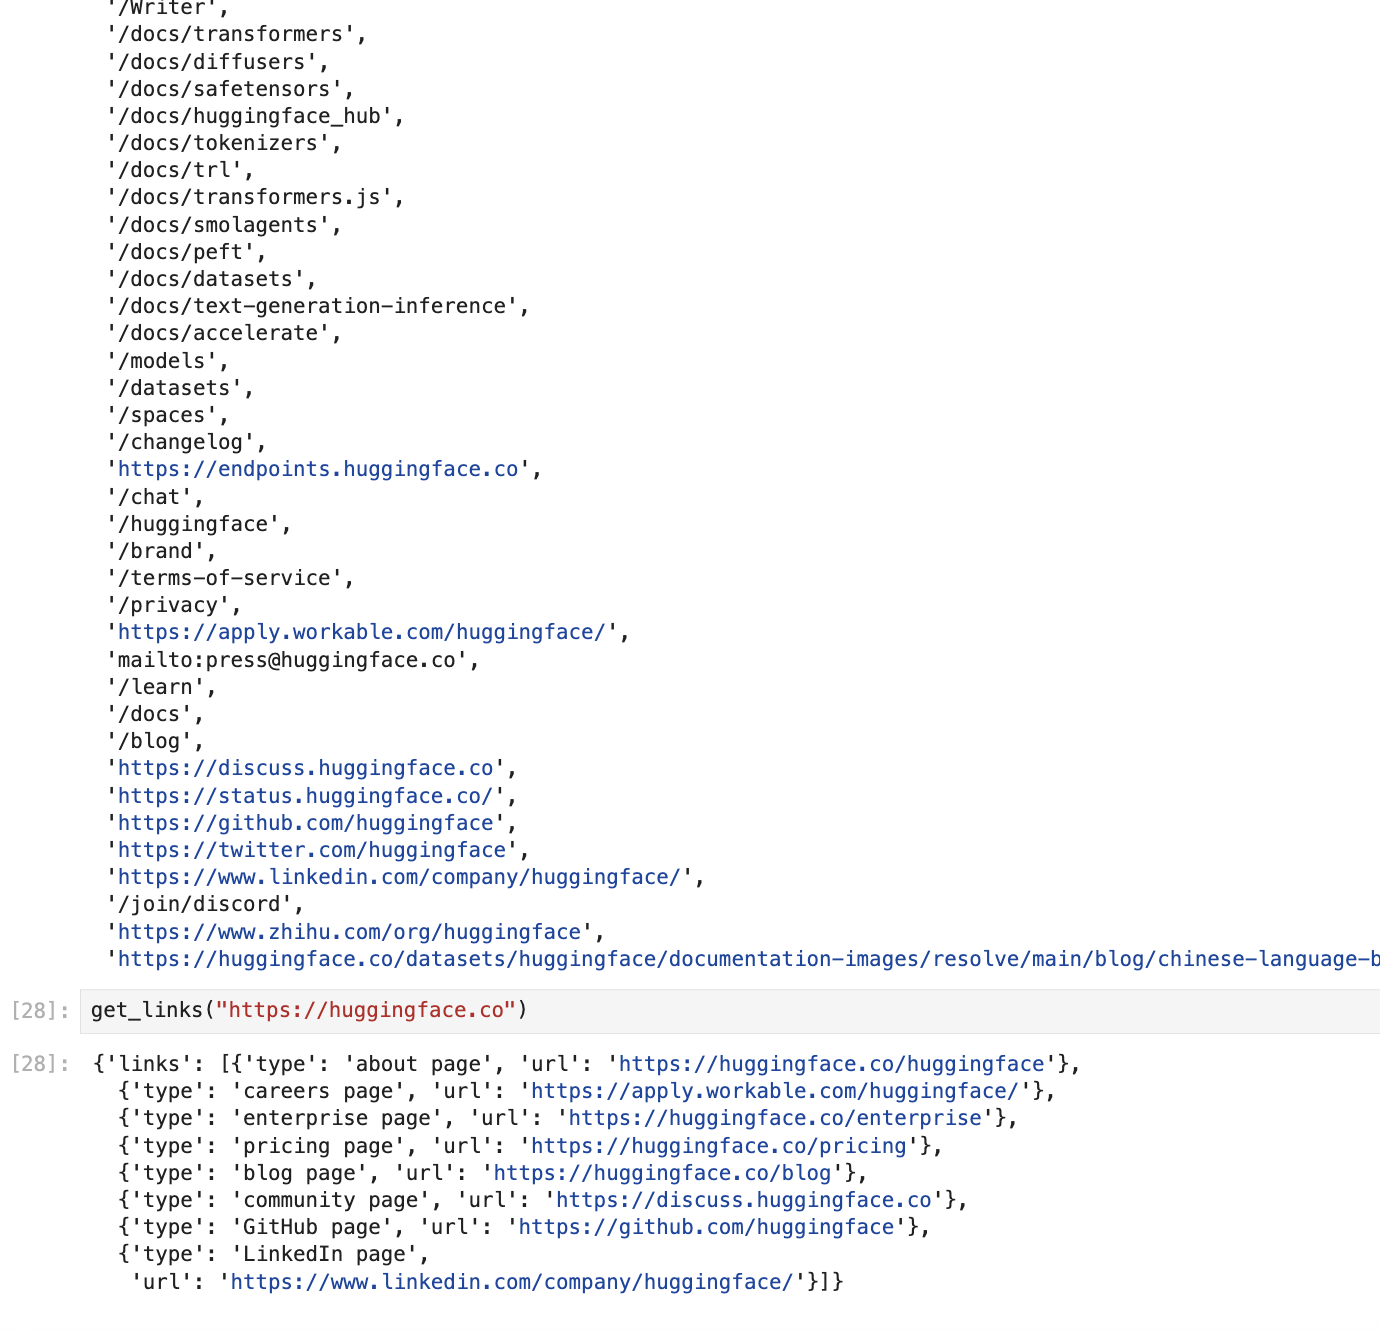
- step 1 - using beautiful soup, parse the home page for a website and gather all the links
- step 2 - ask gpt to gather all the relevant links from this page
- this involves nuanced reasoning around which links make sense to add in a marketing brochure, string formatting (e.g. /about becomes website.com/about), etc. we also want the output in a json format to use in our python code later. we specify all these details in the system and user prompt
link_system_prompt = """
You are provided with a list of links found on a webpage.
You are able to decide which of the links would be most relevant to include in a brochure about the company,
such as links to an About page, or a Company page, or Careers/Jobs pages.
You should respond in JSON as in this example:
{
    "links": [
        {"type": "about page", "url": "https://full.url/goes/here/about"},
        {"type": "careers page": "url": "https://another.full.url/careers"}
    ]
}
"""

def get_links_user_prompt(url, links):

  links = "\n".join(links)

  return f"""
  Here is the list of links on the website of {url} -
  Please decide which of these are relevant web links for a brochure about the company, respond with the full https URL in JSON format.
  Do not include Terms of Service, Privacy, email links.
  Links (some might be relative links):
  {links}
  """
- now, we can use these prompts as follows - notice how we mention the response format as well. it is required to mention it in both places - in the code when making the api call and in the prompts
def get_links(url):
  website = Website(url)

  response = openai.chat.completions.create(
    model=MODEL,
    messages=[
      {"role": "system", "content": link_system_prompt},
      {"role": "user", "content": get_links_user_prompt(website.url, website.links)}
    ],
    response_format={"type": "json_object"}
  )

  result = response.choices[0].message.content

  return json.loads(result)
- notice the kind of input it got vs the kind of structured, relevant output gpt gave us 🤯
- step 3 - we parse all these links again using beautiful soup to gather all the text content
- step 4 - then, all of this text content is simply concatenated and fed into openai to give us the marketing brochure
- not mentioning the code for these, as all of this is pretty easy
- stream - we can stream the responses instead of getting them all at one, to give the typewriter like intuition. it feels like it is using something like a generator for achieving this functionality
def stream_brochure(company_name, url):
  stream = openai.chat.completions.create(
    # ...
    stream=True
  )

  for chunk in stream:
    print(chunk.choices[0].delta.content)
- there is another parameter like “temperature” that these apis accept. they vary between 0 and 1. use a higher value for more random outputs, and a lower value for more deterministic outputs
- example of using claude - similar to openai, but look at how we for e.g. pass the system prompt separately etc -
message = claude.messages.create(
  model="claude-3-7-sonnet-latest",
  max_tokens=200,
  temperature=0.7,
  system=system_message,
  messages=[
    {"role": "user", "content": user_prompt},
  ],
)

print(message.content[0].text)
Miscellaneous
- “gradio” - acquired by hugging face, helps build user interfaces quickly
def shout(text):
  print(f"shout has been called with input {text}")
  return text.upper()

gr.Interface(fn=shout, inputs="textbox", outputs="textbox").launch()
- this simple code generates a fully responsive ui like below for us -
- additionally, adding
.launch(share=True) will automatically generate a publicly accessible url for us - assume the example below - assume we return markdown from openai (its straightforward, just instruct it to return in markdown format!). assume we stream this. now, notice how we are adding to the result every time, and yielding the whole result every time. now, gradio can simply accept even the streaming response, and output the markdown using the interactive typewriter affect
def generate_markdown(content):
  response = openai.chat.completions.create(
      # ...
      stream=True
  )

  result = ""

  for chunk in response:
      if len(chunk.choices) == 0:
          continue
      result += chunk.choices[0].delta.content or ""
      yield result

def website_summary_generator(url):
    content = generate_all_content(url)
    yield from generate_markdown(content)

gr.Interface(
    fn=website_summary_generator,
    inputs=[gr.Textbox(label="url:"), ],
    outputs=[gr.Markdown(label="Response:")]
).launch()
- chat bots - very effective for use cases like customer support
- we can ensure the below things (already discussed) -
- “system prompt” - first, set a friendly tone. then, say “no” if you do not know the answer say so. providing this kind of a system prompt is often critical to for e.g. prevent hallucinations
- “context” - recall how it sends all messages every time for the emergent intelligence. we can also feed it with some additional message / context beforehand, before the actual human interaction starts
- “multi shot prompting”
- give some subject matter expertise to these llms as well
- recall the illusion of memory that gets created by us passing all the messages every time. we say the roles of “system” and “user” for representing the system ad user prompt respectively. for modelling the response given by the model, use the role of “assistant”. this gets used in building the chat bot below
- how gradio works for chat interfaces - it gives us two inputs - the user input and chat history
- we construct them into the messages array of dictionaries that openai expects
- we output the streaming response from openai for the typing animation
- so, below is the full example of building a simple chat interface with gradio -
system_message = "you are a basic assistant"

def chat_bot(user_input, messages):
    system_prompt = {"role": "system", "content": system_message}
    user_prompt = {"role": "user", "content": user_input}
    messages = [system_prompt] + messages + [user_prompt]

    response = openai.chat.completions.create(
        model="gpt-4o-mini",
        messages=messages,
        stream=True
    )

    streaming_response = ""

    for chunk in response:
        if len(chunk.choices) == 0:
            continue
        streaming_response += chunk.choices[0].delta.content or ''
        yield streaming_response

gr.ChatInterface(fn=chat_bot, type="messages").launch()
- note - system prompts can come in between as well, and need not always be at the start of the messages list. below is an e.g. of how we try to add to the context that belts are not sold in the shop
if "belt" in user_input:
  messages.append({ "role": "system", "content": "belts are not sold. redirect to other items" })
- note - what we did above is what “rags” are all about - finding extra information relevant to the prompt and adding it to the context
- this is also a type of “multi shot prompting”, since we are adding context / examples. another way of achieving this could be to add a fictitious set of user and assistant message exchange beforehand. both methods (system prompts vs the fictitious back and forth chat) have their pros and cons
- allows frontier models to connect to functionality outside the model
- some use cases for tools
- fetch data to add extra context to the chat
- take an action on our behalf, e.g. booking a meeting, etc
- one method - we can ask the model to respond to us in json format
- we can then use this as input to the different external functionality
- assume we build a simple chat interface for getting ticket prices as below. right now, it does nothing -
system_message = """
you are an assistant for an airline called "flight ai".
give short answers.
always be accurate, if you do not know the answer say so.
"""

system_prompt = [{"role": "system", "content": system_message}]

def chat(user_input, messages):

  user_prompt = [{"role": "user", "content": user_input}]

  messages = system_prompt + messages + user_prompt

  response = openai.chat.completions.create(
      messages=messages,
      model="gpt-4o-mini"
  )

  return response.choices[0].message.content

gr.ChatInterface(fn=chat, type='messages').launch()
- now, say we have a function like below, which can give us the flight prices. assume this could have some complex functionality like calling apis underneath -
def get_ticket_price(source_city, destination_city):
  if source_city.lower() == "delhi":
      return random.randint(3000, 20000)
  return "unknown"

print(f"delhi -> mumbai: {get_ticket_price('delhi', 'mumbai')}") # delhi -> mumbai: 6004
print(f"kolkata -> mumbai: {get_ticket_price('kolkata', 'mumbai')}") # kolkata -> mumbai: unknown
- now, to tell the llm about this function, below is how we do it. the dictionary structure is important, e.g. we describe what it does using the description field
get_ticket_price_tool = {
    "name": "get_ticket_price",
    "description": "get the flight ticket price for traveling from city a to b. for eg. when a customer asks 'flight ticket price for traveling from city a to b'",
    "parameters": {
        "type": "object",
        "properties": {
            "from": {
                "type": "string",
                "description": "the city the customer wants to travel from"
            },
            "to": {
                "type": "string",
                "description": "the city the customer wants to travel to"
            }
        },
        "required": ["from", "to"],
        "additionalProperties": False
    }
}
- now, we configure openai as follows, by just slipping in the tools parameter -
tools = [{"type": "function", "function": get_ticket_price_tool}]

response = openai.chat.completions.create(
    messages=messages,
    model="gpt-4o-mini",
    tools=tools
)
- basically, the llms have been trained in a way that gives them the ability to parse this object into tokens, and know when they need to call these tools
- the entire workflow -
- step 1 - we gave the chain of messages to the llm
- step 2 - it then determines based on the last user prompt if it needs to make a call to a tool, or it responds with something else based on the system prompt
- step 3 - the llm comes back to us, the developer with a request to make a call to xyz tool
- step 4 - then, we the developers, manually ourself make the call to the tool
- step 5 - then, we send the tool’s response to the llm again
- step 6 - the llm again finally crafts a response using the tool’s response for the end user
- step 3 - e.g. our prompt is “flight price for delhi to kolkata”. the response (truncated) is as follows. it tells us the tool to use, the arguments to pass to it, etc
ChatCompletion(
  choices=[
    Choice(
      finish_reason='tool_calls',
      message=ChatCompletionMessage(
        tool_calls=[
          ChatCompletionMessageToolCall(
            id='call_Z2if2Ra4KiToMhTqX0IdpzC4',
            function=Function(arguments='{"from":"Delhi","to":"Kolkata"}', name='get_ticket_price'),
            type='function'
          )
        ]
      ),
    )
  ]
)
- step 4 - so, we call the tool accordingly based on the response from the llm
if response.choices[0].finish_reason == 'tool_calls':

    tool_call_message = response.choices[0].message
    messages.append(tool_call_message)

    tool_fn = tool_call_message.tool_calls[0].function

    if tool_fn.name == 'get_ticket_price':
        arguments = json.loads(tool_fn.arguments)
        price = get_ticket_price(arguments.get('from'), arguments.get('to'))
- note - see the if we use to understand the function to call. we can use something like this instead -
tool = globals().get(tool_fn.name)
result = tool(**tool_fn.arguments)
- step 5.1 - finally, we append these to the messages list. first, the request to call the tool itself
messages.append(tool_call_message)
- step 5.2 - then the response from tool itself is also appended to the messages. look at how the format - content is a json dump of the arguments and return value, role is tool and finally, the tool id needs to be mentioned as well
content = json.dumps({ "from": arguments.get('from'), "to": arguments.get('to'), "price": price })
tool_response = {"role": "tool", "content": content, "tool_call_id": tool_call_message.tool_calls[0].id }
messages.append(tool_response)
- step 6 - finally, we make a fresh request to the llm for the final response. full code -
system_prompt = [{"role": "system", "content": system_message}]
tools = [{"type": "function", "function": get_ticket_price_tool}]

def chat(user_input, messages):

    user_prompt = [{"role": "user", "content": user_input}]

    messages = system_prompt + messages + user_prompt

    response = openai.chat.completions.create(
        messages=messages,
        model="gpt-4o-mini",
        tools=tools
    )

    if response.choices[0].finish_reason == 'tool_calls':

        tool_call_message = response.choices[0].message
        messages.append(tool_call_message)

        tool_fn = tool_call_message.tool_calls[0].function

        if tool_fn.name == 'get_ticket_price':
            arguments = json.loads(tool_fn.arguments)
            price = get_ticket_price(arguments.get('from'), arguments.get('to'))
            content = json.dumps({ "from": arguments.get('from'), "to": arguments.get('to'), "price": price })
            tool_response = {"role": "tool", "content": content, "tool_call_id": tool_call_message.tool_calls[0].id }
            messages.append(tool_response)

        response = openai.chat.completions.create(
            messages=messages,
            model="gpt-4o-mini",
            tools=tools
        )

    return response.choices[0].message.content

gr.ChatInterface(fn=chat, type='messages').launch()
- there can be multiple tool calls, so we might want to use a while loop i.e. while the finish reason is tool calls, we keep making the tool calls and appending the result of the tool calls to the messages. skipping such details for now, as frameworks handle these better
- when i ask it “flight price for kolkata to delhi”, it responds with “I do not have the flight price for Kolkata to Delhi at the moment.”, since our function returns unknown
Hugging Face
- “hugging face platform” -
- “models” - over a million open source models
- “datasets” - over 250k+ datasets
- “spaces” - host gradio, streamlit, etc apps easily
- “hugging face libraries” -
- “hub” - like a models and datasets artifactory
- “datasets”
- “transformers” - wrapper around the llms following the transformer architecture. underneath, pytorch / tensorflow is what runs
- “peft” - parameter efficient fine tuning. allows us to train llms without using those billions of parameters
- “trl” - transformer reinforcement learning. helps us do “reward modelling” (rm) and “proximal policy optimization” (ppo). these are successors of rlhf, and makes these llms effective at chat. this was the key innovation behind chatgpt in 2022. “supervised fine tuning” (sft), something we use later
- “accelerate” - running hugging face efficiently on gpus
- https://huggingface.co/models - search for llama models, gemma from google, etc
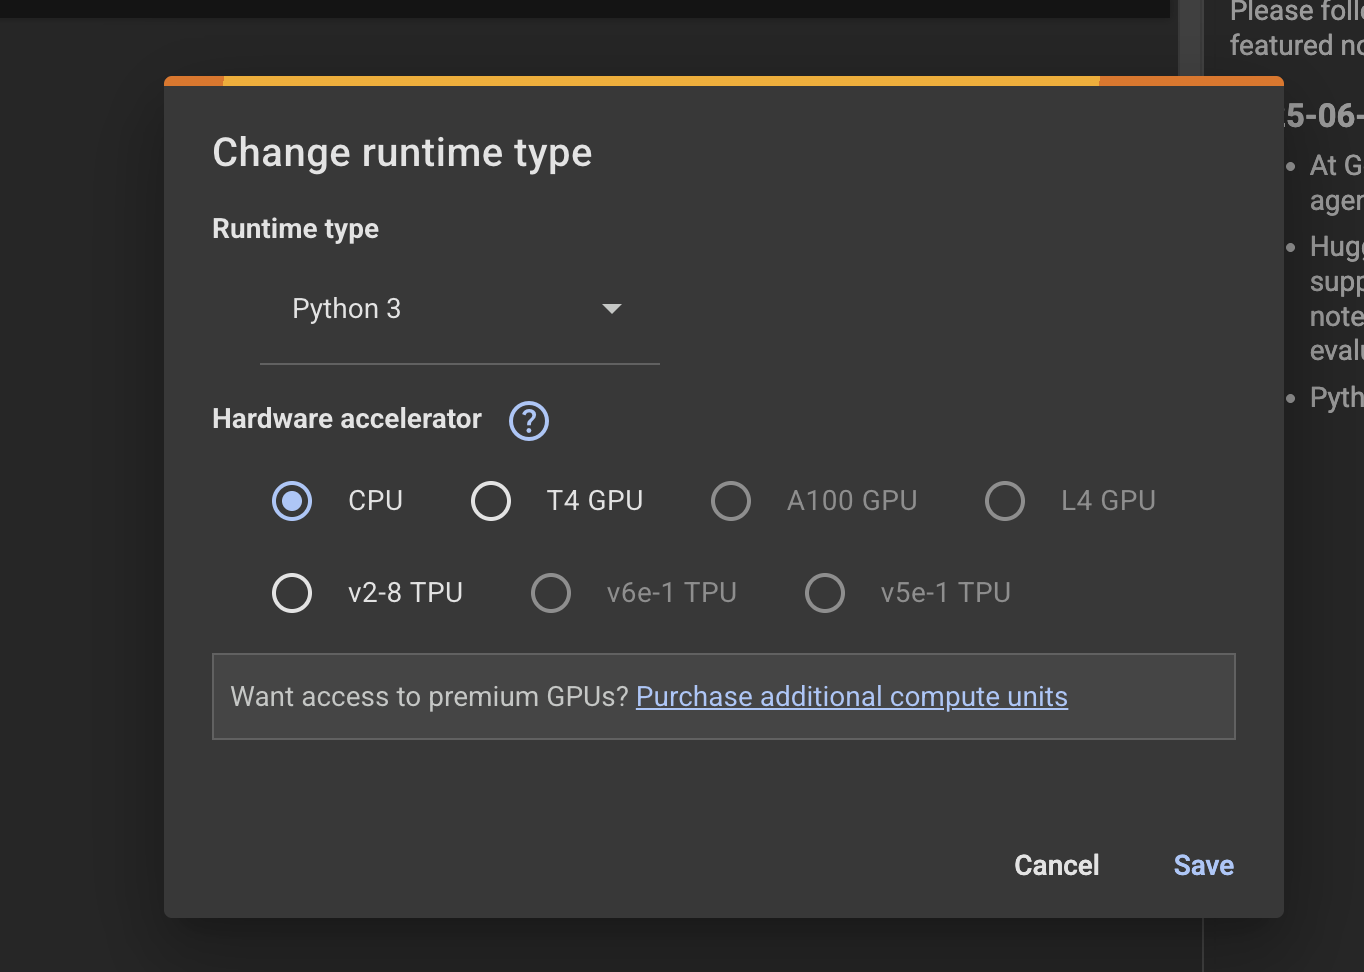
- “google colab” - run a jupyter notebook on a powerful cpu / gpu
- additionally, it allows us to share notebooks easily to collaborate
- integration with other google services - access data from google drive
- we can see use the ephemeral storage of the box we use to read from / write to (the folder icon)
- it also allows us to store simple secrets in the form of key and value (the key icon). advantage - the secrets unlike the code do not get shared when we share notebooks
- “hugging face apis” - there are two apis - “pipelines api” and “tokenizers, models apis”
- “tokenizers apis”, “models api” etc when we want to look underneath of how the tokenizers work, fine tune the llm for our own use case for carrying out specialized tasks, etc
Pipelines API of Hugging Face
- “pipelines” api, for carrying everyday tasks quickly, e.g. generating code, text and images incredibly quickly
- below are simple examples of using these apis
- the kinds of tasks it can perform have been listed here under transformers - e.g. text generation, text classification, token classification, etc
- first, install the libraries -
!pip install -q transformers diffusers datasets
- enure that the key
HF_TOKEN has been setup in colab - “sentiment analysis” - emotion conveyed by the sentence
from transformers import pipeline

analysis = pipeline("sentiment-analysis")
analysis("i am excited to see where llms take me")

# [{'label': 'POSITIVE', 'score': 0.9997376799583435}]
- if we are using a gpu in colab, we can simply ask hugging face to use the gpu like this -
analysis = pipeline("sentiment-analysis", device="cuda")
- “ner (named entity recognition)” - tag words as names of people, places, etc
ner = pipeline("ner", grouped_entities=True)
ner("rajendra prasad was the first president of india")

#[{'entity_group': 'PER', 'score': np.float32(0.96074295), 'word': 'rajendra prasad', 'start': 0, 'end': 15},
# {'entity_group': 'LOC', 'score': np.float32(0.8425352), 'word': 'india', 'start': 43, 'end': 48}]
- “translation” - (docs, languages)
translator = pipeline("translation_en_to_fr")
translator("how are you doing today?")

# [{'translation_text': "Comment allez-vous aujourd'hui?"}]
- “diffusion models” - an image generation example below -
image_gen = DiffusionPipeline.from_pretrained(
    "stabilityai/stable-diffusion-2",
    torch_dtype=torch.float16,
    use_safetensors=True,
    variant="fp16"
)

text = "a class of novices learning about llms specifically"
image = image_gen(prompt=text).images[0]
image
Tokenizers API of Hugging Face
- “tokenizer” - map between text and tokens (encode and decode)
- it contains a “vocabulary” of tokens
- “special token” - a token that tells the model something like start of a sentence, beginning of a chat, etc
- the more the neural network is trained about these token, the better it learns about these special tokens
- initial setup -
from google.colab import userdata
from huggingface_hub import login
from transformers import AutoTokenizer

login(userdata.get('HF_TOKEN'), add_to_git_credential=True)
- then, grab the tokenizer of llama -
tokenizer = AutoTokenizer.from_pretrained('meta-llama/Llama-3.1-8B')
- note - it throws the below error. so, do the needful. view the status here -
Access to model meta-llama/Llama-3.1-8B is restricted and you are not in the authorized list.
Visit https://huggingface.co/meta-llama/Llama-3.1-8B to ask for access.
- TODO - add the outputs based on this notebook
- note - here, we build on what we learnt here
- e.g. look at how each of the word maps to a number
text = "learning a little bit about llms"
tokens = tokenizer.encode(text)
tokens

# [128000, 21656, 264, 2697, 2766, 922, 9507, 1026]
- look at how based on how the model was “trained”, it was able to detect / add the begin token. also recall how tokens also start with a space, to indicate the beginning of a word. also note the exceptions like “ms”, since that word got broken down into multiple tokens
tokenizer.batch_decode(text)

# ['<|begin_of_text|>', 'learning', ' a', ' little', ' bit', ' about', ' ll', 'ms']
- we can also use the below to view the special tokens -
tokenizer.get_added_vocab()

# {'<|begin_of_text|>': 128000,
#  '<|end_of_text|>': 128001,
#  '<|start_header_id|>': 128006,
#  '<|end_header_id|>': 128007,
#  '<|python_tag|>': 128010,
# ...
- “instruct” - most models have these variants. they are specialized for chat (e.g. think how chatgpt is specialized for chat but builds on the gpt4o llm model)
- the models have been “trained” to expect prompts in the format of system prompt, user prompt, assistant prompt. that is why we structure them in the form of a list of dictionaries with role and content - they have been “trained” this way. note how it has added the appropriate special tokens for headers, and the last token basically hints the model it to add the assistant prompt
messages = [
  {"role": "system", "content": "you are a helpful assistant"},
  {"role": "user", "content": "tell a light joke for a data scientist"}
]

prompt = tokenizer.apply_chat_template(messages, tokenize=False, add_generation_prompt=True)
print(prompt)

# <|begin_of_text|><|start_header_id|>system<|end_header_id|>
#
# Cutting Knowledge Date: December 2023
# Today Date: 26 Jul 2024
#
# you are a helpful assistant<|eot_id|><|start_header_id|>user<|end_header_id|>
#
# tell a light joke for a data scientist<|eot_id|><|start_header_id|>assistant<|end_header_id|>
- note - what we saw was all for llama. if we were to look at for e.g. phi3’s approach, it would be slightly different, but the crux stays the same
Models API of Hugging Face
- “quantization” - reducing precision of weights in model to help it run faster, load easily in the memory, etc
- the point is - despite this optimization, it does not affect the results by much, hence we do it
- when we use fine tuning for e.g. using qlora, the q there stands for quantization
- the bits and bytes library is used to help create the config for this quantization -
quant_config = BitsAndBytesConfig(
    load_in_4bit=True,
    bnb_4bit_use_double_quant=True,
    bnb_4bit_compute_dtype=torch.bfloat16,
    bnb_4bit_quant_type="nf4"
)
- explanation - load the weights just inside just 4 bits (by default, they are 32 bits i believe)
- then, we also specify “double quant” i.e. it quantizes the weights twice, thus leading to a further reduction
- next, we prepare the model as follows. we create a causal llm, and all llms we have seen so far are of the kind “causal llm”. “causal llms” are the same as “auto regressive llms”. they take some inputs and then predict some kind of output -
LLAMA = "meta-llama/Meta-Llama-3.1-8B-Instruct"

model = AutoModelForCausalLM.from_pretrained(LLAMA, device_map="auto", quantization_config=quant_config)
- the device map helps with gpu configuration
- next, we prepare the prompt, to be fed into the llm later. we already saw this above
messages = [
  {"role": "system", "content": "You are a helpful assistant"},
  {"role": "user", "content": "Tell a light-hearted joke for a room of Data Scientists"}
]

tokenizer = AutoTokenizer.from_pretrained(LLAMA)
inputs = tokenizer.apply_chat_template(messages, return_tensors="pt").to("cuda")
- my understanding - we now have the model, which we can run as python code. till now, we were making api requests to these models hosted on cloud. because we are running the code locally, we used techniques like quantization. underneath, these are pytorch layers. the weights are downloaded and put on the disk, in this case, the disk of the colab box we are using
- now, we can use it as follows -
outputs = model.generate(inputs, max_new_tokens=80)
print(tokenizer.decode(outputs[0]))
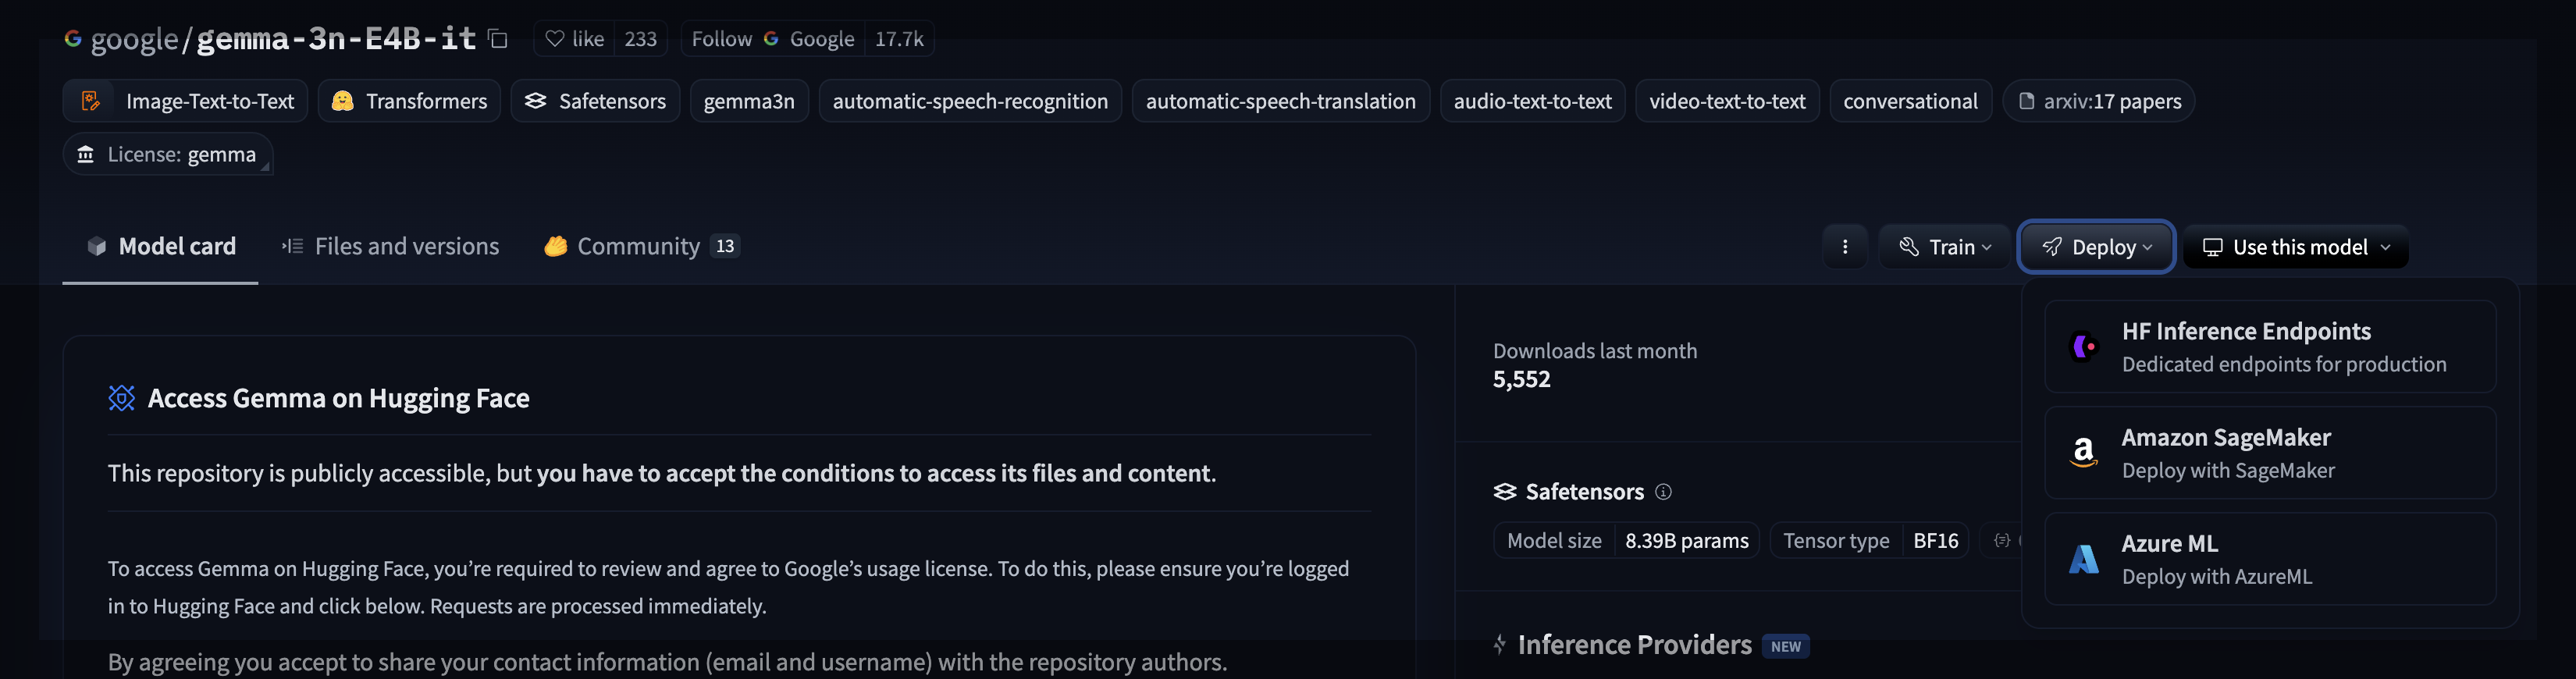
- side note - till now, we were downloading and running the models using a gpu in google colab. there is another method - by running it as a “hugging face inference endpoint” i.e. we deploy this open source model directly on hugging face
Evaluating Models for Use Case
- features to compare -
- is it open source or closed source
- what is its release date and knowledge cutoff date
- number of parameters - determines the strength of model, how much training data would be needed to fine tune it, etc
- training tokens - size of training data used to train the model
- context window size - e.g. all of the exchanges it can keep in memory at a time in the “instruct” use case
- costs to be wary of -
- inference cost - given an input, cost for generating the output
- training cost - useful when we for e.g. train an open source model
- build cost, time to market - using the closed source frontier models have this advantage - we can market faster
- “chinchilla scaling law” - no. of training parameters is proportional to the no. of training tokens
- lets say we are getting diminishing returns from adding more training data to the model. this means we should increase the no. of parameters to be able to feed it more training data
- say we are told to increase the capability of the model by increasing the number of tokens. this means we should also have enough training data to be able to train the model with the additional parameters
- it has been observed that this law applies well to transformers
- “benchmarks” - tests. people use these to weigh different models
- arc - benchmark for scientific reasoning using mcq
- drop - language comprehension test - distilling text, and performing things like counting, sorting, adding
- hella swag - harder encodings, long contexts and low shot activities - common sense reasoning
- mmlu - reasoning across subjects
- truthful qa - how robust the model is in providing truthful replies in adversarial questions i.e. when encouraged in the wrong direction
- winogrande - llm understands the context and can resolve ambiguity
- gsm8k - elementary math and word problems
- elo - head to head face offs between llms
- humaneval - python coding test - writing code based on python docstring
- multipl-e - human eval for multiple programming languages
- issues with benchmarks -
- narrow in scope
- questions can be leaked, and hence get used to train the models
- over fitting - models get high scores on benchmarks, but do not perform good otherwise
- harder benchmarks -
- gpqa - google proof questions and answers. cannot be googled easily. sonnet scores close to phd students on this
- bbhard - big benchmark hard. intended to be tasks that llms cannot do. unfortunately, llms can do this as well now
- math level 5 - competitive high school maths
- ifeval - difficult instructions. e.g. write more than 400 words, mention ai at least 3 times
- musr - multi step soft reasoning - tests logical deduction, e.g. detect the murderer in a crime story
- mmlu pro - upgraded version of mmlu. e.g. 10 instead of 4 options to choose from
- leaderboards -
- open llm leaderboard on hugging face. qwen by alibaba is one of the highest ranked models in this leaderboard. for now, qwen is one of the most powerful open source llms
- big code models leaderboard on hugging face - compares models based on their ability to generate code. qwens variants are winning here too
- llm perf leaderboard on hugging face - measures models on their speed and accuracy, based on inference etc. there is a tab called “Find Your Best Model” in this space. it has a heat chart. x axis measures time taken, y axis measures score and the size of the blob measures resource footprint. so, we are looking for small blobs over on the left and top for best results (phi-3-min is clearly beating the rest at the moment)
- vellum - on the top, there are bar charts for different benchmarks, e.g. gemini scores the highest in gpqa, while claude scores the highest in agentic coding. in terms of speed, llama scores the highest (maybe because it is lightweight / has less parameters). then, we also have comparison for costs, context window lengths, etc as discussed earlier
- lmsys chatbot arena - humans judge the responses from the two models. based on that, humans give them a ranking. it is not revealed which model is which one. then, the models are given an elo ranking accordingly. gemini 2.5 pro is leading here
- evaluating the performance of our genai solution - it can be either “model centric” or “business centric”
- “business centric metrics” - kpis tied to the actual business outcomes that we are trying to solve
- “model centric metrics” - these are technical, e.g. loss (e.g. cross entropy loss), perplexity, accuracy, precision, recall, etc
- loss (“cross entropy loss”) - how poorly an llm has performed its task. we try to minimize loss when training a model. imagine we have a sequence of tokens, and we try to predict the next token using the model. note that our training data will already have the next token. models do not just predict the next token - they give probabilities of the different next potential tokens. so, we use the probability. we want a high probability, so loss is -ve log of this probability. e.g. a perfect answer would mean probability of 1. log(-1) is 0, so 0 loss
- “mean square error” - simply squares. issue - e.g. if we guess 900 instead of 800, our error becomes a 10000, which accounts for a huge error
- so, another model centric metric is rmsle (“root mean square log error”) - it is useful because it will account for percentage difference along with absolute difference. it is useful when the data is skewed
- business outcome can be something like “how many items are priced rightly”. this can internally be a combination of absolute difference (useful for items priced cheaply) and percentage difference (useful for expensive items). e.g. a 10$ item being guessed as 12$ has good absolute but bad percentage difference, while a 900$ item being guessed as 950$ has a bad absolute but good relative percentage difference
RAG
- rags - “retrieval augmented generation”
- till now we saw techniques like multi shot prompting and adding context e.g. system context
- initial idea of rags - before making call to the frontier models, we actually search in the knowledge base for the relevant information. if found, we stuff that in along with the prompt, and that then gets used by the llm to generate the response
- this can be something very naive we implement - imagine we have a python dictionary like so -
context = {
  "shameek": "...",
  "rahul raj": "...",
}
- then, while creating the array for our chats history to send to the llm, we add an additional message to it as for e.g. follows -
def get_relevant_context(message):
  relevant_context = []
  message += "\n\nThe following additional context might be relevant in answering this question:\n\n"
  for context_title, context_details in context.items():
      if context_title.lower() in message.lower():
          message += context_details + "\n\n"
  return relevant_context

# ...
message = add_context(message)
messages.append({"role": "user", "content": message})
- issue - it is of course brittle text matching. e.g. it won’t match rahul, message should have rahul raj
- till now, the llms we saw are “auto regressive llms”. they are given a past set of tokens and generate the next token given the past set of tokens
- “auto encoding llms” - they take the full input, past, present and the future inputs. then, they create an output that represents the full input. e.g. sentiment analysis, classification, etc. we saw this in hugging face examples
- “vector embedding” - it takes a sentence of text, and turns it into a “series of numbers”. this represents a point in that space
- e.g. imagine if it were represented using 3 numbers, then we could think of it as a point in the three dimensional space cube
- point 1 - things with “similar meaning” would be closer to each other in this vector space
- point 2 - “vector math” - e.g. if have the point “king” in the vector space. we then subtract “man” i.e. move backwards in the direction of man. then, we add “woman” i.e. move forwards in the direction of woman. we have essentially asked to replace the concept of man with woman in king. surprisingly, we do end up at “queen”
- so now, when we receive some question, we first vectorize that text. we then search for this vector in the vector datastore. we look for the vectors close to our question vector. finally, we use this additional context to send to our llm
- “lang chain” - new framework to work with llm. simplifies creating assistants and rags. e.g. it is a wrapper around models like claude and openai, so that we can easily switch between them
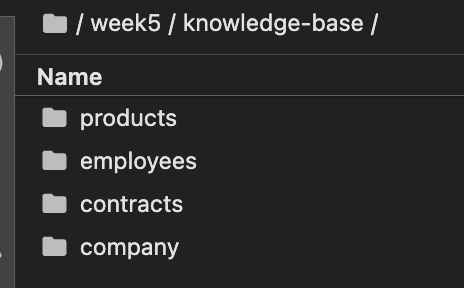
- imagine we have the following directory structure with some content. each directory listed below has some markdowns, e.g. company has the markdowns for about, careers, etc, employees has the markdown containing information about each of the employee and so on
- now, we load all of these documents using lang chain as follows. we tag each of the document with the folder name using the
doc_type attribute. e.g. all the employees will have their doc_type as employee and so onfrom langchain.document_loaders import DirectoryLoader, TextLoader
from langchain.text_splitter import CharacterTextSplitter
import glob
import os
folders = glob.glob("knowledge-base/*")
documents = []
for folder in folders:
directory_name = os.path.basename(folder)
directory_loader = DirectoryLoader(folder, glob='**/*.md', loader_cls=TextLoader)
for document in directory_loader.load():
document.metadata['doc_type'] = directory_name
documents.append(document)
print(documents[0]) gives a structure as follows -page_content='...all of the contents of the markdown...'
metadata={
'source': 'knowledge-base/employees/Alex Chen.md',
'doc_type': 'employees'
}
- then, we break these into chunks. first, we specify the chunk size. lang chain is smart enough to break the words in things like new line characters, spaces, etc, instead of breaking the words themselves. next, we also specify an overlap. this way, the same set of characters can be part of multiple chunks. e.g. having an important word be a part of multiple chunks might be desirable
text_splitter = CharacterTextSplitter(chunk_size=1000, chunk_overlap=200)
chunks = text_splitter.split_documents(documents)
- e.g. of a simplistic vector embedding model - assume we assign an index to each word in our vocabulary. cat has index 0, dog has index 1 and so on. assume our chunk has cat twice. in this case, index 0 would have 2, and so on. advantage - does not care about order. disadvantage - would not know about the context of the word java - is it in the context of coffee or the programming language?
- some popular vector encoding models - word2vec is the earliest, then came “bert” from google. we would use embeddings from hugging face, since it free. we can find others like openai as well for achieving this
from langchain.embeddings import HuggingFaceEmbeddings
embeddings = HuggingFaceEmbeddings(model_name="sentence-transformers/all-MiniLM-L6-v2")
- we use chroma for our vector store. it is open source, and works based on sqlite i.e. uses a local directory. we first clear the local file system, and then initiate the setup for the vector store
from langchain_chroma import Chroma

db_name = 'vector_db'

if os.path.exists(db_name):
  Chroma(persist_directory=db_name, embedding_function=embeddings).delete_collection()

vectorstore = Chroma.from_documents(documents=chunks, persist_directory=db_name, embedding=embeddings)
print(f"Vectorstore created with {vectorstore._collection.count()} documents")
- we try to obtain for e.g. the no. of dimensions in the first vector. i see 384
sample = vectorstore._collection.get(limit=1, include=["embeddings"])["embeddings"][0]
print(f'no. of dimensions in this chunk: {len(sample)}')
- note - another popular vector store is “faiss” or “facebook ai similarity search”. and switching it is just so simple, as below, thanks to lang chain. what i observed is unlike the chroma variant, this can also work with spelling mistakes etc. note how this is entirely in memory and does not use disk, so it does not accept the path unlike chroma
from langchain.vectorstores import FAISS

faiss_vectorstore = FAISS.from_documents(documents=chunks, embedding=embeddings)
- note how some api related changes might be there though - e.g. how we query the number of dimensions. but since the embedding stays the same i.e. the hugging face model, the result stays the same
print(f'no. of dimensions in this chunk: {faiss_vectorstore.index.d}')
- we cannot visualize these many dimensions easily. so, we use a popular algorithm called “t-sne” or “t-distributed stochastic neighbor embedding” to visualize them using 2d / 3d. skipping the code, as it can become verbose with nothing additional to learn from. these can help us see for e.g. how our vectors for similar chunks are placed together. e.g. all ai related things - maybe contracts our company has, or maybe product offerings, or maybe people in ai, should be placed close
- now, we create the open ai client that we usually create, but using langchain
from langchain_openai import ChatOpenAI
from langchain.memory import ConversationBufferMemory
from langchain.chains import ConversationalRetrievalChain

llm = ChatOpenAI(
    temperature=0.7,
    model_name="gpt-4o-mini",
    base_url = "https://models.inference.ai.azure.com",
    api_key = os.getenv("GITHUB_TOKEN")
)
- “langchain retriever” - abstractions around vector stores like chroma
retriever = vectorstore.as_retriever()
# OR
retriever = faiss_vectorstore.as_retriever()
- “langchain memory” - history of discussion with chat bot (the list of dicts)
memory = ConversationBufferMemory(memory_key='chat_history', return_messages=True)
- this is how we create the lang chain “pipeline” of sorts, by wiring the three things together
conversation_chain = ConversationalRetrievalChain.from_llm(llm=llm, retriever=retriever, memory=memory)
- finally, this is how we interact with it
query = "what is insurellm (in short)?"
result = conversation_chain.invoke({ "question": query })
print(result['answer'])
- now, if you recall, earlier, we either had to maintain a history ourselves, or we were relying on the history sent by gradio when interacting with the apis / sdks of the frontier models directly. in this case, that is taken care of by lang chain automatically for us. if we just look at result instead of plucking the answer from it, we will see the entire history. this is why the history sent by gradio is being ignored below -
import gradio as gr

def chat(question, history):
    result = conversation_chain.invoke({ "question": question })
    return result['answer']

gr.ChatInterface(chat).launch()
- “lcel” or “lang chain expression language” - the entire python code we wrote above can also be written as yaml. i do not see any advantage of it, so skipping it for now
- miscellaneous debugging tip - now, when i type “who received the prestigious iioty award?”, it does not return anything
- we can configure the pipeline like so i.e. add the callback to log what lang chain is doing. this helps us see what all “chunks” (recall what chunks were from above) was added after the vector store lookup. then, it adds all the chunks it retrieved from the “langchain retriever” aka the “vector store” as part of the prompt (commented out below for brevity). see how without us specifying, lang chain is already adding the appropriate prompts to stop hallucinations
from langchain_core.callbacks import StdOutCallbackHandler

conversation_chain = ConversationalRetrievalChain.from_llm(
  llm=llm,
  retriever=retriever,
  memory=memory,
  callbacks=[StdOutCallbackHandler()]
)

# System: Use the following pieces of context to answer the user's question.
# If you don't know the answer, just say that you don't know, don't try to make up an answer.

# ...
- when adding the debugging, we noticed that the context related to the award was not being forwarded. fixes can include tweaking things like -
- playing with the chunk size / chunk overlap when configuring the embedding
- configuring the number of chunks returned by the vector store
- we perform the second while creating the retriever as follows -
retriever = faiss_vectorstore.as_retriever(search_kwargs={"k" : 25}) - understand that this does mean that we are potentially sending much more context to the llm. however, this is actually a good thing. sending more context can only be an issue when we use things like those deep research complex models, as it might confuse them / make them slower. but in most cases, additional context is good, as we already do prevent hallucinations as we saw in the prompt generated by lang chain
- use case of rags - e.g. we have so many emails in gmail. all of this would never fit inside the context window. so, we can instead vectorize them and put them inside of chroma. and then, we can easily for e.g. pull up the relevant emails based on our chats
- rags are more based on facts. we need to build pipelines to continue populating the vector databases
Training Process
- the training process has 4 steps
- “forward pass” - we have a training point and we pass it through the neural network to predict the next token
- “loss calculation” - we compare the neural network’s output with the actual expected output
- “backward pass” - also called “back propagation”. we determine the “gradient”. gradient is the sensitivity in the weights i.e. how does the loss change based on the change in weights
- “optimization” - the changing of weights based on the gradients. this is where we chose optimizers like “adamw”. we say that the we change the weights based on the gradients we calculated in such a way that if given the same input, it would perform better
- recall how the neural network does not predict the next token - it instead predicts a variety of such tokens with their probabilities. these are called “logits” which are in the form of a vector. a function called “soft max” is applied on it to get the actual probabilities
- now, how to choose the next token? there are multiple strategies - use the one with the highest probability, perform a random sampling to choose the most likely next token, etc. use more convoluted techniques in for e.g. price prediction - take an average of say the first x predictions with the highest probability made by the model
- recall “cross entropy loss” - we want to increase the probability or decrease the loss, and so we use -log(probability)
Fine Tuning Frontier Models
- “training a model” - we take a deep neural network and optimize its weights so that it gets better at predicting future tokens
- training a multi billion parameter model from scratch can take hundreds of millions
- this is what all these big companies do when creating these frontier models
- so, we instead use “transfer learning” - we take a pre trained model and continue training it with new data to add on to it
- example - we build an e commerce related model that takes an input for the description of the product, and outputs the cost of it
- typically this is not generative ai - its what “regression models” do - output a number
- however, given the background of emergent intelligence, these models can also perform such tasks
- we will use this dataset - https://huggingface.co/datasets/McAuley-Lab/Amazon-Reviews-2023
from dotenv import load_dotenv
import os
from huggingface_hub import login

load_dotenv()
login(os.getenv('HF_TOKEN'), add_to_git_credential=True)

# ...

from datasets import load_dataset

dataset = load_dataset("McAuley-Lab/Amazon-Reviews-2023", f"raw_meta_Appliances", split="full", trust_remote_code=True)
print(f"no. of appliances: {len(dataset)}")
- note - this dataset is getting cached under ~/.cache/huggingface/datasets/McAuley-Lab___amazon-reviews-2023/raw_meta_Appliances, so rerunning that cell is not an issue
- we can also look at a datapoint using
dataset[0] - the average length of fields like descriptions and details can affect the size of tokens, and thus how much we pay for frontier models / how much resources we spend in training our open source models
- we will be performing this both for frontier and open source llms. so, one optimization ed does is - using llama’s model from hugging face, he first determines the no. of tokens that the description generates. if it exceeds the maximum no. of tokens we would like to use for training the llm (due to constraints like resources), we pick the first x tokens, and then decode it back to text. additionally, we only consider items having more than a specific no. of characters / tokens in the description. we use such items because maybe items with data smaller than this length are not great for training
tokenizer = AutoTokenizer.from_pretrained("meta-llama/Meta-Llama-3.1-8B", trust_remote_code=True)

# ....
  if len(contents) > MIN_CHARS:
      contents = contents[:CEILING_CHARS]

      text = f"{self.scrub(self.title)}\n{self.scrub(contents)}"
      tokens = self.tokenizer.encode(text, add_special_tokens=False)

      if len(tokens) > MIN_TOKENS:
          tokens = tokens[:MAX_TOKENS]
          text = self.tokenizer.decode(tokens)
          self.make_prompt(text)
          self.include = True

# ...
def make_prompt(self, text):
    """
    Set the prompt instance variable to be a prompt appropriate for training
    """
    self.prompt = f"{self.QUESTION}\n\n{text}\n\n"
    self.prompt += f"{self.PREFIX}{str(round(self.price))}.00"
    self.token_count = len(self.tokenizer.encode(self.prompt, add_special_tokens=False))
- remember - we do techniques like “hyperparameter tuning”, but improving the data quality is usually much more effective when training models
- this is what the prompt used for training looks like. each item has this
prompt attribute we use for training. it first has the question for the price, a title in the new line, the description in a new line again and finally, the priceHow much does this cost to the nearest dollar?
Rack Roller and stud assembly Kit (4 Pack) by AMI PARTS Replaces
PARTS NUMBER The dishwasher top rack wheels and stud assembly Kit (4 pcs) SCOPE OF APPLICATION The dishwasher works with most top name brands,If you are not sure if part is correct, ask us in Customer questions & answers section or visiting the AMI PARTS storefront.We’re happy to help ensure you select the correct part for your Rack Roller and stud REPLACES PART FIXES SYMPTOMS Door won’t close | Not cleaning dishes properly | Noisy | Door latch failure QUALITY WARRANTY The replacement part is made from durable high quality material and well-tested by manufacturer.For any reason you’re not satisfied,you can ask for a replacement or full refund Brand Name AMI PARTS, Model
Price is $9.00
- when we access the
test_prompt attribute, it is exactly the same, except it does not have the price value part i.e. 9.00 in the above case - business to production for llms -
- understanding - understanding the business requirements, how to judge success. e.g. deciding the business metrics. understand the data and its quality, e.g. like we did with the pice and details. only then can we do things like performing the right cleanup
- preparation - testing baseline models and curating the datasets. research the existing solutions out there to get a deeper understanding
- selecting - selecting the set of model(s). use techniques like leaderboards. understand concerns around licensing, pricing, etc
- customizing - using techniques like chaining, multi shot prompting, tools. the two more convoluted techniques like rags or fine tuning. the difference is fine tuned is a “training time” technique as it tweaks the model parameters itself, while the others are more “inference time” techniques, since they add more to the context etc during inference. another point - in other techniques, the expense is during the inference, and that expense is incurred every time. however with fine tuning, the expense is incurred during the training time, and it is a huge one time investment. any subsequent inferences become much cheaper
- productionize - how to run in production. how to host and serve via an api, etc
- with fine tuning unlike rags, our models gain a much deeper understanding of the data. they are much more nuanced
- “catastrophic forgetting” - this is a concern with fine tuning. as the model keeps getting trained, it forgets the information in the base model
- we see a lot of cheap products, but some very expensive products as well. our dataset is skewed. the expensive products increase the mean, while a lot of cheap products can affect how our model gets trained. so, we instead ensure that we only train the model on products ranging from say 0$ to 100$
- again, say we have a lot of categories, but most of the products are for the automotive category. here too, our data is skewed. hence, we try to accordingly remove this skew a little bit, by ensuring that we have a relatively equal number of products from all categories
- using these two methods, we ensure that the skew from our data in terms of price and category is removed or at least reduced
- finally, we divide our sample into training and test data. best practice - training, test and sometimes validation data, and both test and validation are typically 5% of the training data
random.seed(42)
random.shuffle(sample)
train = sample[:400_000]
test = sample[400_000:402_000]

print(f"divided into a training set of {len(train):,} items and test set of {len(test):,} items")
- then, we convert it formats suitable for hugging face -
from datasets import Dataset, DatasetDict

train_dataset = Dataset.from_dict({"text": train_prompts, "price": train_prices})
test_dataset = Dataset.from_dict({"text": test_prompts, "price": test_prices})
dataset = DatasetDict({ "train": train_dataset, "test": test_dataset })
- finally, we publish it to hugging face hub (e.g. available at here)
my_hf_profile = "ShameekAgarwal"
dataset_name = f"{my_hf_profile}/llm_finetuning_getting_started"

dataset.push_to_hub(dataset_name, private=True)
- “baseline” - we need to have a baseline to know if our model is performing good. e.g. this problem of predicting prices is a much more traditional nlp + linear regression problem. so, we need to have a baseline to know if our efforts of llms and fine tuning it are worth it
- “feature engineering” - we determine the important factors or “features” that affect the price
- then, we try to find some linear combination of these features which gives us some accurate results
- we have a list of items. so, we for e.g. look at the “counts” of a particular feature
- now, some of the feature engineering might also include data cleansing - e.g. some items might use brand name and some manufacturer, some might use weights in kilograms and some in ounces.
- we typically add simple python code to clean these up. additionally, my idea was to maybe make calls to llms themselves to help with these
- another method might be for e.g. to instead of use brand as a feature, we can use a boolean feature like “is top electronics brand”. if the brand / manufacturer is in a pre defined list, which contains brands like dell, lenovo, samsung, etc., we mark it as a top electronics brand
- additionally, apparently modern deep learning is able to figure out the right features themselves. this kind of feature engineering pre dates the new advancements
- this is how the final regression code might look like. we split the columns of the pandas dataframe into the features and the final attribute to predict. we train the linear regression model, and then make predictions for the test data. internally, it uses weights / coefficients for each of the features (which is what we print below)
feature_columns = ['weight', 'rank', 'text_length', 'is_top_electronics_brand']

X_train = train_df[feature_columns]  y_train = train_df['price']
X_test = test_df[feature_columns] y_test = test_df['price']

model = LinearRegression()
model.fit(X_train, y_train)

for feature, coef in zip(feature_columns, model.coef_):
    print(f"{feature}: {coef}")
print(f"intercept: {model.intercept_}")

y_pred = model.predict(X_test)
- now, we try the nlp solution for our baseline. first, obtain the training data as follows. notice that the documents does not include the price. we have it come separately
prices = np.array([float(item.price) for item in train])
documents = [item.test_prompt() for item in train]
- “bag of words” - the count of words in our chunk determines our vector. recall the simplistic vector we talked about. it disregards the order of words and grammar, and only looks at the frequency. notice how additionally, we get rid of the “stop words”, which are articles like a, an, the and others
vectorizer = CountVectorizer(max_features=1000, stop_words='english')
- finally, our linear regression model fits the prices against the bag of words / vector instead of the custom made features like earlier
X = vectorizer.fit_transform(documents)
regressor = LinearRegression()
regressor.fit(X, prices)
- again, instead of the naive “bag of words” algorithm, we could use the more convoluted ones like word2vec
- additionally, we can use techniques like “support vector regression”, “random forest regression”, etc to have a decent baseline, before making llms as our final choice
- now, we will first try by giving the frontier model the product directly. so, no training data and giving the test data directly
- one concern - “test data contamination” - given the enormous size of the frontier models, maybe it has already seen the test data or parts of it before
- not adding the code here, since it is pretty straightforward. it was way better than even “random forest regression”, which was the best till now
- now, we will try fine tuning with openai
- below is an example how we need to structure each item in our training data as a prompt to train openai
# [
#   {'role': 'system', 'content': 'You estimate prices of items. Reply only with the price, no explanation'},
#   {'role': 'user', 'content': 'How much does this cost?\n\nDelphi FG0166 Fuel Pump Module\n...'},
#   {'role': 'assistant', 'content': 'Price is $226.95'}
# ]
- openai expects the training data to be in jsonl format. each line looks like below i.e. what we saw just above is converted into json and keyed using “messages”
# {"messages": [{"role": "system", "content": "..."}, {"role": "user", "content": "..."}, {"role": "assistant", "content": "..."}]}
# {"messages": [{"role": "system", "content": "..."}, {"role": "user", "content": "..."}, {"role": "assistant", "content": "..."}]}
- upload the jsonl file to gpt. the object it will return will have properties like “id”, which we use to create fine tuning jobs later
with open("fine_tune_train.jsonl", "rb") as f:
    train_file = openai.files.create(file=f, purpose="fine-tune")

with open("fine_tune_validation.jsonl", "rb") as f:
  validation_file = openai.files.create(file=f, purpose="fine-tune")
- weights and biases (https://wandb.ai/) allows us to visualize our training while it runs,. additionally, we need to add its api key to the “integrations” section in open ai
wandb_integration = {"type": "wandb", "wandb": {"project": "gpt-pricer"}}
- finally, we create the fine tuning job. suffix is the optional parameter to include in the name of the model. “hyper parameters” - knobs we keep tweaking when fine tuning. this is also called hyper parameter optimization / hyper parameter tuning
openai.fine_tuning.jobs.create(
    training_file=train_file.id,
    validation_file=validation_file.id,
    model="gpt-4o-mini-2024-07-18",
    seed=42,
    hyperparameters={"n_epochs": 1},
    integrations = [wandb_integration],
    suffix="pricer"
)
- we can see the latest job like this -
latest_job = openai.fine_tuning.jobs.list(limit=1).data[0]
- finally, we can see the events for this job as follows. e.g. of events - “created fine tuning job”, “validating training file”, and so on. e.g. if we had 500 data points in the training data set, we will see 1 event per data point in this event -
job_id = openai.fine_tuning.jobs.list(limit=1).data[0].id
openai.fine_tuning.jobs.list_events(fine_tuning_job_id=job_id, limit=10).data
- meanwhile, the weights and biases ui shows us the training loss etc
- finally, after all of this is over, we get an email of our fine tuned model name etc
- and this time around, when running
openai.chat.completions.create, we pass in this new model name - however, we did not notice much difference in the error after fine tuning - why? because we typically fine tune an open source model to make it compete with a frontier model, not train a frontier model typically. openai tells the below reasons when we should actually train models -
- we want to reliably produce a particular style of output format, e.g. sarcasm
- correcting edge cases, erorrs to correct for
- performing a new skill that is hard to articulate on the prompt. it recommends to fix the prompt first
- these frontier models have a lot of parameters and training data, and such small training data from us wont add any value
- the underlying reason can be many like “catastrophic forgetting”, but bottom line is finetuning frontier model training is not worth it typically, improve the prompting etc instead
Fine Tuning Open Source Models
- llama 3.1 for e.g. comes in 3 sizes - 8b, 70b, 405b parameters
- even the smallest one - 8b, is 32gb in size (calculation - each parameter is 32 bit, and we have 8 billion parameters)
- in addition, when we start training it to get gradients etc, it ends up occupying even more memory
- so, we ned tricks to train these
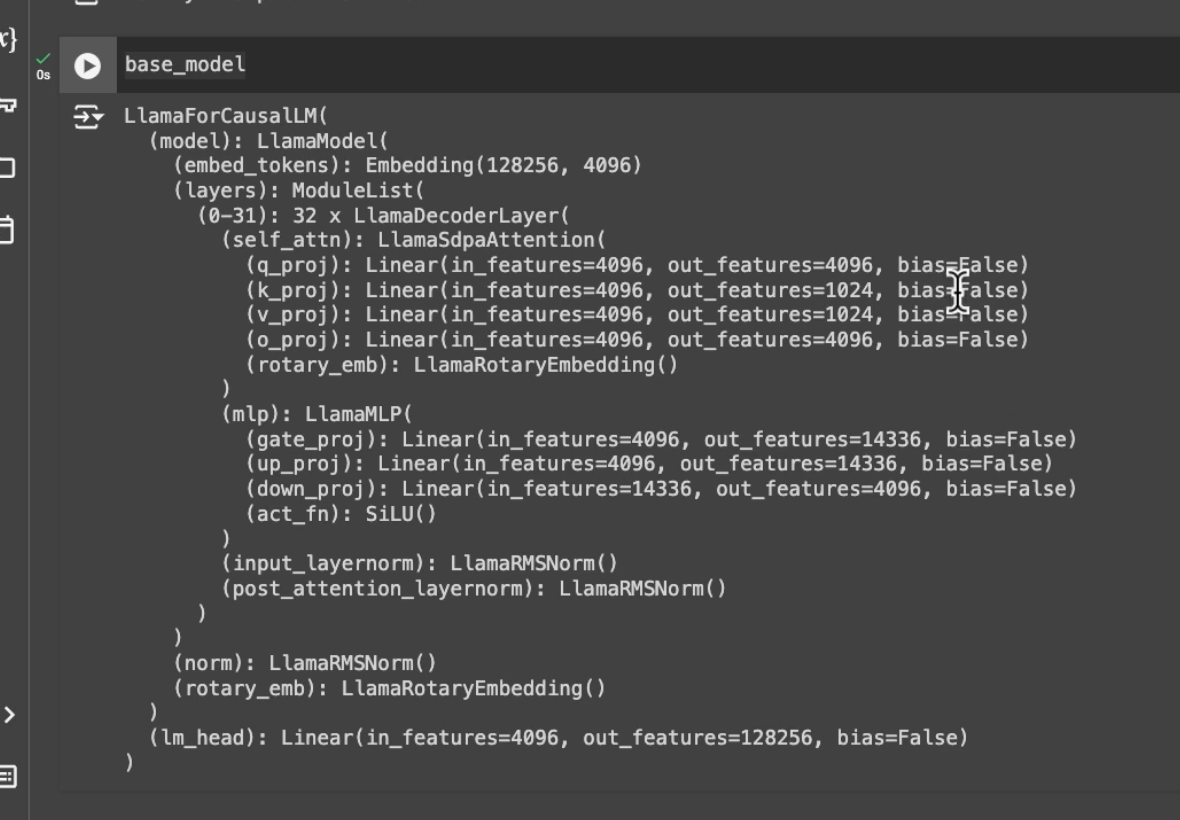
- llama 3.1 consists of layers. each of these layers is called a “llama decoder layer”
- there are 32 such decoder layers
- each of these decoder layers has the 4 self attention layers (q_proj, v_proj, k_proj and o_proj), a multi layer perceptron layer, etc
- typically how the training works is - we have the next token, and we look at the token that the model predicts
- then, we start tuning “each” of the different parameters of the model accordingly
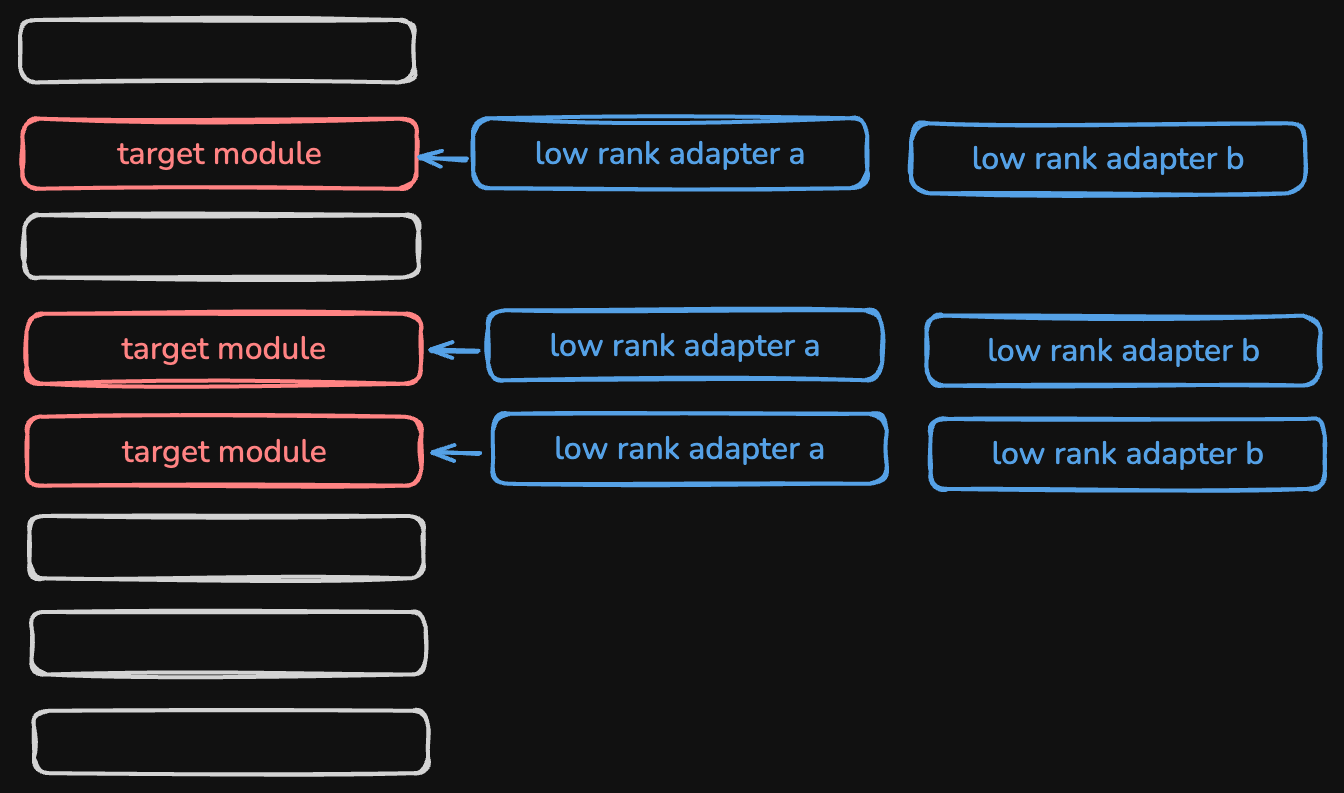
- lora - “low rank adaptation”
- lora instead freezes all the weights, since it is just too many knobs to turn
- it picks of the “few of the layers” that it thinks it needs to train
- these layers are called the “target modules”
- now, there are “lower rank adapters” that get applied against these target modules
- these low rank adapters help shift the weight of the target module by a little
- note how we pick a few layers, and we do not even change its parameters directly. we instead change the parameters of lora
- we train the weights in the llora adapters, and then these get applied to the target modules
- note - these layers are also called as “matrices” apparently
- slight nuance / detail - there are two such low rank adapters per target module
- now qlora - quantized lora
- recall the 32gb we mentioned - cheap gpus we use are like around 16gb i believe
- when we use fewer parameters - we loose on the powers of the models
- so, we instead reduce the precision of parameters - e.g. 4 bits instead of 8 bits
- unlike when reducing the parameters, reducing the precision does not quite affect the model’s capabilities as much
- note - we do not quantize the lora adapters. only the base model
- “peft” or “parameter efficient finetuning” is the library that includes lora
- first, we read in the base model as is. recall that this is the smallest of the llama models -
BASE_MODEL = "meta-llama/Meta-Llama-3.1-8B"
base_model = AutoModelForCausalLM.from_pretrained(BASE_MODEL, device_map="auto")
- associate this theory with what we read earlier
- next, we can confirm how much memory it uses. it would be ~ 32gb, because of the 8 billion 32 bit floating point parameters. the t4 we use has close to 16gb of gpu memory, so the model is stored in gpu, cpu and disk
print(f"Memory footprint: {base_model.get_memory_footprint() / 1e9:,.1f} GB")
- additionally, 32 gb is only for the base model, and the memory usage only increases as we try finetuning
- so, recall from models api of hugging face how we load quantized models
quant_config = BitsAndBytesConfig(load_in_8bit=True)

base_model = AutoModelForCausalLM.from_pretrained(
    BASE_MODEL,
    quantization_config=quant_config,
    device_map="auto",
)
- this new model only uses 9gb if we try printing the memory footprint again, since we are using 8 bit instead of 32 bits. the architecture stays the same if for e.g. we try printing the model again
- neat trick - runtime -> restart session when trying to for e.g. load quantized models again, to clear the already loaded model from the gpu and cpu
- following is the new config for quantization. we tell it to quantize twice via
bnb_4bit_use_double_quant, which results in a further reduction of memory occupied. hence, following is the new config -quant_config = BitsAndBytesConfig(
load_in_4bit=True,
bnb_4bit_use_double_quant=True,
bnb_4bit_compute_dtype=torch.bfloat16,
bnb_4bit_quant_type="nf4")
base_model = AutoModelForCausalLM.from_pretrained(
BASE_MODEL,
quantization_config=quant_config,
device_map="auto",
)
- this one is now ~ 5.6gb. a few 100 mb or so would be added on top of this for the additional layers for lora we introduce
- we are finetuning a small open source model for competing with the frontier model
- we have two options - use the “base” or “instruct” variant
- if we are finetuning for a particular propmpt, where we are expecting the response in a particular way. when we do not need things like multi shot prompting, things like system and user prompt, we should start with the base variant. its like the base model uses up some of its capabilities to learn, in learning the instruct style of system and user prompt, which we do not really need
- why llama is a good fit in our case - we want the model to generate the price, like a regression model. now, we ensured that we perform the price prediction only on products costing less than a thousand dollars. and the way that the llama tokenizer works, it uses only “one token” per 3 digits, unlike most other models like qwen, gemma or phi, that use one token per digit. so, unlike llama, they would have to predict a series of tokens, which is more difficult than what llama needs to do
- e.g. notice the output for the below. also observe the output for 1000 - it is the tokens for 100 followed by the output for 0
def investigate_tokenizer(model_name):
  tokenizer = AutoTokenizer.from_pretrained(model_name, trust_remote_code=True)

  for number in [0, 1, 10, 100, 999, 1000]:
    tokens = tokenizer.encode(str(number), add_special_tokens=False)
    print(f"The tokens for {number}: {tokens}")

investigate_tokenizer(LLAMA_3_1)
# The tokens for 0: [15]
# The tokens for 1: [16]
# The tokens for 10: [605]
# The tokens for 100: [1041]
# The tokens for 999: [5500]
# The tokens for 1000: [1041, 15]

investigate_tokenizer(PHI_3)
# The tokens for 0: [29871, 29900]
# The tokens for 1: [29871, 29896]
# The tokens for 10: [29871, 29896, 29900]
# The tokens for 100: [29871, 29896, 29900, 29900]
# The tokens for 999: [29871, 29929, 29929, 29929]
# The tokens for 1000: [29871, 29896, 29900, 29900, 29900]
- now, we try predicting the price without any training. the code would approximately look as follows -
inputs = tokenizer.encode(prompt, return_tensors="pt").to("cuda")
outputs = base_model.generate(inputs, max_new_tokens=4, num_return_sequences=1)
response = tokenizer.decode(outputs[0])
- “max new tokens” controls the no. of tokens to output. while we saw that we are fitting everything in one token by using llama, we are still giving it a bit of leeway for dollar sign etc
- “min return sequences” controls the no. of possible outputs to return. we are asking it to return only the first possible path / sequence of output
- the results are very very bad - worse than making a random guess. this is expected because the model is small and quantized
- we also observe that the 8 bit quantized model does perform better than the 4 bit quantized
Hyper Parameters for QLora
- “hyper parameters” - these are knobs we can choose to turn
- we use “hyper parameter tuning” to just experiment different values to see what fits our use case best
- here, we describe the hyper parameters we use for qlora
- “r” - stands for rank. how many “dimensions” we will use for the adapter layers. the actual layers in for e.g. the llama model will have a few thousand dimensions. we typically start with a low number like 8, and keep doubling till we start seeing diminishing returns
- “alpha” - “scaling factor” that is applied to the 2 adapter layers. the amount that the weights in the target module layers change by is (alpha * lora a matrix * lora b matrix). typically, start with alpha as 2 * r or 16
- “determining target modules” - which one of the layers to affect. typically, we target the “attention head layers”. sometimes, e.g. if we want for e.g. the output to be in a different language, we might target the final layers
- “quantization” - we reduce the precision of the weights in the base model - 4 bit, 8 bit and so on
- “dropout” - a “regularization technique” to prevent overfitting. it takes a random percentage of neurons and removes them (sets their activation to 0). we typically start at 10. so, this 10% neurons are not involved in the forward pass (predicting the next token) and backward pass (optimizing the parameters) of that training. so, every training sees a different 90% neurons. so, weights do not end up being overfitted
LORA_R = 32
LORA_ALPHA = 64
TARGET_MODULES = ["q_proj", "v_proj", "k_proj", "o_proj"]
LORA_DROPOUT = 0.1
QUANT_4_BIT = True

lora_parameters = LoraConfig(
    r=LORA_R,
    lora_alpha=LORA_ALPHA,
    target_modules=TARGET_MODULES,
    lora_dropout=LORA_DROPOUT,
    bias="none",
    task_type="CAUSAL_LM",
)
Hyper Parameters for SFT
- “sft” or “supervised fine trainer” is what we use from the “trl” library or “transformers reinforcement learning”
- below, we discuss its hyper parameters
- “epochs” - epochs are when we run our model across the same training data multiple times, and it happens maybe when we for e.g. do not have enough training data. why does shifting help? e.g. when we run through the model through the training data once, it ends up being in a different state. so, running it across the dataset again, the weights the data sees are different, and thus it helps shift the weights once again in the presumably right direction. while we want “training loss” to come down, we should ensure “validation loss” goes down too, to ensure we are not over fitting. usually, this can be a problem when we run multiple “epochs”
- “batch size” - we do not take one data point and run it through the whole model and then adjust the weights. we instead do it in batches, like 4, 8, 16 and so on. it helps with performance. note - bigger the batch size we use, bigger the gpu required
- note - before running the new epoch, we resort the data, so that the batches change. this way, the data is different for the different epochs automatically
- the idea is we run for the different hyper parameters, save the results and keep for e.g. increasing the epochs, till we start seeing diminishing results
- “learning rate” - during the back propagation, we shift the weights. the amount by which we shift the weights is called the learning rate. this rate is either 0.0001 or 0.00001. now, visualize a line graph with curves. now, imagine learning is like travelling along the x axis. now, if learning rate is too high - we might skip the actual minimum we are trying to reach for best performance. if it is too low - we might be stuck in the local minimum and never reach the global minimum
- “learning rate scheduler” - we decrease the learning rate itself as our model gets trained, because the amount we would want our weights to be shifted by as our models get trained would be lesser
- “warmup ratio” - the initial jumps might be too high when the model sees the training data for the first time. so essentially, we actually start with a low learning rate. we “warm it up” towards the learning rate we specify. finally, we apply the learning rate scheduler on it to decrease the learning rate gradually
- “gradient accumulation” - normally, we do a forward pass, get the loss, and shift the weights in the right direction. with gradient accumulation, we accumulate the shifts for a few epochs and then perform it at once
- “optimizer” - formula to make the update to the weights. we have a bunch of optimizers to choose from. one of the popular ones to use is adam or adamw (adam with weight decay). advantage - it uses the rolling average of gradients. disadvantage - resource intensive
- typically, there is a maximum size of tokens that we need to specify, so that it can fit in the memory of the gpu. additionally, via preprocessing, we should also ensure that our training data stays within these limits
- using steps, we tell how often we would like to push it to the hub
- next, we dynamically decide the model name using timestamp etc. this way, we would have a separate repo in hugging face for each run. some people like to push to the same repo and rely on the different commit versions. we can decide this based on our use case. additionally, based on our configuration, we see a different revision / commit after each of our step
EPOCHS = 1
BATCH_SIZE = 4
LEARNING_RATE = 1e-4
GRADIENT_ACCUMULATION_STEPS = 1
LR_SCHEDULER_TYPE = "cosine"
WARMUP_RATIO = 0.03
OPTIMIZER = "paged_adamw_32bit"

MAX_SEQUENCE_LENGTH = 182

STEPS = 50
SAVE_STEPS = 2000
LOG_TO_WANDB = True

HF_USER = "ShameekAgarwal"
PROJECT_NAME = "pricer"
RUN_NAME =  f"{datetime.now():%Y-%m-%d_%H.%M.%S}"
PROJECT_RUN_NAME = f"{PROJECT_NAME}-{RUN_NAME}"
HUB_MODEL_NAME = f"{HF_USER}/{PROJECT_RUN_NAME}"

train_parameters = SFTConfig(
    num_train_epochs=EPOCHS,
    per_device_train_batch_size=BATCH_SIZE,
    learning_rate=LEARNING_RATE,
    gradient_accumulation_steps=GRADIENT_ACCUMULATION_STEPS,
    lr_scheduler_type=LR_SCHEDULER_TYPE,
    warmup_ratio=WARMUP_RATIO,
    optim=OPTIMIZER,

    max_seq_length=MAX_SEQUENCE_LENGTH,

    logging_steps=STEPS,
    save_total_limit=10,
    save_steps=SAVE_STEPS,
    hub_model_id=HUB_MODEL_NAME,
    output_dir=PROJECT_RUN_NAME,
    save_strategy="steps",
    hub_strategy="every_save",

    run_name=RUN_NAME,

    per_device_eval_batch_size=1,
    eval_strategy="no",
    weight_decay=0.001,
    fp16=False,
    bf16=True,
    max_grad_norm=0.3,
    max_steps=-1,
    group_by_length=True,
    report_to="wandb" if LOG_TO_WANDB else None,
    dataset_text_field="text",
    push_to_hub=True,
    hub_private_repo=True
)
Finetuning Handson
- hugging face makes the training process really easy
- login to wanda and hugging face -
hf_token = userdata.get('HF_TOKEN')
login(hf_token, add_to_git_credential=True)

wandb_api_key = userdata.get('WANDB_API_KEY')
os.environ["WANDB_API_KEY"] = wandb_api_key
wandb.login()

os.environ["WANDB_PROJECT"] = PROJECT_NAME
os.environ["WANDB_LOG_MODEL"] = "checkpoint" if LOG_TO_WANDB else "end"
os.environ["WANDB_WATCH"] = "gradients"
- now, this is how our datasets look like. notice how the last token is missing for the test data -
DATASET_NAME = f"{HF_USER}/llm_finetuning_getting_started"
dataset = load_dataset(DATASET_NAME)
train = dataset['train']
test = dataset['test']

train[0]
# {
#   'text': 'How much does this cost to the nearest dollar?\n\nDelphi FG0166 Fuel Pump Module...\n\nPrice is $227.00',
#   'price': 226.95
# }

test[0]
# {
#   'text': "How much does this cost to the nearest dollar?\n\nOEM AC Compressor w/A/C Repair Kit For Ford F150...\n\nPrice is $",
#   'price': 374.41
# }
- tokenizer configuration - “the padding” is needed because when we train in batches, (recall batch size here), all the sequences should have the same length. we already know how in our use case, descriptions of all products can have different lengths. so, we use padding to make all of them the same length
tokenizer = AutoTokenizer.from_pretrained(BASE_MODEL, trust_remote_code=True)
tokenizer.pad_token = tokenizer.eos_token
tokenizer.padding_side = "right"
- grab the model -
base_model = AutoModelForCausalLM.from_pretrained(
    BASE_MODEL,
    quantization_config=quant_config,
    device_map="auto",
)
- now, we saw how our training data is structured. we do not want it to learn to predict the details of the product - only the price. this idea of setting “masks” is made easy by hugging face “data collators”
from trl import DataCollatorForCompletionOnlyLM
response_template = "Price is $"
collator = DataCollatorForCompletionOnlyLM(response_template, tokenizer=tokenizer)
- finally, we set up the trainer using the config etc that we configured till now -
fine_tuning = SFTTrainer(
  model=base_model,
  train_dataset=train,
  peft_config=lora_parameters,
  args=train_parameters,
  data_collator=collator
)
- finally, we start the training process and push it to hub -
fine_tuning.train()

fine_tuning.model.push_to_hub(PROJECT_RUN_NAME, private=True)
print(f"Saved to the hub: {PROJECT_RUN_NAME}")
- now, we will see each run / pass being logged in collab. no. of such passes would be = (no. of data points / batch size * no. of epochs)
- when we go to the models page in hugging face, we can see the different files, like the file for adapter etc
- additionally, we can see a commit for each step, just like step. this way, we can check out any revision of the model to play with
- now, we load our model using “peft” (parameter efficient fine tuning). peft represents a model with a base and then an adapter on top. the memory
fine_tuned_model = PeftModel.from_pretrained(base_model, FINETUNED_MODEL, revision=REVISION)
print(f"memory footprint: {fine_tuned_model.get_memory_footprint() / 1e6:.1f} MB")
- we see a few 100 mb or so added on top of this base model, for the additional layers for lora we introduced
- generate the ouputs for this fine tuned model in the same way we generated it for the untrained model here
GPU Understanding
- use case - we are editing a large video file
- the video is stored in the hard disk drive. while is is great for storing data, it is slow to access data
- we also have ssd (solid state driver), which has better performance
- when we open the video editor, the necessary portions of the video are copied into the ram
- a cpu has multiple cores
- each core has the following components - alu (arithmetic logic unit), cu (control unit) and cache (l1 cache)
- the l2 and l3 layers of cache might be shared between multiple or all cores
- ram is “random access memory”, and is also called the “main memory”
- in layman terms - the lookup first goes to l1, then l2, then l3 and finally ram
- the size increases and speed decreases as we go right of this order
- gpus help in video games, graphics, machine learning, etc
- cpu are designed and optimized for sequential instructions
- gpu is designed for massive level of parallelism and high throughput
- so, gpu have a lot of alus, and very few cu and l1 cache
- so, they have high instruction latency, as they do not have a lot of cache, but have very high computational power as they have so many alus
- so, gpus can perform a massive number of calculations in parallel at a smaller rate
- gpus do not replace cpus, but they aid cpus
Modal
- we will use an “agent framework”, which will have memory, logging, etc
- a “planning agent” will be responsible for coordinating activities between other agents
- then, we will have agents like one for scanning deals, one for sending push notifications, an “ensemble agent” for estimating prices
- “modal.com” is used for deploying production models or running python code easily
- we can do things like deploy and call it as a rest api as well
- however, we will call it like a function from python call, feels something similar to rpc to me
- first, we just need to set the token id and secret of modal as follows -
import os

os.environ["MODAL_TOKEN_ID"] = "..."
os.environ["MODAL_TOKEN_SECRET"] = "..."
- then, we write the code below. this code will specify the base image, the libaries to install, etc. it is like infra as code
import modal
from modal import App, Image

app = modal.App("hello")
image = Image.debian_slim().pip_install("requests")

@app.function(image=image)
def hello() -> str:
    import requests

    response = requests.get('https://ipinfo.io/json')
    data = response.json()
    city, region, country = data['city'], data['region'], data['country']
    return f"Hello from {city}, {region}, {country}!!"
- now, we can invoke it as follows for running it on our local vs remote machine -
with app.run():
    reply=hello.local()

with app.run():
    reply=hello.remote()
- note that this is an ephemeral app. so, this would mean that every time we run
app.run, it would spin up the ephemeral container, do the setup, etc and finally, terminate the container as well - so, we can instead build a rest api around it for serving our models easily like so (remember that the
! helps run shell commands from notebooks) -!modal deploy -m hello
- then, we can call it as follows. i guess that the first argument to
from_name is the name we pass to modal.App, while the second argument is the name of the function -hello = modal.Function.from_name("hello", "hello")
hello.remote()
- note - the app goes to sleep / container gets shut down every minute or two. this way, the entire thing would be run again every time
- this can be a problem in cases like llm, where we need to download the model from hugging face etc, where the build process is time taking
- so first, we specify a cache path for hugging face, and tell it to our base image. this is where we mount our volume as well
- additionally, we turn the function into a class and use
app.cls instead of app.function and separate out our setup vs method invocation using modal.enter and modal.methodimport modal
from modal import App, Volume, Image
import os
import torch
from transformers import AutoTokenizer, AutoModelForCausalLM, BitsAndBytesConfig, set_seed
app = modal.App("llama")
image = Image.debian_slim().pip_install("torch", "transformers", "bitsandbytes", "accelerate")
secrets = [modal.Secret.from_name("hf-secret")]
GPU = "T4"
MODEL_NAME = "meta-llama/Meta-Llama-3.1-8B" # "google/gemma-2-2b"
CACHE_DIR = "/cache"
MIN_CONTAINERS = 0
hf_cache_volume = Volume.from_name("hf-hub-cache", create_if_missing=True)
@app.cls(
image=image.env({"HF_HUB_CACHE": CACHE_DIR}),
secrets=secrets,
gpu=GPU,
timeout=1800,
min_containers=MIN_CONTAINERS,
volumes={CACHE_DIR: hf_cache_volume}
)
class LLamaServer:
@modal.enter()
def setup(self):
# load tokenizer
self.tokenizer = AutoTokenizer.from_pretrained(MODEL_NAME)
self.tokenizer.pad_token = self.tokenizer.eos_token
self.tokenizer.padding_side = "right"
# quant config
quant_config = BitsAndBytesConfig(
load_in_4bit=True,
bnb_4bit_use_double_quant=True,
bnb_4bit_compute_dtype=torch.bfloat16,
bnb_4bit_quant_type="nf4"
)
# load model
self.model = AutoModelForCausalLM.from_pretrained(
MODEL_NAME,
quantization_config=quant_config,
device_map="auto"
)
set_seed(42)
@modal.method()
def generate(self, prompt: str) -> str:
inputs = self.tokenizer.encode(prompt, return_tensors="pt").to("cuda")
attention_mask = torch.ones(inputs.shape, device="cuda")
outputs = self.model.generate(inputs, attention_mask=attention_mask, max_new_tokens=5, num_return_sequences=1)
return self.tokenizer.decode(outputs[0])
- note - while we have reduced the time to build, we still have cold restarts. to keep the container / server always running, we can set the
min_containers to 1. this will avoid cold restarts, but it will also incur costs - and so the invocation part will now look as follows, since we are using a class instead of a function -
LLamaServer = modal.Cls.from_name("llama", "LLamaServer")
llama_server = LLamaServer()
reply = llama_server.generate.remote("Life is a mystery, everyone must stand alone, I hear")
print(reply)
RAG Without Langchain
- first, we create the chroma vector store -
DB = "products_vectorstore"
collection_name = "products"

existing_collection_names = [collection.name for collection in client.list_collections()]

if collection_name in existing_collection_names:
    client.delete_collection(collection_name)
    print(f"deleted existing collection: {collection_name}")

collection = client.create_collection(collection_name)
- we use an embedding from hugging face called “sentence transformer”. it maps text chunks to 384 dimensions. it is ideal for semantic search. it is a transformer model that produces these vector embeddings
model = SentenceTransformer('sentence-transformers/all-MiniLM-L6-v2')
vector = model.encode(["Well hi there"])[0]
len(vector) # 384
- we could also have used “openai embeddings”. advantage - more dimensions, more accurate. disadvantages - some cost to it, maybe a little slower, and most importantly, data does not stay with us / goes to openai
- now, we add the vectors to the vector datastore. note how we populate the metadata with the price and category of the product, while the actual vector is generated using the description of the product -
documents = [item.description for item in train]
vectors = model.encode(documents).astype(float).tolist()
metadatas = [{"category": item.category, "price": item.price} for item in train]
ids = [f"doc_{j}" for j in range(i, i+len(documents))]
collection.add(
    ids=ids,
    documents=documents,
    embeddings=vectors,
    metadatas=metadatas
)
- additional note to self - note how we are adding multiple documents at one go to the vector store. say we have a lot of training data. we might want to look at techniques like batching to achieve this
- exercise - recall that when we use libraries like tsne to help visualize this, we would see that there are clusters, where products with similar categories end up in the same area in the vector store. note that the vector was generated using only the description, not using the category. running such visualizations might be important to get an intuition of the data. e.g. try verifying that similar categories have an overlap
- now, querying the vector store can be done as follows. we ask for the top 5 results this way. note - i think it can accept and perform the search for multiple items at once -
item_vector = model.encode([item.description])
collection.query(query_embeddings=item_vector.astype(float).tolist(), n_results=5)
- the output has the following format -
{
  "ids": [
    [ "doc_103224", ... 4 more ]
  ],
  "embeddings": null,
  "documents": [
    [ "Motorcraft Fan Clutch Assembly - YB3130...", ... 4 more ]
  ],
  "metadatas": [
    [ { "category": "Automotive", "price": 223.78 }, ... 4 more ]
  ],
  "distances": [
    [ 0.19148662686347961, ... 4 more ]
  ]
}
- so finally, we need to create a prompt using these results to give to the frontier model. understand the two different approaches - on one hand, we finetuned the open source model, while here, we populated the vector store and performed a search on it, to give additional context to the frontier model. observation in this example - the finetuned open source model is still better than the rag + frontier model
- a third method - we use a “random forest regressor”. our inputs become the vectors for the product descriptions, and we try to fit it using the prices of the products -
rf_model = RandomForestRegressor(n_estimators=100, random_state=42, n_jobs=-1)
rf_model.fit(vectors, prices)
- finally, we write the weights of this model to a file, as the training / fitting process can be very time consuming. this way, we can simply load the saved weights next time around -
joblib.dump(rf_model, 'random_forest_model.pkl')
# ...
rf_model = joblib.load('random_forest_model.pkl')
- now, we can predict using this model like so -
vectorizer = SentenceTransformer('sentence-transformers/all-MiniLM-L6-v2')
vector = vectorizer.encode([item.description])
result = max(0, rf_model.predict(vector)[0])
- note that this solution is not as good as the frontier model + rag approach / finetuned model approach, but it is still worth including
- now, we create an “ensemble agent” - this uses linear regression to predict the price. first, it predicts the price using the three methods described above. we can include additional metrics like minimum and maximum. then, this linear regression model is trained to understan the weightage of these five different parameters
specialists = []
frontiers = []
random_forests = []

prices = []

mins = []
maxes = []

for item in tqdm(test[1000:1250]):

  specialists.append(specialist.price(item.description))
  frontiers.append(frontier.price(item.description))
  random_forests.append(random_forest.price(item.description))

  prices.append(item.price)

  mins.append(min(specialists[-1], frontiers[-1], random_forests[-1]))
  maxes.append(max(specialists[-1], frontiers[-1], random_forests[-1]))


X = pd.DataFrame({
    'Specialist': specialists,
    'Frontier': frontiers,
    'RandomForest': random_forests,
    'Min': mins,
    'Max': maxes,
})

y = pd.Series(prices)

lr = LinearRegression()
lr.fit(X, y)
- note - just like in random forests, we save the model weights to a file, so that we can load it next time around
- finally, it does the same to predict the price - it will run it through the three different models, determine the mimimum and maximum and finally, run these via the linear regression model to determine the final price
Structured Outputs
- earlier, we told the model to generate json, and specified the format. however, this is not always reliable
- when using “structured output”, we specify the output format via a class that uses pydantic’s
BaseModel. pydantic allows us to easily convert between json and python objectsclass Deal(BaseModel):
product_description: str
price: float
url: str
class DealSelection(BaseModel):
deals: List[Deal]
- note - we still do include an example of the output format in the prompt, but using structured outputs makes it more reliable
system_prompt = """You are a helpful assistant that ...
{
  "deals": [
    {
      "product_description": "string",
      "price": float,
      "url": "string"
    }
  ]
}
"""

# ...

completion = openai.beta.chat.completions.parse(
  model="gpt-4o-mini",
  messages=[
    {"role": "system", "content": system_prompt},
    {"role": "user", "content": user_prompt}
  ],
  response_format=DealSelection
)

result = completion.choices[0].message.parsed
- why llms are good - e.g. if we had detailed descriptions with words like price, upto, off, we would not be able to differentiate between prices and discounts easily via just code. however, llms are good at such fuzzy problems
LLama.CPP
- traditional llms require powerful hardware, often with gpus
- llama.cpp is a lightweight solution that allows running “llama models” on local or less powerful hardware
- apparently it also optimizes performance, by for e.g. enabling faster inference times
- developed by georgi gerganov, llama.cpp is built on top of “ggml”, which helps run large models on commodity hardware. so, its this ggml library that helps interface with the various hardware we mention below seamlessly
- about its hardware support (also called “backend” in the docs i believe) -
- supports cpu
- supports gpu - “cuda” is proprietary / used for nvidia gpus, while “opencl” is an open standard
- supports hybrid architecture of gpu + cpu - first try fitting on vram (gpu), and put the remaining on ram (cpu). this is called “partial acceleration”
- supports “apple silicon” - apple silicon is the m series - m1, m2 and so on. it is based on arm, unlike earlier where it was using intel. remember - arm is risc, while intel was cisc. now, most of these m series chips have an integrated gpu. like “cuda” for nvidia, “metal” is the apple equivalent for gpu acceleration
- so basically, i guess llama.cpp abstracts the details of interacting with cuda, metal, etc
- platform support - even docker is supported
- we can expand the models section here to view the list of models supported
- both pre trained and fine tuned versions of these models are supported
- we can also add a custom model to llama.cpp. we need to follow the steps mentioned here to do so
Bindings
- llama.cpp provides “bindings” for various languages like python, javascript, etc
- so we can use llama.cpp in our applications without having to write the code in c++ directly
- also, notice how it is openai api compatible
from llama_cpp import Llama

model_path = "./models/gemma-3-1b-it-q4_0.gguf"

gemma = Llama(
  model_path=model_path,
  n_gpu_layers=-1,
  n_ctx=2048,
  verbose=True,
  chat_format="gemma"
)

messages = [
    {"role": "user", "content": "What are your views on Donald Trump?"}
]

response = gemma.create_chat_completion(
    messages=messages,
    temperature=0.2,
    max_tokens=500,
    stop=["<end_of_turn>"]
)

print(response["choices"][0]["message"]["content"])
- the models that run on llama.cpp use the “gguf format” (gpt generated unified format)
- it supports various “quantization formats” like 8bit, 4bit, etc
- extensibility - add new functionality without breaking existing functionality etc to its predecessor, the ggml format
- “header” of the gguf format contains metadata about the model, the tokenizer to use for the model, etc
- “body” of the gguf format contains the model weights, the vocabulary, etc
Llama.CPP Steps
- “initialization” -
llama_init_from_file - helps initialize the “context object”. the context object contains information about the model, the backend, etc - “tokenization” -
llama_tokenize - helps tokenize the input text - “inference” -
llama_generate - generate the output text based on the input tokens. it internally has the following steps -- “forward pass” - calculate the next set of tokens. recall that the predicted tokens have a probability associated with them
- “sampling” - the next token is selected based on the configuration we provide
- “iteration” - repeat the process till the “end token” or “max tokens” is reached
- “detokenization” -
llama_detokenize - helps convert the output tokens back to text
Docker Example
- sometimes, the model can already be in gguf format, e.g. google/gemma-3-4b-it-qat-q4_0-gguf
- otherwise, it might also happen that the model requires converting into gguf format and quantization e.g. microsoft/Phi-4-mini-instruct
- in the example below, we look at the latter case. for the prior case, we can skip the conversion and quantization steps
- note that we can use the same openai api as well at http://localhost:8080/v1/chat/completions
FROM ghcr.io/ggml-org/llama.cpp:full AS phi_builder

# hugging face cli setup
RUN pip install -U "huggingface_hub[cli]"
RUN --mount=type=secret,id=HF_TOKEN \
    export HF_TOKEN=$(cat /run/secrets/HF_TOKEN) && \
    huggingface-cli login --token $HF_TOKEN

# download phi base model, convert to gguf and finally quantize it
RUN huggingface-cli download microsoft/Phi-4-mini-instruct \
    --local-dir ./phi-src \
    --revision 5a149550068a1eb93398160d8953f5f56c3603e9 && \
    python3 convert_hf_to_gguf.py ./phi-src/ --outfile Phi-4-mini-instruct.gguf && \
    ./llama-quantize Phi-4-mini-instruct.gguf Phi-4-mini-instruct-q4_0.gguf Q4_0 && \
    rm -rf ./phi-src Phi-4-mini-instruct.gguf

FROM ghcr.io/ggml-org/llama.cpp:server

RUN mkdir -p ./models

COPY --from=phi_builder /app/Phi-4-mini-instruct-q4_0.gguf ./models/

CMD ["-m", "models/Phi-4-mini-instruct-q4_0.gguf", "--port", "8080", "--host", "0.0.0.0"]