About Docker
- docker is a tool for managing containers
- container is a package of our code along with the dependencies and libraries to run that code
- docker follows a client server architecture
- we issue commands via cli to the docker client
- all tasks like creating containers, pulling images, etc. is done by docker daemon (dockerd)
- docker can be run natively in linux, so for macOS and windows, a virtualization layer is needed
- docker engine - dockerd, docker client
- docker desktop - docker engine, docker cli, kubernetes, docker compose, etc
Why use Docker
- the same piece of code will always yield the same application i.e. doesn’t rely on host environment
- having similar development, staging and production environments
- easily manage different projects running different versions of dependencies
- easily switch between versions of dependencies
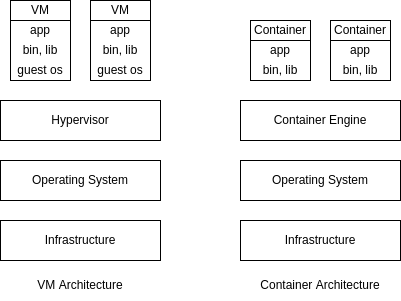
- virtual machines are not as easily reproducible as containers since they have their own dedicated OS
- sharing and distributing is very convenient using Dockerfile, image, etc
Images and Containers
- images are templates for containers, and a container is a running instance of an image
- containers are lightweight, isolated and run independent of each other
- we can use official prebuilt images, the most common source is docker hub
- note: while issuing docker commands
- container name and container id can be used interchangeably, same for image
- first few characters of the image_id are enough to reference the image if they can uniquely identify it
docker container run image_nameto create a container from an image- if the image is not available locally, it is downloaded from dockerhub by docker
docker container lsto list all running containersdocker container ls -ato list all running as well as stopped containers
- Dockerfile is a special file name, as it is the default file docker looks for when we build an image
- Dockerfile contains the instructions for creating our own image
- example of a Dockerfile
FROM node:14-alpine WORKDIR /app COPY . . RUN npm install EXPOSE 80 CMD npm run start - all commands except the last instruction
CMDare used to build the image,CMDis used to run the container - so basically
CMDis used fordocker container run... EXPOSEis only for documentation purposedocker image build .- used to build an image using the Dockerfile,.here is the build context-tflag to specify an image tag
- images have layers i.e. docker caches result after every instruction in the Dockerfile
- this means docker can reuse layers if possible - e.g. two different react applications use the same base image - node layer
- so, to optimize i.e. make building of images faster, in the Dockerfile example shown earlier, we can first install dependencies and then copy the source code, as rebuilding of image will be triggered more frequently by a change in the source code than it will be by a change in the dependencies
FROM node:14-alpine
WORKDIR /app
COPY package.json .
RUN npm install
COPY . .
EXPOSE 80
CMD npm run start
docker container start container_id- start a stopped container- we can reattach our terminal to the container using
docker container attach container_id - we can view logs using
docker container logs container_id- add
-fflag for following the logs
- add
- flags for
docker container run--itcan be used to enter interactive mode--rmflag to delete the container when we stop it--nameto specify the name of container-dto run in detached mode i.e. to not block our current terminal and run the container in foreground-pflag means publish, i.e. map host port to a container port
docker image ls- lists the downloaded imagesdocker image rm image_id- remove the image with id image_iddocker container stop container_id- stop the containerdocker container pruneto delete all stopped containers- to get more information on images and containers, use
docker container inspect container_idanddocker image inspect image_id docker container cp host_folder container_id:folderto copy folder from the host to the container- we can also reverse the order of arguments to copy folders and files from the container to the host
- we can share images, by sharing the Dockerfile or by hosting it on an image registry like docker hub
docker image push image_name:tagto push images to the registrydocker image pull image_name:tagto pull images from the registry- we can also tag images using
docker image tag new_image_name old_image_name - a full example of running a container -
docker container run -d -p 3000:80 --name=backend --rm backend docker loginto login to docker hub- note: i had to generate and use a personal access token in the docker hub ui and use that instead of the docker hub password in the cli
docker image rm -f $(docker image ls -a -q)- deletes all locally downloaded images-qhelps list only image ids-ahelps list intermediate images as well-fforce removal, e.g. if image is referenced by another image
- we can use a file
.dockerignoreto prevent copying files when using commandCOPYinside the Dockerfile e.g.node_modules Dockerfile .git
Tags
- an image tag has two parts - the name / repository of the image and the tag
- tag is like a version, so we can generate different versions of our image
- the default tag if not specified is latest
- why tags are important -
- rollback to previous versions in the production environment if newer versions have a bug
- newer versions of other images which are used by our images might have breaking changes in future
- suppose we always push and pull using tag latest. when we run
docker container run..., it looks for the image locally and if it doesn’t find it, it goes online to fetch it. but it will find the image with the tag latest, and docker doesn’t understand that someone else has pushed a newer version online
Layered Architecture
- all the docker related data like images, containers, etc. can be seen in /var/lib/docker
- the docker image we build contains of layers, and these layers are shared across various images
- e.g. if two images use the same base image, the layer of the base image is shared
- the image layers are read only
- when we create a container, a new layer is created on top of the existing layers of the image
- thus, all writes that we perform during runtime, log files, etc. get written onto this layer
- the persistence during the container’s lifetime happens through this writable layer
- this mechanism is called copy on write, and the changes we made are lost unless we use volumes
Volumes
- containers should be stateless as they can be easily created and destroyed, scaled up and down
- we can have data that we want to persist even if containers are killed
- this data shouldn’t be stored inside containers, or we may lose that data
- volumes - mapping a persistent storage to docker containers. the persistent storage can be cloud storage, e.g. s3 of aws or our host directory system
- this way, every time a container tries to persist changes, they go to the persistent storage and don’t get lost irrespective of how many times the container is started or stopped
- volumes can be of three types -
- anonymous volumes
- named volumes
- bind mounts
docker volume lsshows all volumes- anonymous volumes are managed by docker
- the reference to anonymous volumes are lost after the container shuts down
- if we use
--rmflag while running the container, the anonymous volume is deleted as well - we can create anonymous volume by using
VOLUME ./feedbackinside the Dockerfile - we can also create anonymous volume by using flag
-v /a/bduringdocker container runwhere /a/b is the path inside the container - named volumes are managed by docker too
- unlike anonymous volumes, we don’t lose the reference to named volumes after the container is deleted
- use flag
-vto create named volumes, e.g.-v feedback:/app/feedback, where the name of the volume is feedback and the directory of the container it maps to is/app/feedback - bind mounts are managed by us. it can be used for source code, so that the changes that we make to the code get reflected in the container
- in case of bind mounts, we have access to the folder which gets mapped to the container’s folder
- in case of clashes, the more specific paths win e.g. if we are using bind mounts for /app of container and anonymous volumes for /app/node_modules of container, /app/node_modules relies on anonymous volumes
- using nodemon with bind mounts prevents us from rebuilding images repeatedly i.e. our changes in source code are accounted for in the running container
- we can use suffix
:roso that it specifies to the container that the volume is read only e.g.-v $(pwd)/app:ro, so that only hosts and not containers can edit the source code - note:
docker volume lswill not list bind mount volumes, since it doesn’t manage them docker volume rm volume_nameto remove volumesdocker volume pruneto remove volumes not being used by any containersdocker volume inspect volume_nameto get details of the volume
Arguments and Environment Variables
- docker supports build time arguments and runtime environment variables
- runtime environment variables can be provided using
ENV PORT 80inside the Dockerfile - we can also provide it dynamically using
-e PORT=80, which makes the earlier method a default - for situations like api keys where security is a concern, the method suggested above is better
- we can also use build arguments, i.e. dynamic variables used when building an image
- can be done using
ARG PORT=80in the Dockerfile - my understanding - so basically, arg is used by all commands above cmd and env is used by cmd?
Example
ARG DEFAULT_PORT=80
ENV PORT $DEFAULT_PORT
EXPOSE $PORT
- we are giving the value of the build argument to the environment variable
- if we don’t provide a port, the port used by container is
80 - now, we can change the default port while building an image using
docker image build ... --build-arg DEFAULT_PORT=9999 ... - we can also receive a dynamic port using
docker container run ... -e PORT=9545 ... - if we don’t provide a port dynamically, the port specified for building of images gets used
Networks
- there are three kinds of entities with which containers can communicate -
- internet
- host
- other containers
- containers can by default talk to the internet e.g. a public api
- for containers to talk to the host, we can replace localhost by
host.docker.internal - e.g. for containers to talk to mongodb running on our host machine, we can use
mongodb://host.docker.internal:27017/favorites - for containers to talk to other containers, we can use
docker container inspect ...to get the container’s ip address (available in the key IPAddress) and then use it. e.g. with a mongodb container running, we rundocker container inspect mongodband then usemongodb://the_ip_address:27017/favorites - this is not ideal, as this IP could change after a new container replaces the old one
- we can create a docker network, and all containers placed inside the network can reference each other directly using the container names, e.g.
mongodb://mongodb_container_name:27017/favorites docker network create network_nameto create a networkdocker container run ... --network=network_name ...to create a container inside a specific network- also, we don’t need
-pfor the container to which another container connects, i.e.-pis only needed when we want our host port to map to the container port, not when another container wants to communicate with it - docker networks support different kinds of drivers. the default driver is bridge, which we saw above
- there can be other types of drivers and third party plugins for drivers as well
- we can use driver as “host” so that isolation between the container’s network and localhost is removed
- examples of usage -
docker network create --driver bridgeordocker container run --network host - we can clean up unused networks using
docker network prune - the bridge type of network uses network namespaces behind the scenes. so, on running
ip addr, we see docker0, which is basically the virtual switch in network namespaces. each container is encapsulated inside its own network namespace. an e.g. is shown below -docker container run nginx docker container inspect <<container_name>> | grep SandboxKey # the output is /var/run/docker/netns/<<namespace-name>>
Docker Compose
- docker compose helps in preventing having to run docker commands from cli repeatedly
- it has syntax in yml which is easier to read and can be shipped with our code
- services in docker compose are containers, for which we can define environment variables, network, image, etc
- version of docker compose I had to use was 3.8 based on my docker engine version
- note - i think it comes with docker in newer version, i just have to use
docker composenow
- note - i think it comes with docker in newer version, i just have to use
- all container names are one level nested under the services key
- can specify networks, volumes key for each container
- for named volumes, we should also mention them under the volumes key in the root of the file
- all the containers are a part of the default network created by docker-compose
docker-compose upstarts all the containers and builds the images as well- flag
-dcan be used to start in detached mode - add flag
--buildto force the images to be rebuilt
- flag
docker-compose down- deletes all the containers and the default network that docker-compose creates- flag
-valso removes the volumes which were created
- flag
- use
depends_onkey to ensure the order in which containers start e.g. serverdepends_onmongodb container docker-compose buildto build the imagesdocker-compose run service_nameto run a specific container in the compose file under the services key
Issues while Containerizing Frontend Apps
- docker doesn’t work in the web browser for e.g. when we make xhr requests
- so referring the backend application just by container name won’t work as it utilizes docker networks
- so, we publish the backend on a host port and simply use localhost:that_port in frontend
- reactJS needs the terminal to be in interactive mode to ensure it continues to run
- it is like adding
-itflag while usingdocker container run..., or settingstdin_open: trueandtty: trueinside of the docker compose
- it is like adding
CMD and ENTRYPOINT
- when we specify
docker container run image_name xyz, xyz replaces what there is in CMD - however xyz appends what is there in ENTRYPOINT
- we can replace what is there in ENTRYPOINT using
--entrypoint - useful tip - since a space separated command needs to be a part of different items in an array, use
sh -c. i.e.CMD ["a", "b", "c"]can becomeCMD ["sh", "-c", "a b c"]
FROM ubuntu
ENTRYPOINT [ "sleep" ]
CMD [ "10" ]
docker image build -t ubuntu-sleeper .- run
docker container run ubuntu-sleeper, sleep is of 10 seconds - run
docker container run ubuntu-sleeper 20, sleep is of 20 seconds - run
docker container run -it --entrypoint=bash ubuntu-sleeper, run bash in interactive mode
Setup Containers
how do we set up initial project e.g. how to run npm init when we don’t have node installed locally? below is an example for setup using node
Dockerfile.setup -
FROM node:14-alpine
WORKDIR /app
docker-compose-setup.yml -
version: "3.8"
services:
  npm:
    build:
      context: ./
      dockerfile: Dockerfile.setup
    stdin_open: true
    tty: true
    volumes:
      - ./:/app
    entrypoint: npm
now, we can use commands to help during development like -
docker-compose -f docker-compose-setup.yml run npm initdocker-compose -f docker-compose-setup.yml run npm i express
the npm in the command is the service name inside docker compose, and entrypoint was given as npm in docker-compose, otherwise we would have to run docker-compose -f docker-compose-setup.yml run npm npm init
About Kubernetes
- kubernetes is the most widely used container scheduler
- modern infrastructure is created using immutable images, and an upgrade is performed by replacing the older containers with newer ones using rolling updates
- we specify how many resources to run and kubernetes maintains that number
- it ensures that the resources run within the specified memory and cpu constraints
- kubernetes is cloud-agnostic and can also be run on-prem
- it has features like service discovery, load balancing, secret and configuration management, etc
Minikube and Kubectl
- minikube allows us set up a single node cluster on our local workstation
- minikube is useful for development purpose
- kubectl is the kubernetes command line tool which allows to manage a kubernetes cluster
- add alias to .bashrc -
alias kubectl="minikube kubectl --" - configuring autocomplete for kubectl (restart terminal after running the command) -
echo 'source <(kubectl completion bash)' >> ~/.bashrc - minikube can be deployed as a vm or as a container (i am trying as a container for now)
- configuring minikube -
minikube config set driver dockerminikube config set memory 8192minikube config set cpus 4
- view config using
minikube config vieworcat ~/.minikube/config/config.json - start minikube -
minikibe start minikube status - pointing docker client installed locally to minikube’s docker daemon -
docker container ls minikube docker-env eval $(minikube -p minikube docker-env) docker container ls - to ssh into minikube -
minikube ssh. now also we can run commands likedocker container lsetc - to get all running components, we can use
kubectl get all --all-namespaces - to shut down minikube, use
minikube stop. it preserves the state - to start minikube again,
minikube start - to delete the cluster,
minikube delete - can format output e.g.
kubectl version --output=yaml. output format can be json as well minikube ipto get the ip address of minikube cluster- an issue on my laptop - minikube cannot pull docker images at times. temporary fix is to pull manually using
docker image pullafter pointing docker client to minikube’s docker daemon
Cluster Architecture
- the cluster has master nodes and worker nodes. note: there can be multiple masters in the cluster
- the master nodes schedule and monitor the containers assigned to it on the worker nodes
- different methods of viewing information related to the different components e.g. etcd
ps aux | grep etcdsudo cat /etc/kubernetes/manifests/etcd.yamldocker container ls | grep etcd
- it has 7 major components as described below
Etcd
- a distributed key-value store that allows for fast storage and retrieval
- it runs on the port 2379
- etcdctl is the etcd control client which helps communicate with etcd
- it is used for storing and retrieving information about all kubernetes resources
- the etcd clusters can either be present on the master nodes or be entirely decoupled from them
- kubeadm runs etcd as a static pod on the master nodes
- we specify its ip address and port on the api server
- an example of using etcdctl api version 3 -
kubectl exec etcd-minikube --namespace=kube-system -- sh -c \
  "ETCDCTL_API=3 etcdctl get / \
  --prefix --keys-only --limit=100 \
  --cacert /var/lib/minikube/certs/etcd/ca.crt \
  --cert /var/lib/minikube/certs/etcd/server.crt \
  --key /var/lib/minikube/certs/etcd/server.key"
to get the location of the certs, use
kubectl get pod etcd-minikube --namespace=kube-system --output=yaml - peer to peer communication in etcd clusters when there are multiple master nodes happens through 2380
- etcd is distributed i.e. we can read from any of the instances, while all writes go to the master in the etcd cluster which syncs the data on the other replicas
- in case of inconsistencies, the quorum determines if the update is valid. it is the minimum number of nodes in the etcd cluster which should have processed the update, which is floor(n / 2) + 1. the value of fault tolerance is total instances - quorum. so, it is recommended to have an odd number of etcd instances / master nodes depending on the configuration, since fault tolerance is the same for n and n - 1 nodes where n is even
Api Server
- it runs on the master node
- external clients like kubectl communicate changes to the cluster via the api server
- schedulers, controllers, kubelets, etc. monitor the api server for new resources
- they also send updates to the api server which then updates it on the etcd cluster
- so, api server is the only component that directly interacts with the etcd cluster
- the api server on the multiple master nodes can run concurrently i.e. all api servers on all the master nodes can be active at once. however, in case of controller manager and scheduler, to avoid duplication and inconsistencies, they are in the active state on the master node which is elected as the leader while they are in standby mode on the other master nodes
- in case of multiple masters, clients like kubectl interact with a load balancer, where the load balancer routes requests to the multiple api servers
Controllers
- also called controller manager
- different kinds of controllers run on the master node
- for instance, the master node expects heartbeats from the worker nodes. the node controller monitors them and if the heartbeats do not reach the master nodes for a certain time period, the pods on it are evicted
- similarly, we have replication controller to maintain the number of pods of the same type
- the controller manager package installs all the different controllers. to view the different controllers, use -
kubectl get pod kube-controller-manager-minikube \
  --namespace=kube-system --output=yaml | grep controllers
Scheduler
- runs on the master node
- it assigns pods to a specific node
- it does this based on available resources like cpu and memory and filters out nodes which cannot run the pod
- it then based on a priority function ranks the remaining nodes
- the pod then gets scheduled on one of the remaining nodes
Kubelet
- it runs on all worker nodes (and optionally on the master node). see how this is different from the components seen above - etcd, api server, controller manager, scheduler
- unlike the rest, kubelet does not run as a static pod, daemon set etc. it runs via a binary installed on the vms - i think this flow deviates since is doesn’t use static pods / daemon set
- it registers the nodes with the cluster
- picks up the pods from the api server to run on the node and then runs it
- it then sends updates of the status of the pod to the api server
- so, to view information, use
ps aux | grep kubelet - this will show the files locations, so, for e.g., use -
cat /var/lib/kubelet/config.yaml
Kube Proxy
- it runs on all nodes, since it runs as a daemon set
- pods in a node can reach pods on other nodes as well because of this
- the kube proxy assigns an ip to the service
- to view the ip range from which services are assigned ip addresses, we can use
kubectl get pod kube-apiserver-minikube --namespace=kube-system --output=yaml | grep service-cluster-ip-range - it configures ip tables, which maps the ip address of services to endpoints
- an endpoint = the ip address of the pod + port of the pod. this port can belong to any one of the containers, set by target port field in the service definition
- if we have multiple pods sitting behind a service, an algorithm similar to round robbin is used
Kube Dns
- it maps the service name to the service ip address
- so, it configures the dns server
- kubernetes uses coredns for achieving this functionality
- on running
kubectl get deployment coredns --namespace=kube-system --output=yaml, we can see that a config map is mounted as a volume on it - we get the contents of it using
kubectl get configmap coredns --namespace=kube-system --output=yaml. it shows the plugins being used by coredns - there is also a service associated with kube dns, which we can get using
kubectl get service kube-dns --namespace=kube-system --output=yaml | grep clusterIP. the pods point to this ip, which can be confirmed by inspecting the pod usingkubectl exec any_pod_name -- cat /etc/resolv.conf
Pods
- the smallest unit in kubernetes
- represents a single running process
- a pod encapsulates one or more containers, but usually we run only one container in a pod
- sidecar pattern - helper containers can be spun alongside the application container in the same pod
- to create a pod in an imperative way using commands, use
kubectl run db --image=mongo - to get all running pods, use
kubectl get pods- to get more information, we can use
--output=wide,--output=yamlor--output=json
- to get more information, we can use
- we can do a dry run and get the yaml, e.g.
kubectl run db --image=mongo --dry-run=client --output=yaml - to see the list of events that occurred, use
kubectl describe pod db - yaml file to create a pod declaratively
- now, we can run
kubectl apply -f file_name.yml - we can specify the file name in commands instead of the resource name -
kubectl describe -f file_name.yml,kubectl delete -f file_name.yml,kubectl get -f file_name.yml - suppose we want to execute a command against a container. one way would be to issue commands using docker, e.g.
docker container exec container_name command, this is just like spawning off another process in an already running container. however, we have to issue this command on a particular node of the cluster. this may not matter for minikube since everything is on our local but would matter for a production cluster. another way is to runkubectl exec pod_name -- command. this would by default execute the command on the first container of the pod. we can also specify the container using--containerflag - to view logs, use
kubectl logs pod_name. like inexec, the container can be specified explicitly - containers of the same pod run on the same node. they can talk via localhost i.e. if a container is running in a pod on port 8080, the other container can make requests to localhost:8080. they also share the same volumes
- if we stop the container using
docker container stop container_id, the pod will restart the container - to stop a pod, use
kubectl delete pod db - when a pod is deleted
- it first sends
TERM(terminate) signal to all processes of all containers of the pod - if it does not stop within the
gracePeriod,KILLsignal is sent for a forceful shutdown
- it first sends
- all containers part of the same pod coexist in the same node i.e. they cannot be distributed across the nodes
- all of them can also access the same volume
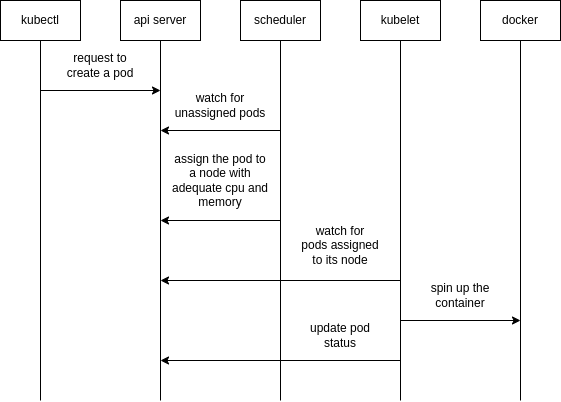
Process of Creation
ReplicaSets
- it is a type of controller i.e. it tries to maintain a specified number of pods
- this provides high fault tolerance, high availability, self-healing mechanism, etc.
- replica sets are the newer version of replication controllers, since replication controllers are deprecated
- note: when setting image using
kubectl set image...in replica sets, i had to delete the older pods - yaml example
- look how in yml syntax,
spec.templateis the exact same as that of the contents of a pod - labels defined for a pod should match the labels defined for its replica set i.e. value of
spec.selector.matchLabelsshould matchspec.template.metadata.labelselse kubernetes gives an error - however, the replicaset can manage pods not defined in the
spec.templatesection as well. in this case, the labels of pods should match the selector of the replica set spec.replicasdefines the number of pods to run- use
kubectl get replicasetsandkubectl get podsto verify - verifying the self-healing feature - if we try to delete a pod using
kubectl delete pod pod_name, we will see that the replica set will automatically spin up a new pod - deleting the replica set will delete the pods it spun up as well
kubectl delete -f replica-set.yml --cascade=orphan. this will delete the replica set but not the pods. so, in general, to prevent removal of downstream objects, use thecascadeflag
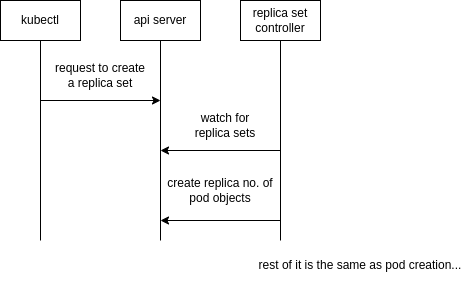
Process of Creation
only the first part has been described here, the remaining parts are similar to that of a pod
Services
- pods are short-lived, so using addresses of pods for inter-pod communication is not reliable
- services can be used to expose pods, replication controllers, replication sets, etc
- the controller used here is called endpoint controller
- service can be of different types
NodePort- target port on every node is exposed to the outside world. if we have multiple worker nodes, to hit a particular set of pods, we would have to useworker_ip:node_port. this also indicates that the services span multiple nodes without us having to configure anythingClusterIP- this is the default. exposes the port only inside and not from outside the clusterLoadBalancer- useful when deploying to cloudExternalName- map a service to an external address like a url
- imperative command -
kubectl expose replicaset rs --name=svc --target-port=28017 --type=NodePort - note: the node port cannot be specified when using
kubectl expose - if we run
kubectl describe service svc, we see that it has inherited all the labels of the replica set. recall how replica set is associated to the pods using labels, services are associated to the pods in the same way - when describing a service, it also shows all endpoints aka pods it directs traffic to
- the three ports involved in node port are -
- node port - how to access from outside the cluster. hit
http://minikube_ip:NodePort. if not specified, a free port is chosen at random for its value - port - incoming traffic i.e. traffic from other pods or outside the cluster hit this port of the service
- target port - port of the pod to which the service should forward traffic. if not specified, it takes the same value as port. so, in yml, usually only the port is specified
- node port - how to access from outside the cluster. hit
- we can run
kubectl get endpointsto get a list of all the endpoint objects. we can also get more information about a specific endpoint usingkubectl get endpoints endpoint_name --output=yaml - we can run
kubectl exec pod_name env- here, we will get environment variables like<<SERVICE_NAME>>_SERVICE_HOST,<<SERVICE_NAME>>_SERVICE_PORT. this will have the ip address and port of the different services respectively - communication - till now, we were using
<<service-name>>for communication. it can be expanded to<<service-name>>.<<namespace-name>>. if we don’t specify the namespace-name, it defaults to the namespace in which the resource initiating the request is - communication to services can be further expanded to
<<service-name>>.<<namespace-name>>.svcor<<service-name>>.<<namespace-name>>.svc.cluster.local. this bit can be confirmed usingkubectl exec any_pod_name -- cat /etc/resolv.confunder the search field
Process of Creation

Liveliness Probe
- used for configuring health checks, done at a container level
- if the health check fails, it applies the restart policy which defaults to always
- the restart policy is specified at the pod level and applies to all containers
initialDelaySeconds- when should the probe starttimeoutSeconds- after waiting for how many seconds should the probe failperiodSeconds- after how many seconds should the probe be repeatedfailureThreshold- how many consecutive health checks are allowed to fail- code example
name: api image: user-service livenessProbe: httpGet: path: /actuator/health port: 8080 initialDelaySeconds: 20 timeoutSeconds: 5 periodSeconds: 5 failureThreshold: 3 - note - this is http, but i think health checks at tcp level are supported as well
Readiness Probe
- it is used to determine whether a pod is ready to serve requests
- it has the same configuration as liveliness probe
- ip addresses of unhealthy pods are removed from ip tables, so that the future requests do not make it to them
An Example
- a complete example of
- a database and exposing it using cluster ip
- backend service which talks to db, exposing it using node port, configuring health checks
Deployments
- helps us achieve zero downtime when we deploy services
- we should not create pods or even replica sets directly
- deployments create replica sets behind the scenes
- when we make an update to for e.g. the image version, the deployment will first create a new replica set with the desired number of pods, and once that replica set has successfully scaled the pods, the deployment would mark the desired replicas of the older replica set as 0. a part of
kubectl describe deployment db-Type Reason Age Message ---- ------ ---- ------- Normal ScalingReplicaSet 12m Scaled up replica set db-5cc56bf6fb to 1 Normal ScalingReplicaSet 4m22s Scaled up replica set db-76774bbdf to 1 Normal ScalingReplicaSet 92s Scaled down replica set db-5cc56bf6fb to 0 - a side note - the random characters that we see are actually the hash value of the pod template
- to create a deployment imperatively, use
kubectl create deployment nginx --image=nginx --replicas=2- we can also add flags
--dry-run=client --output=yamlto generate the yaml
- we can also add flags
- deployment strategy can be rolling update (default) or recreate
- in recreate, the old pods are stopped and new ones are created in its place. this leads to some downtime. use recreate when the coexistence of two versions of the applications can cause inconsistencies e.g. db migrations
- in rolling deployments, the new replica set is scaled up and the old replica set is scaled down simultaneously gradually. they can be tweaked using
maxSurgeandmaxUnavailablefields. at any given time, we can have a maximum of desired +maxSurgeor a minimum of desired -maxUnavailablepods running. both can be absolute numbers or % and both default to 25%. since both versions of applications run in parallel, the response can be returned from either of the versions at random during deployment - e.g. of rolling deployment - by using the following code, the deployment order is 3 old ➝ 3 old, 1 new ➝ 2 old, 1 new ➝ 2 old, 2 new ➝ 1 old, 2 new ➝ 1 old, 3 new ➝ 3 new
replicas: 3 strategy: rollingUpdate: maxSurge: 1 maxUnavailable: 1 - everytime we deploy in kubernetes, a rollout takes place and a revision is created
- we can monitor the status of the update to deployment using
kubectl rollout status -f deployment.yml - we can view the history of updates using
kubectl rollout history -f deployment.yml - we can also create a rollback using
kubectl rollout undo -f deployment.yml- if we want to go back to a much older version and not just the previous one, we can use
kubectl rollout undo -f deployment.yml --to-revision=2
- if we want to go back to a much older version and not just the previous one, we can use
- side note: rollbacks might not always be possible e.g. if we had database migrations. so, we may need to roll forward in some cases i.e. implement a hot fix and redeploy the new changes
- using labels -
kubectl get all --show-labels- show the resources with their labelskubectl get all --selector=name=db,app=demo- filter the resources using their labels- e.g. to count the total number of resources in dev environment, use
kubectl get all --selector=env=dev --no-headers | wc -l
- we can set image of a deployment using
kubectl set image deployment db db=mongo:3.3, where the first db is the deployment name and the second db is the container name, since we can have multi container pod - to add the default change cause to the
kubectl rollout history ...output, append commands with--record, e.g.kubectl apply -f infra --record. this flag is deprecated but i cannot find its replacement - to scale deployments imperatively, use
kubectl scale deployment api --replicas=2 - both in deployments and in services, any one of the labels on pod need to be present in
spec.selector
Process of Creation
- a deployment controller will watch for new deployment creation requests
- it will then create replica set definitions on api server
- after this, the process of replica set creation is continued
Imperative vs Declarative
- in declarative, we just tell the desired state which kubernetes tries to achieve
- e.g.
applyfollows the declarative approach - however, in the imperative approach, we have to give clear instructions
- all commands like
create,edit,replace,expose,runetc. are imperative - using declarative approach we can track configuration using version control as well for iac
- imperative approach can be used for hot fixes / experimental purpose
- when using
apply, we can see the last yaml configuration converted to json which we had sent undermetadata.annotationsinkubectl.kubernetes.io/last-applied-configuration. this is used by kubernetes to keep track of changes and is only available when we useapply - if for e.g. we use
editto edit a resource, and that resource is not allowed to be edited, we just usewqto exit out of vim, and then that file gets saved to /tmp. we can then usekubectl replace --force -f <<file>>to replace the existing resource with our newly configured one
Ingress
- it is like a layer 7 load balancer built inside the kubernetes cluster
- makes the services inside cluster accessible from outside
- we also want features like ssl termination, route requests based on domain, etc
- my understanding - recall how a service based on labels can only expose a set of pods. instead of multiple node ports / load balancers i.e. one for each set of pods, we have one node port / load balancer which directs traffic to the ingress service. the ingress service can then direct traffic to the different cluster ips in the cluster
- kubernetes provides the ingress resource but not the ingress controller i.e. it provides the api which can be utilized by other third party implementations
- minikube has an addon that can be enabled
minikube addons enable ingress minikube addons list | grep ingress - to verify,
kubectl get all --all-namespacesshould show theingress-nginx-controller-*pod running - ingress is spun up using a deployment and a node port to expose it outside the cluster
- it also deploys configmaps to manage configuration and cluster roles to monitor kubernetes resources
- all resources are deployed in the ingress-nginx namespace
- we can also hit the endpoint http://minikube_ip/healthz to verify the working of ingress
- we can also provide a domain so that the requests are routed based on domain names
- we can also provide a catch-all entry
- in this example, if requests come from custom-api.com, and start with request path
/apithey are routed to the api service, but all other requests are routed to the devops service - note: to simulate that requests are coming from a specific domain on our local, we can use
curl -H "Host: custom-api.com" http://192.168.49.2/api/ - the ingress resource provided by kubernetes has limited functionality, so to configure the ingress controller provided by third party, we use annotations
- e.g. we want traffic from ingress-service/calendar to our calendar-cluster-ip:port. so, the calendar prefix should be removed. we can do this by using the annotation below -
annotations: nginx.ingress.kubernetes.io/rewrite-target: / - so,
/calendarinrules[x].http.paths.pathgets replaced by the value inrewrite-targetwhich is/here - use
kubectl get ingressto view the ingress resources - my understanding - view the port of the node port service
ingress-nginx-controllerinside thenginx-ingressnamespace. this is the port we hit when making requests to worker_node_ip
Volumes
- references to files and directories made available to containers
- the file system can be anywhere, e.g. outside the host as well i.e. this could be used for aws ebs as well
- e.g. it helps us preserve data across pod restarts
- there can be several types of volumes like host path, git repo (like host path but the path is a git repository) and even cloud specific like aws elastic block store
- empty dir volume type - if a container crashes, a new container is spun up in the same pod. however, if we don’t specify any volume, the container crash results in a loss of data. this can be prevented using empty dir volume type, which can survive container restarts but not pod restarts. it is usually chosen as the default by third party manifests and is expected to be replaced by a better solution like nfs
- an issue with using host volumes - it needs to be available on each node so that pods on different nodes can have access to it, and this of course is not an issue with minikube
- so, in cloud, we should ideally mount an nfs on each node, else we would have to copy this file on all nodes. for e.g., we should use aws efs. the syntax should be similar
Example 1
- for docker client to be able to communicate to the correct docker daemon, use the file /var/run/docker.sock
- e.g. we want to run docker commands on the host from pods. so, the container running inside the pod should have docker client installed to issue docker commands, and it should point to the docker daemon of the host
- so, we can use
hostPathvolume type - full yaml here
- now, we run the pod using
kubectl apply -f docker.yml - then, we can issue commands like
kubectl exec docker -- docker image lsto list the images on minikube
Example 2
- recall how for bind volumes in docker, we needed to specify a path in the host. the host now is minikube, so the host path needs to be that of minikube. before running
minikube start, if i copy files to the path in ~/.minikube/files directory on my workstation, i can see those files in the root on minikube host. we can verify this usingminikube sshand then by runningls / - so, suppose we want to specify a configuration file for prometheus
- we can copy this configuration file to minikube and then use host path volumes to reference it
- in this example, a better solution would have been to create a custom image and use
COPYin the docker file
# ...
spec:
  containers:
    - # ...
      volumeMounts:
        - mountPath: /etc/prometheus/prometheus.yml
          name: prom-conf

  volumes:
    - name: prom-conf
      hostPath:
        path: /prometheus-conf.yml
        type: File
Config Maps
- we can have different sources of configuration like environment variables, files, env files, literals, etc
Default Config Map
- it is used to make calls to the kubernetes api from containers
kubectl get configmaps- kube-root-ca.crt is the config map created by defaultkubectl describe pods pod_namewill give the mount location of this config map. note that this config map may not be mounted to the pods in kube-system thoughkubectl exec pod_name -- ls /var/run/secrets/kubernetes.io/serviceaccountshows that there are three files - namespace, ca.crt and token- on reading online, i see that this can also be a secret instead of a configmap
Mount Volumes
- config maps can mount the configuration as volumes to running containers
- imperative command -
kubectl create configmap prometheus-config --from-file=prometheus-conf.yml kubectl describe configmap prometheus-config- using in the yml file -
spec:
  containers:
    - # ...
      volumeMounts:
        - mountPath: /etc/prometheus
          name: prometheus-config
  # ...
  volumes:
    - name: prometheus-config
      configMap:
        name: prometheus-config
verify using
kubectl exec prometheus -- cat /etc/prometheus/prometheus-conf.yml - instead of providing a file, we can use literals, e.g.
kubectl create configmap --from-literal=foo=bar - in this case, if we use volume mounts, a file called foo would be created with its contents as bar
Environment Variables
- e.g. create a file called .env
client-id=qwerty
client-secret=12345
kubectl create configmap api-credentials --from-env-file=.env- my understanding - the difference between
--from-filevs--from-env-fileis in from file, kubernetes does not care about the file’s content, while in from env file, it knows how to treat as different key value pairs, so that it can inject them all at once / individually as discussed below - usage -
containers: #... envFrom: - configMapRef: name: api-credentials - verify using
kubectl exec alpine -- env - we can also inject the variables of the config map individually -
containers:
    #...
    env:
      name: CLIENT_ID
      valueFrom:
        configMapKeyRef:
          name: api-credentials
          key: client-id
Secrets
- secrets are similar to config maps
- secrets can be of three types -
- docker-registry - for pulling images from private registry
- tls - for storing certificates
- generic - works like config maps, so can have sources like
--from-env-file,--from-file,--from-literal
- creating a secret imperatively -
kubectl create secret generic jenkins-credential \ --from-literal=username=johndoe \ --from-literal=password=incognito - to retrieve the original value -
kubectl get secret jenkins-credential --output=json kubectl get secret jenkins-credential --output=jsonpath="{.data.password}" | base64 --decode - to use the secrets, we put them into files /etc/secret/jenkins-user and /etc/secret/jenkins-pass -
spec: containers: - # ... volumeMounts: - mountPath: /etc/secrets name: jenkins-credentials volumes: - name: jenkins-credentials secret: secretName: jenkins-credential defaultMode: 0444 items: - key: username path: jenkins-user - key: password path: jenkins-pass - we made it read only for all users using 0444 as the mode
- verify using
kubectl exec pod_name -- cat /etc/secrets/jenkins-pass - if creating secrets declaratively, the values should be base64 encoded first
# ...
data:
  username: am9obmRvZQ==
using sh base64 utility -
# to encode echo -n johndoe | base64 # to decode echo -n am9obmRvZQ== | base64 --decode - the only difference between config maps and secrets is that secrets are stored in tmpfs (temporary file storage) thus leaving no trace on the nodes
- secrets should be combined with rbac for limited access
- cons of using kubernetes secrets: secrets are stored in plain text in etcd, so anyone with access to etcd can read the secrets. so, we should use solutions like hashicorp vault, integrating it with kubernetes is smooth
Docker Registry
- by default, we use public docker registry
- sometimes we might need private registry
- we use
docker loginwhen using vanilla docker - when using kubernetes, we can create the secret of type
docker-registrykubectl create secret docker-registry registry-credential \ --docker-server=...\ --docker-username=...\ --docker-password=...\ --docker-email=... - we can then specify the name of the secret in pod
spec:
  imagePullSecrets:
    - name: registry-credential
Namespaces
- we can spin up multiple clusters to isolate the different environments. this can help prevent accidental changes to the production cluster
- however this has operational and resource overhead
- namespaces help us create different segments on a cluster
- namespaces are like virtual clusters
- we can scope resource limits and permissions to namespaces
- we use the “default namespace” by default
- we can run
kubectl get namespacesto view all the available namespaces - kube-public - the resources in this namespace are accessible to all (including unauthenticated) users
- kube-system -
kubectl get all --namespace=kube-systemshows the resources managed by kubernetes itself - to create a namespace, use
kubectl create namespace staging - if we set the namespace in context, we do not have to repeatedly suffix commands by
--namespace=staging. e.g. we can usekubectl config set-context $(kubectl config current-context) --namespace=staging - when we delete a namespace, the cascading effect deletes all the resources within it as well. the command is
kubectl delete namespace staging - in the resource files, we can also specify the
namespacekey undermetadata
Config
- we can specify flags like
--key,--certand--cacertwhen making requests via curl to api server - we can also specify flags in kubectl everytime, e.g.
kubectl get pods --client-key=... --client-certificate=... --certificate-authority=... - by default for all our requests using kubectl, the configuration is specified in ~/.kube/config. it also is like a kubernetes resource with
kind: Config. so, instead of defaulting to ~/.kube/config in every command, we can specify the file using the--kubeconfigflag - it has three parts - clusters, users and contexts
- clusters refer to the different kubernetes clusters that we would like to access
- the cluster requires the path to the ca server certificate and the api server address
- to get the server address, use
kubectl config view --output=jsonpath="{.clusters[0].cluster.server}" - the user requires the path to private key and signed certificate
- we can also provide the base64 encoded data directly instead of the path for the user / cluster
- contexts pair the clusters to users. so, they have the cluster, user and even the namespace to use by default
- the one used by default by kubectl is defined via
current-context - create a new cluster -
cp ~/.minikube/ca.crt . kubectl config set-cluster johndoe \ --certificate-authority ca.crt \ --server https://192.168.49.2:8443 # cluster server address kubectl config get-clusters # verify that the cluster is created - create a new user -
kubectl config set-credentials johndoe \ --client-certificate johndoe.crt \ --client-key johndoe.key - create and set the context -
kubectl config set-context johndoe \ --user johndoe \ --cluster johndoe # create / edit the context kubectl config use-context johndoe # change the context kubectl config get-contexts # verify that the context is set - we can view the entire config using
kubectl config vieworcat ~/.kube/config - note: the context section can also take the namespace as an argument
Roles and Bindings
- rules, comprise of -
- verbs, e.g. get, list, create
- resources, e.g. pods
- resource names
- api groups of the resources
- roles - they are a collection of rules. a role is applied to a namespace
- cluster role - same as roles but scoped to clusters
- resources like pods are namespaced while resources like nodes are cluster scoped. to get an exhaustive list, we can use
kubectl api-resources --namespaced=trueor set the flag to false - subjects - can be -
- user
- service accounts - used by pods to interact with kubernetes api
- groups - collection of users and service accounts
- we also have role bindings and cluster role bindings
kubectl config get-users- by default we have only one user minikube- a few commands we can use include -
kubectl get roles,kubectl get clusterroles,kubectl get rolebindings,kubectl get clusterrolebindings - we can also use
kubectl describe clusterrole view - we already have some cluster roles and cluster role bindings created by default
- ones prefixed with
system:should be generally avoided, so we can runkubectl get clusterroles | grep -v system. we get four roles, each of them has been described below - view - can perform get, list and watch operations (verbs) on almost everything
- edit - everything that admin can do except modify roles and role bindings
- admin - everything that cluster-admin can do except modification to namespaces and resource quotas
- cluster-admin - can perform all operations. e.g. the default user minikube has this role. this can be verified by running
kubectl auth can-i "*" "*" - to verify if an operation can be performed, we can use for instance
kubectl auth can-i get pods - we can impersonate as someone else using
kubectl auth can-i get pods --as=johndoe - creating a role binding -
kubectl create rolebinding johndoe \ --clusterrole=view \ --user=johndoe \ --namespace=default - verify using
kubectl describe rolebinding johndoe. note: sometimes in kubectl outputs, the namespace field is empty when it is referring to the default namespace - my understanding - role bindings can reference cluster roles, it just means that the permissions would be granted on the specified namespace only. this allows for role reuse. the view role is a cluster role, but by creating a role binding we can limit the user’s view capabilities to a namespace
- delete a role binding using
kubectl delete rolebinding johndoe - using role bindings, we can attach one role to multiple subjects
- declaratively creating a cluster role binding using yaml -
apiVersion: rbac.authorization.k8s.io/v1 kind: ClusterRoleBinding metadata: name: johndoe-view roleRef: apiGroup: rbac.authorization.k8s.io kind: ClusterRole name: view subjects: - apiGroup: rbac.authorization.k8s.io kind: User name: johndoe - note how role bindings have a single role but can have multiple subjects
- verify using
kubectl auth can-i get pods --as=johndoe --all-namespaces - describing the admin cluster role created by default -
kubectl describe clusterrole admin - e.g. yml to create a custom role -
apiVersion: rbac.authorization.k8s.io/v1 kind: ClusterRole metadata: name: release-manager rules: - resources: ["pods", "pods/attach", "pods/exec", "pods/log", "pods/status"] verbs: ["*"] apiGroups: [""] - resources: ["deployments", "replicasets"] verbs: ["create", "get", "list", "update", "watch"] apiGroups: ["", "apps", "extensions"] - note: to grant permissions for different operations on pods, specifying the resources as
podsis not enough, as there can be other sub resources likepods/logsetc
NodeName
- recall that the scheduler decides which node to schedule a pod on
- if we run
kubectl get pod pod_name --output=yaml, we can see the node it was scheduled on undernodeName - behind the scenes, a binding object is created which binds the pod to a node
- we can manually specify the node a pod should be scheduled on using the
nodeNameproperty - we can use this for e.g. if we didn’t have a scheduler, and this would schedule the pod on the specified node
Taint and Toleration
- taint is set on nodes which prevent any random pod from being scheduled on it
- toleration is set on pods which allows them to be scheduled on a node with taint
- by default, the pods have no toleration
- use case - a worker node has resources to enable running of a certain type of pod
- it means that only pods with toleration can be scheduled on the node with that taint
- however, the pods with this toleration can be scheduled on other nodes as well
- this feature is used by kubernetes as well to help ensure that normal pods are not scheduled on the master and only the management pods scheduled by kubernetes itself are
- to taint nodes, use
kubectl taint node node_name key=value:taint-effect - similarly, to remove the taint, use
kubectl taint node node_name key=value:taint-effect-, i.e. suffix the prior command with a-symbol - taint effects can be -
NoSchedule- do not schedule any new pods without the right tolerationPreferNoSchedule- prefer not schedulingNoExecute- likeNoSchedulebut also evicts the existing pods on the node without the correct toleration
- to apply toleration on pods, use -
spec:
  tolerations:
    - key: key
      operator: Equal
      value: value
      effect: NoSchedule
Node Selectors and Node Affinity
- we add labels to nodes and then add selectors for them to pod definitions
- this way, the pods with the node affinity can only be run only on specific nodes
- however, pods without the node affinity can still be spun up on the nodes with labels
- to label a node, we use -
kubectl label node node_name key=value - we can use
kubectl get nodes --show-labelsto verify - to apply selectors for labels on nodes, use -
spec: nodeSelector: size: large - but, using node selectors we cannot specify complex conditions
- so, we use node affinity
spec: affinity: nodeAffinity: requiredDuringSchedulingIgnoredDuringExecution: nodeSelectorTerms: - matchExpressions: - key: size operator: In values: - large - medium - what if the node labels are changed after the pod was already scheduled? what if there are no nodes found with the conditions matching the node affinity value? for these, the value can be
requiredDuringSchedulingIgnoredDuringExecutionorpreferredDuringSchedulingIgnoredDuringExecution - my understanding -
requiredDuringSchedulingRequiredDuringExecutionis not available by default - some operators to use -
Equal,In,Exists - so, overall, to ensure pods of a particular type and only this type end up on a particular node, we need to use node selectors / node affinity and taints and tolerations in conjunction
Resource Management
- we can give an indication and set limits for the resources that can be used by kubernetes components
- specified at the container level
- this helps kubernetes in scheduling
- to enable metrics server, use -
minikube addons enable metrics-server - can be written as for e.g.
0.5or500m(500 milli cpu). 1 milli cpu is equivalent to 1 hyperthread / 1 vcpu - memory can be written as
KorKifor kilobyte,MorMifor megabyte and so on. we can only specify the numerical value as well, its value is in bytes e.g.256Mior268435456 - syntax -
containers: #... resources: limits: memory: 100Mi cpu: 200m requests: memory: 50Mi cpu: 100m - limits - amount of resources that containers should not cross
- if the container crosses the memory limit, it will be terminated / restarted. the pod has status
OOMKilled(out of memory killed). the pod remains the same, the container changes - containers are not allowed to use more than the cpu limit for an extended period, so there are no restarts / termination of the containers for crossing the cpu limits as cpu usage gets throttled automatically
- requests - amount of resources that containers are expected to use
- only when the node runs out of memory, the pod that the container exceeding the requests is a part of is evicted from the node, and it gets rescheduled
- if a container’s memory request exceeds the available memory on any node (technically sum of the memory requests of all the containers of a pod), the pod stays in
Pendingstate indefinitely - if the memory usage exceeds only the requested amount (and not the limit), the pod can be evicted if another pod enters with a higher qos and needs that memory
- so, memory limit cannot be exceeded while memory request can be exceeded if the node has enough memory
kubectl describe nodesgives details of the available and in use resourceskubectl top podsgives cpu and memory usage details because of the metrics-server addon. to get information related to the containers in the pod as well, we can usekubectl top pods --containers- similarly, we can use
kubectl top nodes - prometheus is a better solution than metrics-server for real world use cases
- qos - quality of service determines the priority - guaranteed > burstable > best effort
- guaranteed - resource limit = resource request. note: remember that if only limits are defined, request = limit
- burstable - at least one container has limit / request defined, unequal limits and requests, etc
- best effort - no resources are defined at all
- we can view the qos assigned by kubernetes using
kubectl describe pod pod_name | grep QoS - additional concept - priority classes are useful for e.g. when two pods have the same
qosClass. we can runk get priorityClassesand then assign one of the values usingpriorityClassNameunderspecof the pod. note that this concept is entirely different from qos, refer documentation
Limit Ranges
- limit ranges help us specify the following at a namespace level (a yaml example) -
default- default resources limitdefaultRequest- the default resources requestmaxandminthe maximum and minimum permitted values for the requests and limitsmaxLimitRequestRatio- the maximum limit to request ratio (limit should ideally be higher than request?)
Resource Quotas
- limits the resources that can be consumed by a namespace. so, if we have multiple namespaces to support environments like dev and prod in our clusters, we can distribute resources equally so that there is no starvation for any of the environments. a yaml example
- using resource quotas, we can limit compute (e.g. cpu and memory requests and limits), storage (e.g. persistent volume claims) and object count (e.g. number of pods, number of node ports, etc.)
Daemon Sets
- ensures one pod runs on each node
- e.g. logging and monitoring pods which need to be run on every node can be created using daemon sets
- even kube-proxy is run this way. to verify, use -
kubectl get daemonsets --all-namespaces - it used node name but in newer versions node affinity underneath
Init Containers
- defined inside a pod
- before the long-running containers start, we might want to install binaries, etc
- init containers are run to completion one at a time sequentially before the normal containers start running
- their syntax in yaml is the same as normal containers
Static Pods
- a pod created by kubelet itself on the node without involving the api server / etcd is called a static pod
- the kubelet continuously monitors a directory for changes
- so, when we can create a file in it, it gets picked up by the kubelet
- if we edit the file / remove the file, the kubelet automatically changes / terminates the pod accordingly
- this does not work for deployments etc. since they require controllers
- if the node is a part of a cluster, it will notify the api server about the static pod. so,
kubectl get podswill show the pod, since the etcd cluster etc. know about these pods. however, unlike a normal pod, the only way to modify this pod is to modify the file - use case - since static pods do not depend on control plane components like controllers, scheduler, etc., they are used to deploy the control plane components themselves
- unless configured otherwise, the directory is
/etc/kubernetes/manifests/ - we can verify this in minikube after running
minikube sshby runningsudo ls /etc/kubernetes/manifeststhat it has files for etcd, scheduler, api server and controller manager - static pods will be suffixed by
-nodename-kubectl get pods --all-namespaces | grep minikube - if we run
kubectl get pod pod_name --output=yaml, we can confirm that the owner is a node by going toownerReferences.kindwhich should have the valueNode - to get the static pod path, use -
cat /var/lib/kubelet/config.yaml | grep staticPodPath
Persistent Volumes
- persistence of state should be decoupled from pods since they can be added / removed easily
- nfs is the way to go for disk storage in cloud. here, aws ebs has been shown
- note: ebs volumes should only be spun up in azs where worker nodes exist, since ebs is scoped to an az
- the
spec.capacity.storagein the persistent volume defn. should be <= the capacity of ebs - access modes can be
ReadWriteOnce- can be mounted as read write by one node only. note that multiple pods on the same node can still use itReadOnlyMany- can be mounted as read only by multiple nodesReadWriteMany- can be mounted as read write by multiple nodesReadWriteOncePod- only one pod can read from / write to it
- we can run
kubectl get storageclassesto get the available storage classes - e.g. if we were using kops with aws, it would automatically add the storage class of gp2 for us
- default storage class admission controller observe requests for persistent volume claims and when a claim does not specify the storage class, it gets assigned the default storage class. when we run
kubectl get storageclasses, we see that gp2 is marked as default - yaml example of persistent volume
- persistent volumes are used through persistent volume claims. the idea is that admins create a set of persistent volumes, and developers use them via persistent volume claims
- there is a one to one mapping i.e. one persistent volume can only be used by one persistent volume claim
spec.storageClassNameandspec.accessModesshould have the same value as that of persistent volume while the value ofspec.resources.requests.storageshould be <= the value ofspec.capacity.storageso that the persistent volume claim can get a segment of the persistent volume- because of this, if the persistent volume has more storage than what the persistent volume claim asks for, the claim gets the extra storage as well
- if no matching persistent volume is found, the persistent volume claim remains unbound indefinitely
- yaml example of persistent volume claim
- usage -
spec: containers: - # ... volumeMounts: - name: jenkins-home mountPath: /var/jenkins_home volumes: - name: jenkins-home persistentVolumeClaim: claimName: jenkins-storage - the status of a persistent volume can be -
Availablewhen no persistent volume claim is bound to itBoundwhen a persistent volume claim is bound to itReleasedwhen the persistent volume claim is deleted
- the default reclaim policy of a persistent volume is
Retain. first, the pod / deployment is deleted, and then the persistent volume claim is deleted. now, the persistent volume has status of released. but it is not available to be bound because it already has existing data from previous pods which need to be deleted first - so, we delete the persistent volume manually, try to clean up / delete the aws ebs manually and then can create new persistent volumes for the persistent volume claims
- till now, we used the manual method of provisioning volumes, i.e. static persistent volumes
- the dynamic method requires lesser intervention - we do not have to manually create the underlying storage volume or the persistent volume, k8s creates these for us automatically by inspecting the pvc, and finally binds the pv to our pvc
- however, in case of a conflict, kubernetes will choose the static one
- important - the persistent volume is “created automatically” in case of dynamic persistent volumes, based on the persistent volume claim that we create
- when we delete the deployment and then the persistent volume claim now, the persistent volume as well as the actual nfs ebs volume is deleted automatically. this is because when using dynamic persistent volumes, the reclaim policy of the persistent volume is
Delete - yaml example for persistent volume claim for dynamic persistent volume
- the storage classes have a field called volume binding mode. this can be set to
WaitForFirstConsumeri.e. persistent volume will not be bound to the persistent volume claim till there is a pod for the persistent volume claim. the other value that the binding mode can take isImmediate
Commands and Arguments
- difference between command and entrypoint in docker is described here
- for e.g. in the pod definition -
spec.containers[*].commandis used for replacingENTRYPOINTof docker filespec.containers[*].argsis used for replacingCMDof docker file
Patching Nodes
- if we remove a node suddenly, the pods scheduled on it are lost
- if it was a part of a replica set, it would be rescheduled, but not if it was a normal pod
- to stop any further scheduling on the current node, run
kubectl cordon node_name - to stop any further scheduling and also evict existing pods, use
kubectl drain node_name - if the node included a pod not spun as a part of a controller, we have to add
--force. this is because that pod would be lost forever - so, i think drain already does what cordon does
- pods part of replica sets etc. will be rescheduled on other nodes, because that is the job of controllers
- after running the
drain, we can start the upgrade - to enable scheduling pods on the node again, run
kubectl uncordon node_name - my understanding - suppose a node goes down. so do the pods running on it. the time a controller waits to reconsider rescheduling the pod on another node is defined via
podEvictionTimeout. this is why draining nodes is important, we don’t rely on the timeout, and instead, rescheduling of pods happens gracefully - to verify, use
kubectl describe node <<node-name>> | grep Unschedulable
Interface
- for implementations to work with kubernetes, they should be compatible with the interface
- this allows for kubernetes to be extended with multiple implementations seamlessly
- e.g. cri for container runtime interface, cni for network, csi for storage, etc
- e.g. csi lays a set of rpc calls that the cri will make. the csi implementations should implement these rpcs