Introduction
- we typically use apache airflow for organization - set the order of tasks, make sure the next task starts after the previous one is completed successfully and control the scheduling of the entire dag
- “visibility” - using the user interface, we can easily monitor progress of workflows, troubleshoot issues and then take action. we can also see the relationships between workflows and tasks
- “flexibility” and “scalability” - we can perform a lot of different kinds of tasks and at scale
- “extensibility” - we can interact with services like aws, databricks, dbt, etc by using their corresponding providers, or add our own logic using plugins etc as well
- dynamic nature of airflow -
- “dynamic tasks” - generate tasks based on “dynamic” input, e.g. the number of files we receive can change, and we can generate one task per file
- “dynamic workflows” - generate workflows based on “static” input, e.g. we have a bunch of configuration files, and we can generate a workflow for every configuration file
- “branching” - execute a different set of tasks based on a condition
- “workflow” - it is the entire process / pipeline, which is defined using a dag
- “dag” - directed acyclic graph - collection of tasks organized in a way that reflects the dependencies
- remember - acyclic means the graph cannot have any cycles
- “dag run” - a single instance / run of a dag
- “operator” - a single, “idempotent” task in the dag. idempotent - we can run this operator however many times we want. we always get the same output for the same input
- using operators, we can break down the workflow into separate, manageable pieces of work
- “task” - a specific instance of an operator. it is the actual execution. it is also called a “task instance”
- airflow is not meant for the following things -
- it is not for sub minute scheduling / “realtime processing”, it is used for “batch workloads”
- it is for “orchestrating” data pipelines, not to perform “data processing”
Components of Airflow
- “web server” - the ui dashboard
- “scheduler” - helps run tasks in the right order and at the right time. it puts the tasks into the queue
- “meta database” - keeps track of tasks and their statuses
- “triggerer” - responsible for triggering deferrable tasks i.e. tasks that wait for external events
- “executor” - which task should execute on which worker etc. assuming it picks up the tasks from the queue, which were put there by the scheduler
- “queue” - list of tasks waiting to be executed. also takes ordering into account
- “worker” - process that actually performs the tasks
- airflow can be run using a “single node architecture”, where all the components are running on the same node, vs a “multi node architecture”, where we can now use solutions like postgres / mysql for the meta database, redis / rabbit mq for the queue, have multiple worker nodes, have multiple web servers running behind a load balancer, and finally maybe for components like scheduler and executor, an active passive like architecture is needed if running multiple copies of it
Installing Airflow
- download the compose file -
curl -O https://airflow.apache.org/docs/apache-airflow/stable/docker-compose.yaml - create the three directories -
mkdir -p ./dags ./logs ./plugins ./config - create a .env file -
echo -e "AIRFLOW_UID=$(id -u)" > .env - optionally, there is an environment variable
AIRFLOW__CORE__LOAD_EXAMPLESin the compose file, which we can set to false to keep the airflow ui clean - run the db migrations -
docker compose up airflow-init - finally, run
docker compose up -d. both username and password is airflow to access the web server
Creating a Basic Dag
- we create a file in the dags directory for creating a dag
- the parameters include the “dag id”, the “start date”, the “schedule”, and “catchup”
- “catchup” is true by default, and we would generally want to set it to false, because if true, it will trigger all the missing dag runs between the current date and the the start date we specified
with DAG("user_processing", start_date=datetime(2023, 1, 1), schedule="@daily", catchup=False) as dag: - best practice - do not put multiple steps into the same task, as if there is a failure in the later steps, the entire task would be retried
- putting each step in a separate operator / task means we will only have to retry parts that fail
- there are three types of operators -
- “action operator” - to perform an action, e.g. bash operator to execute bash scripts or commands
- “transfer operator” - to transfer data from source to destination
- “sensors” - wait for a certain condition to be met, e.g. file sensor to wait for files to be added
- we need to create a “connection” by going to admin -> connections. this is what we provide in the postgres operator below for the connection id parameter
- understand that the clause
if not existsis what makes this idempotentcreate_table = PostgresOperator( task_id='create_table', postgres_conn_id='postgres', sql=""" create table if not exists user ( first_name text not null, last_name text not null, country text not null, username text not null, password text not null, email text not null ); """ ) - testing out tasks in airflow -
- enter the scheduler terminal -
docker container exec -it airflow-instance-airflow-scheduler-1 /bin/bash - now, we should be able to access airflow -
airflow --help - finally, we can run a specific task as follows - we need to provide the dag id, task id and the execution date -
airflow tasks test user_processing create_table 2022-01-01
- enter the scheduler terminal -
- “sensors” have two important parameters -
- “poke interval” - how frequently to perform the check. defaults to 60s
- “timeout” - when the sensor should time out and fail. defaults to 7 days i believe
is_api_available = HttpSensor( task_id="is_api_available", http_conn_id="users_api", endpoint="api/" ) - assume a task called
process_userwrites a csv from the dictionary, which comes from another task calledextract_user, which makes an api call process_userneeds access to the output ofextract_user. it does so usingti.xcom_pull. we achieve this using “xcom”- xcom stands for “cross communication” and is used to exchange small amounts of data between tasks. xcom is stored inside the meta database as well. use other techniques like a shared file system, object storage, etc for large amounts of data
- the http operator takes care of pushing the data for us below. if we were using the python operator, we could have either returned the value from the callable, or used
ti.xcom_push(key='foo', value='bar') - we can already see in the code snippet below how to extract it from xcom. we could pull using a specific key as well -
ti.xcom_pull(task_ids="foo", key="bar"). i think the key isreturn_valueby default - notice how the parameter name is
task_ids, which means we can fetch xcoms of multiple tasks with the same key. e.g. upload fetches data pushed into xcom by processing - [process_a, process_b, process_c] » load - finally, we can also view the data transferred using xcom in admin -> xcoms
def _process_user(ti): response = ti.xcom_pull(task_ids="extract_user") dict_user = response["results"][0] user = { "name": f"{dict_user["name"]["title"]} {dict_user["name"]["first"]} {dict_user["name"]["last"]}", "username": dict_user["login"]["username"], "password": dict_user["login"]["password"], "email": dict_user["email"] } with open("/tmp/processed_user.csv", "w") as file: csv_writer = csv.DictWriter(file, fieldnames=user.keys()) csv_writer.writerow(user) extract_user = HttpOperator( task_id="extract_user", http_conn_id="users_api", endpoint="api/", method="GET", response_filter=lambda response: json.loads(response.text), log_response=True ) process_user = PythonOperator( task_id="process_user", python_callable=_process_user ) - we need to tell airflow about this dependency i.e.
process_userneeds to be triggered afterextract_usercompletes successfullyextract_user >> process_user - note - instead of using the bit shift operators above, we could also have used
set_upstreamandset_downstreamfunctions - value of xcom can be serialized using both - “json” and “pickle”
- the value of
do_xcom_pushfor tasks are set to true by default, which means that whatever a task instance returns, gets written into the xcom by default - to be able to interact with external services easily, we use “operators”. operators use “hooks” underneath. hooks helps abstract away the complexities of interacting with the underlying service, while operators abstract away the complexities of performing specific things
- sometimes the operators are not enough for us since we want access to some internals. in such cases, we can interact with hooks directly. notice how we are instead of using a postgres operator, using a python operator below, and then instantiating a postgres hook inside the callable to interact with postgres
def _store_user(ti): postgres_hook = PostgresHook(postgres_conn_id="postgres") postgres_hook.copy_expert( sql="copy users from stdin with delimiter as ','", filename="/tmp/processed_user.csv" ) store_user = PythonOperator( task_id="store_user", python_callable=_store_user ) - we saw how catchup applies to date ranges that the dag runs were missed for - between pause date and current date / between start date and current date. to run the dag for date ranges before the start date, we can use
airflow dags backfill - for all dag runs that were triggered due to the schedule (and not manually), there are two fields - “data interval start” and “data interval end”. e.g. if the schedule is daily, the values for the two will look like this
- dag run 1 - 01-01-2022 and 02-01-2022
- dag run 2 - 02-01-2022 and 03-01-2022
- and so on…
Datasets
- “trigger dag run operator” - from a dag, trigger another dag
- “external task sensor” - wait for a task in another dag to finish
- however, we have a better paradigm to handle these situations now
- “dataset” - logical grouping of data, like a file, sql table, etc
- for creating a dataset, we need to define the “uri”. it can be paths to s3, files, etc. note - only ascii characters are supported
- optionally, we can also attach metadata when creating a dataset, e.g. the owner of the dataset etc
file = Dataset("file.csv") file = Dataset("file.csv", extra={"owner": "james"}) - so, we create the producer dag as follows. my understanding - notice the
outletsparameter. this is what helps airflow know that a particular task would be writing to a dataset, and maybe this in turn helps airflow know which downstream dags to trigger?file_dataset = Dataset("/tmp/file.txt") with DAG("producer", schedule="@daily", start_date=datetime(2023, 1, 1), catchup=False): @task(outlets=[file_dataset]) def produce_data(): with open(file_dataset.uri, "a+") as file: file.write(datetime.now()) produce_data() - in the previous section, we saw
@dailyfor the schedule parameter. it is called a cron preset i believe. we can also use actual cron expressions,datetime.timedeltaobject, timetable and now, dataset. again, my understanding is that specifying the dataset in the schedule parameter is what helps airflow trigger this dag when the dataset gets updatedfile_dataset = Dataset("/tmp/file.txt") with DAG("consumer", schedule=[file_dataset], start_date=datetime(2023, 1, 1), catchup=False): @task def consume_data(): with open(file_dataset.uri, "r") as file: print(file.read()) consume_data() - after writing the producer and the consumer dags, the “dependency graph” in the “datasets” tab will show us the following graph -
![]()
- we can specify multiple datasets in the schedule parameter of the consumer dag. this means that the dag would only consume the data once both datasets receive updates
- final note to self - this feature does not have care about the data - it will not care about what new records, files, etc were added, and call the consumer with this new data

Executors
- recall that the “executor” decides which system to run tasks on etc
- there are different types of executors -
- “sequential executor” - run one task at a time on a single machine. so no concurrency / inefficient? useful for testing. meta database used is sqlite
- “local executor” - run multiple tasks on a single machine, so better. this time, either of mysql, postgres, etc need to be used for the meta database
- remote executors like “celery executor” and “k8s executor” to run tasks across multiple machines. this helps scale our pipelines, as we simply need to add a worker to the cluster if we need more resources
- steps to see the executor being used -
- enter the scheduler -
docker container exec -it airflow-instance-airflow-scheduler-1 /bin/bash - see the executor in the config file -
cat airflow.cfg | grep -i "executor =". it showsSequentialExecutor - however, check the environment variables -
env | grep -i executor, i seeAIRFLOW__CORE__EXECUTOR=CeleryExecutor. all airflow related variables start withAIRFLOW__. basically, the environment variable value overrides the value in the config file. this environment variable is set via the compose file
- enter the scheduler -
- we can also access flower, the celery cluster ui. to do this, run the compose file using
docker compose --profile=flower up -d. it is accessible at 5555. we can see the different workers in our celery cluster, active tasks and their statuses, etc - for adding another worker, just copy the block for the worker in the compose file under a different key
- i believe airflow also allows us to have different queues and different types of workers, so for instance, tasks that require running high cpu can be routed to a specific queue and its corresponding specific worker(s)
- to do this on our local, if we see the command used by the different workers, we see
celery worker. we need to change it to for e.g.celery worker -q high_cpu. this should show up in the flower ui - the worker with no arguments is listening on the default queue, while the other one is listening on the high cpu queue - the “operators” also accept a queue parameter, and this is where we can specify the queue name and thus route the task to the right worker instance(s)
process_user = PythonOperator( task_id="process_user", queue="high_cpu", python_callable=_process_user ) - for concurrency, look at variables like
AIRFLOW__CORE__PARALLELISM(number of tasks that can run per scheduler that we have. so, this multiplied by the number of schedulers gives us the total active tasks possible),AIRFLOW__CORE__MAX_ACTIVE_TASKS_PER_DAG(look below),AIRFLOW__CORE__MAX_ACTIVE_RUNS_PER_DAG(look below), etc - also, in the python code itself, we can define parameters like -
max_active_runs- (dag level) max active dag runsmax_active_tasks- (dag level) max active task instancesmax_active_tis_per_dag- (task level) max task instances per task across all dag runs for a dag. difference from above - it applies to a particular task. note - i think it was named totask_concurrencyin the earlier versionsmax_active_tis_per_dagrun- (task level) max task instances per task per dag run
Task Groups
- note - task group is the newer alternative to the older and deprecated “subdag operator”
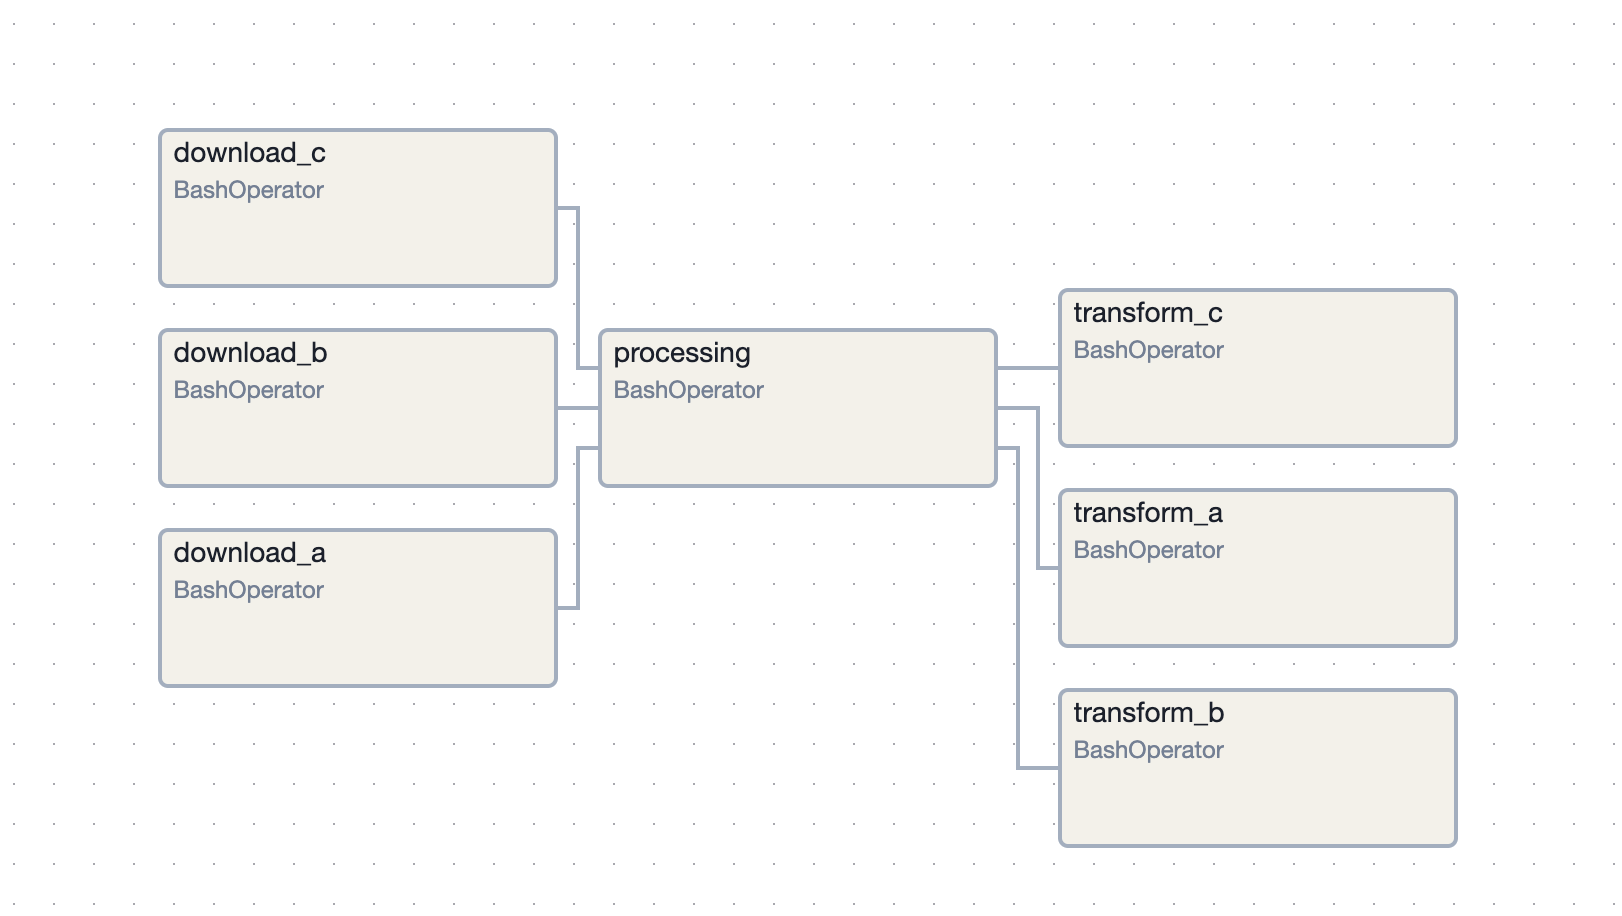
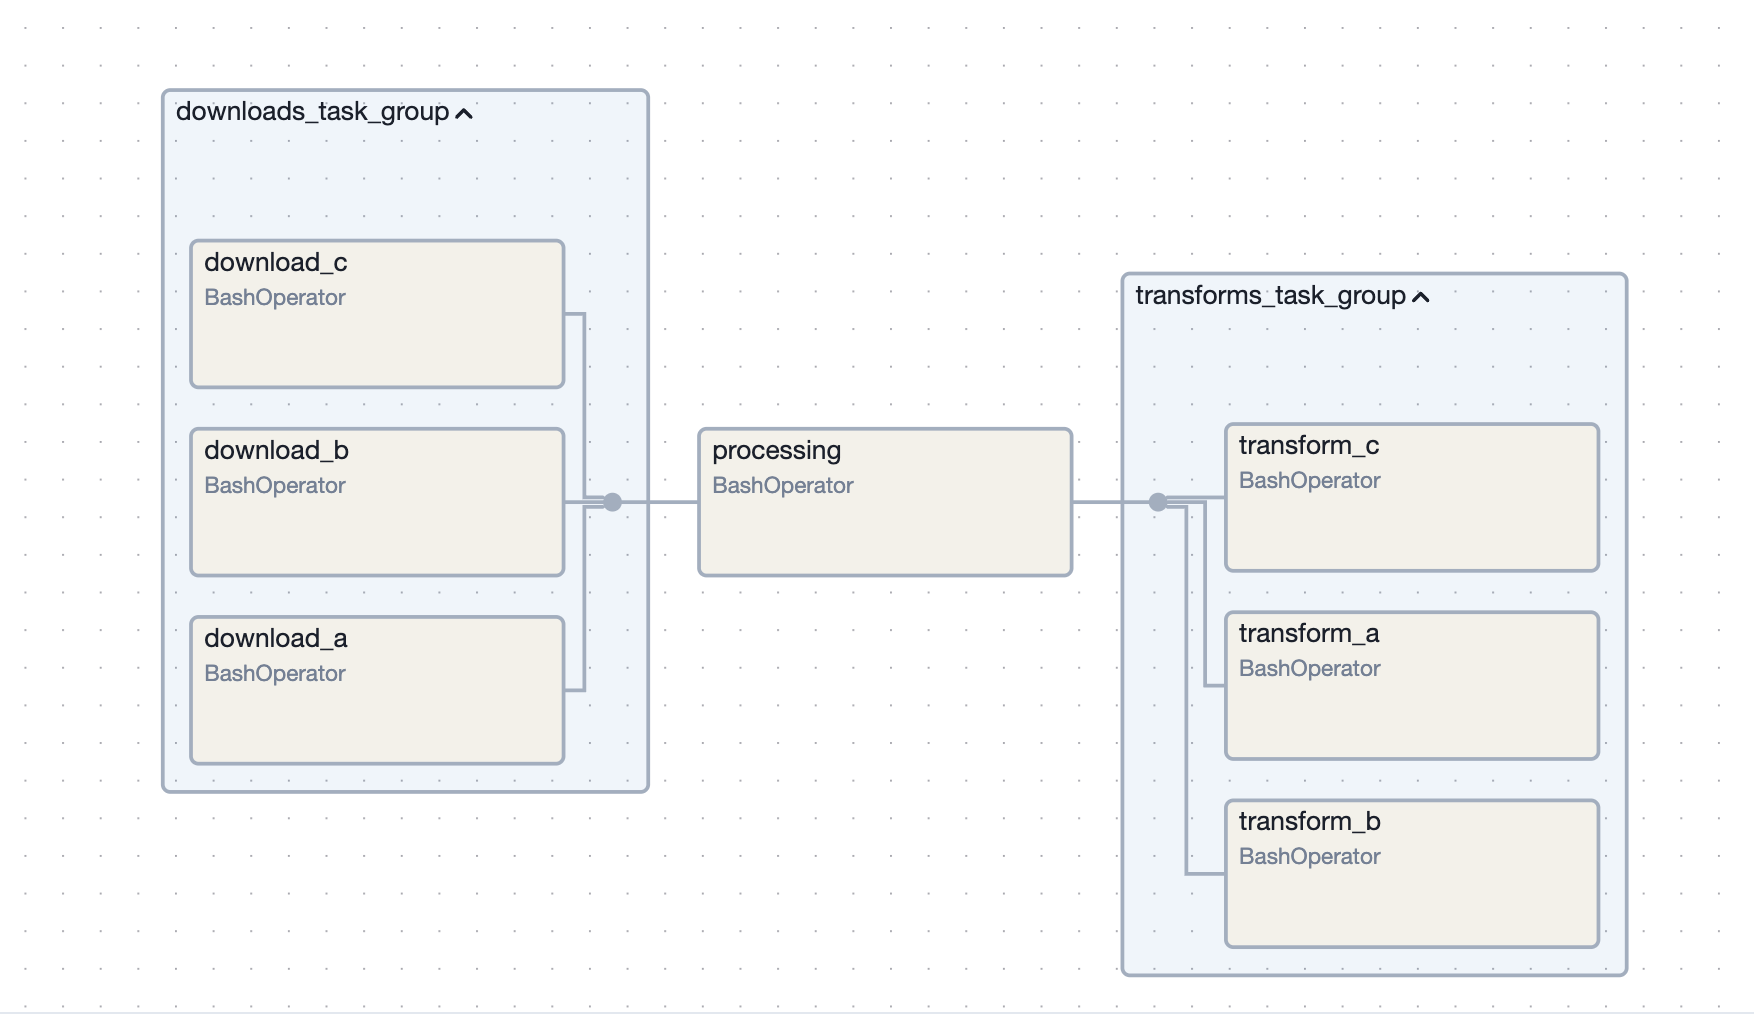
- “task groups” - make our dags easier to read and maintain by splitting it into various smaller groups of tasks. assume we have the following i.e. three download tasks done in parallel, then a combined processing step and finally three parallel transformation steps
[download_a, download_b, download_c] >> processing >> [transform_a, transform_b, transform_c]![]()
- we would like to make the downloading and transforming into their own dags. e.g. to do this for downloading -
def get_downloads_task_group(): with TaskGroup("downloads_task_group") as group: download_a = BashOperator( task_id="download_a", bash_command="downloading file a; sleep 3;" ) download_b = BashOperator( task_id="download_b", bash_command="downloading file b; sleep 3;" ) download_c = BashOperator( task_id="download_c", bash_command="downloading file c; sleep 3;" ) return group - the main dag just has to import and use it. note - i placed the above function inside the file taskgroups_example/downloads_task_group.py, similarly for the transform variant. so, i imported it in the main dag as follows
from taskgroups_example.downloads_task_group import get_downloads_task_group from taskgroups_example.transforms_task_group import get_transforms_task_group # ... downloads_task_group = get_downloads_task_group() processing = BashOperator( task_id="processing", bash_command="processing file; sleep 3;" ) transforms_task_group = get_transforms_task_group() downloads_task_group >> processing >> transforms_task_group - now, the entire thing can be for e.g. collapsed like an accordion in the dag
![]()
- we can also nest task groups inside one another
Branching
- we can use the “branch python operator” for branching
- the python function has to return the list of task ids to run next
- notice how we define the dependencies - all tasks that the branch task can return have an edge from it
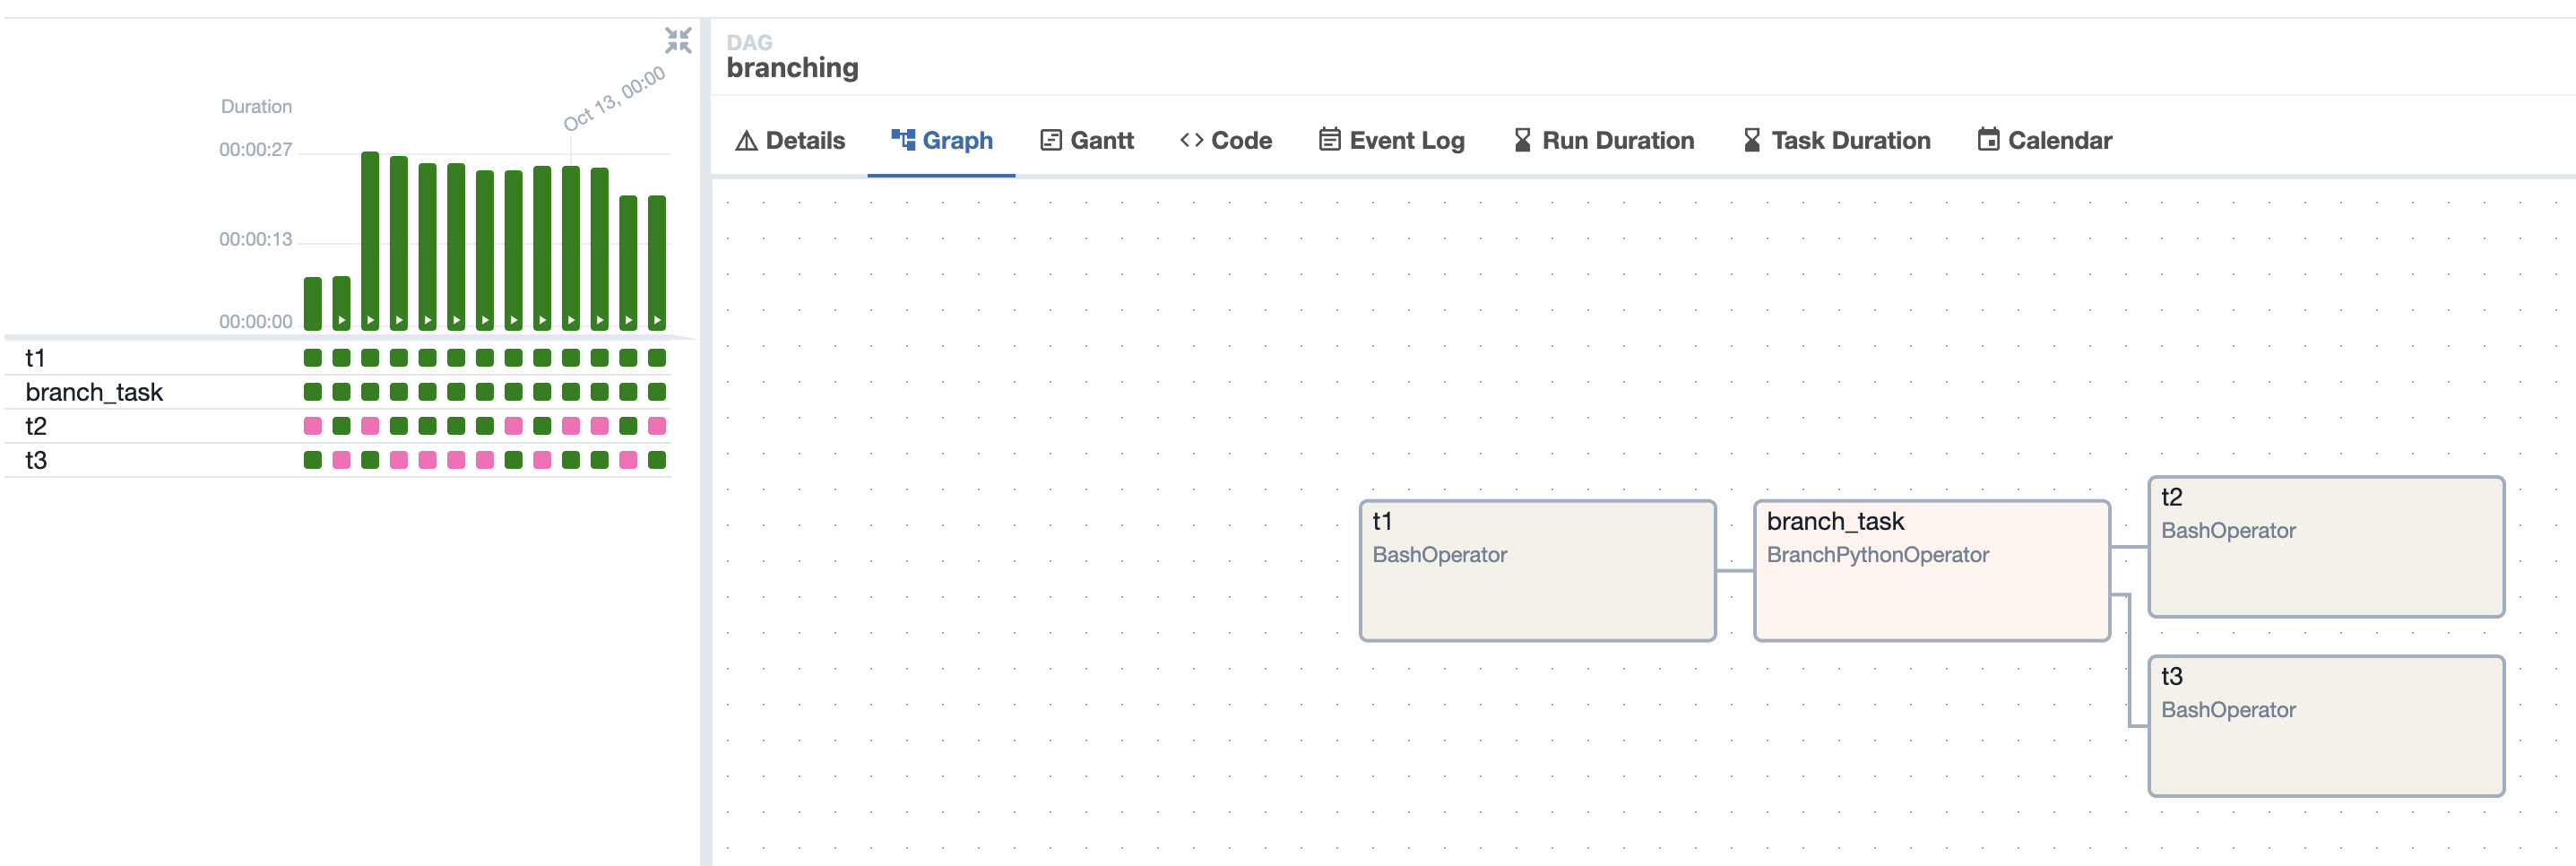
with DAG("branching", schedule="@daily", start_date=datetime(2024, 1, 1), catchup=False) as dag: t1 = BashOperator(task_id="t1", bash_command="sleep 3") branch_task = BranchPythonOperator(task_id="branch_task", python_callable=lambda: f"t{random.randint(2, 3)}") t2 = BashOperator(task_id="t2", bash_command="sleep 3") t3 = BashOperator(task_id="t3", bash_command="sleep 3") t1 >> branch_task >> [t2, t3] - look at the dag runs, skipped tasks are in pink -
![]()
- note - since it receives a python callable, it can effectively pull values from “xcom” using “ti” to make its decisions, not shown here
- remember that all downstream tasks of skipped tasks are skipped as well
- assume that a task is dependent on 3 tasks. even if one of them is skipped, this task would be skipped as well
- this is the default behavior, i.e. all the upstream tasks should succeed. it is called
all_success - however, we can modify this behavior using “trigger rules”
- e.g. assume we have a set of download tasks. we can trigger an alerting pipeline even if one of them fail using
one_failed - one example of using branch python operator - assume we have a dag scheduled to run daily. however, there are some very specific holidays when we do not want to run the dag. we can have the branch python operator as the first task in this dag. it performs some calculations, e.g. fetches the list holidays from a file / database, calculates if the date is a holiday and if yes, it returns an empty task list. if not, it returns the list of next task ids in line
- “branch sql operator” - we run an sql statement. it needs to return one of the values as mentioned in the docs -
- boolean
- integer - false if 0 is returned, true otherwise
- string - true, yes, y, etc (refer documentation link above for the exhaustive list)
- based on the value returned from the sql, one of the paths are executed -
choose_task = BranchSQLOperator( task_id="choose_task", sql="select count(*) from partners where status = 'true'", follow_task_ids_if_true=["success_task"], follow_task_ids_if_false=["failure_task"], conn_id="postgres" ) - note - these sql related operators allow an additional argument called “parameters” which allow us to parameterize our sql statements. these are templated as well, which allow us to make our statements more dynamic. finally, i guess they should also prevent “sql injections” for us
- “branch date time operator” - docs. we provide the lower and upper bounds, and based on whether the date falls in this time range, the
follow_task_ids_if_trueorfollow_task_ids_if_falseis executed. e.g. we can conditionally run different paths based on whether the time is between 10 and 11 am - note, my understanding - by default,
use_task_logical_dateis set to false, i.e. the current date and time is checked. we can set it to true, so that the dag run’s “logical date” gets used - “latest only operator” - e.g. we have a dag that does some stuff and at the end, dispatches an email containing the summary
- if we are backfilling this dag for 2 years. we would not want to bombard the users with so many emails
- solution - we can use the latest only operator. it will only continue the dag for the latest run
with DAG("latest_only", schedule="@daily", start_date=datetime(2024, 12, 1), catchup=True): task_a = DummyOperator(task_id="task_a") task_b = DummyOperator(task_id="task_b") task_c = LatestOnlyOperator(task_id="task_c") task_d = DummyOperator(task_id="task_d") task_a >> task_b >> task_c >> task_d![]()

Customization
- we can add our own “operators” / customize existing operators
- modify or add “views” to the airflow ui
- create your own “hooks” - recall that hooks help in abstracting away the complexity of interacting with an external system
- we do these customizations using the airflow’s “plugin” system
- we then call it like regular python modules
- e.g. assume airflow has no support for elasticsearch. first, inside the plugins folder, create a file called hooks/elastic/elastic_hook.py as follows -
class ElasticHook(BaseHook): def __init__(self, connection_id, *args, **kwargs): super().__init__(*args, **kwargs) connection = self.get_connection(connection_id) self.es = Elasticsearch([f"{connection.host}:{connection.port}"]) def info(self): return self.es.info() def add_doc(self, index, doc_type, doc): return self.es.index(index=index, doc_type=doc_type, doc=doc) - the plugin receives a connection id because this way, the clients can create their own simple http connection in airflow, and pass the connection id. the host and port are extracted from it and used to initialize the elasticsearch client. note - i used the container id directly for the host since i created the elasticsearch container on the same network as the airflow stack
![]()
- this hook then can have multiple methods used to interact with elasticsearch, which the clients can use
- then, we need to register the above. we do it as follows in the same file at the end -
class AirflowElasticPlugin(AirflowPlugin): name = 'AirflowElasticPlugin' hooks = [ElasticHook] - if we enter the scheduler container and run
airflow pluginsnow, we see the following -![]()
- finally, our dag can now use this hook easily as follows -
from hooks.elastic.elastic_hook import ElasticHook

def _es_info():
  elastic_hook = ElasticHook(connection_id='elasticsearch')
  print(elastic_hook.info())

with DAG("custom_hook", schedule="@daily", catchup=False, start_date=datetime(2023, 1, 1)) as dag:
  es_info = PythonOperator(
    task_id="es_info",
    python_callable=_es_info
  )


Docker Operator
- normally, we would need to have all the right dependencies and compatible versions with each other on all the worker nodes, so that our tasks can use them. this can result in “dependency hell”
- also, we would have to learn the apis of the different operators, which may not be intuitive
- so, we can use the “docker operator” instead
- additionally, we can easily test our task by spinning up the container locally as well
- now, our worker needs to interact with / make calls to the docker daemon
first, i mounted the docker.sock file to the volumes section in
x-airflow-common. this section gets used in all airflow related containers, if i install airflow using these instructions -- /var/run/docker.sock:/opt/airflow/docker.sock- for some reason, the docker operator was unable to pull the image on my machine. i just pulled it manually using
docker image pull python:3.9.17-slim-busterfor now - the final dag looks like this - notice how we need to provide the path to the socket file using
docker_url-@dag(start_date=datetime(2022, 1, 1), schedule="@daily", catchup=False) def docker_operator_example(): @task() def _t1(): pass t2 = DockerOperator( task_id="t2", image="python:3.9.17-slim-buster", command="python3 --version", docker_url="unix://var/run/docker.sock" ) _t1() >> t2 dag = docker_operator_example() - all arguments like cpu, memory, volume mounts, network mode, etc that we can expect to pass to a normal docker container, can be passed here as well
XCom
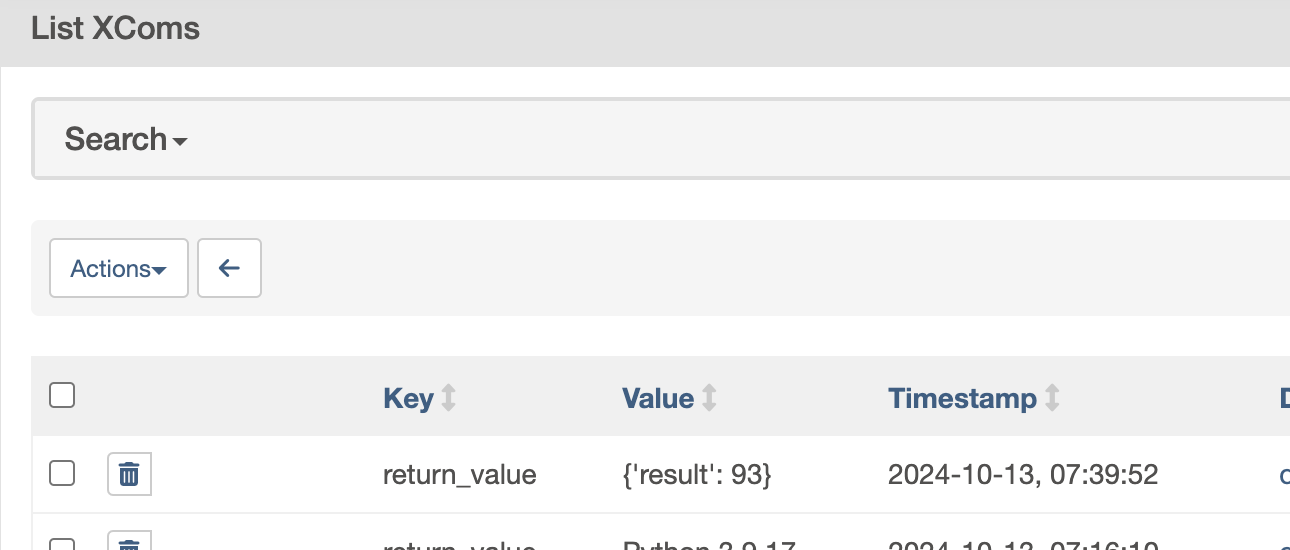
- now, we can also extract output from the docker container and put it into the “xcom” using
retrieve_outputandretrieve_output_path - lets assume we build an image called docker-operator-example to achieve this - notice how we use the “pickle” library to achieve this
import pickle with open("/tmp/app.out", "wb") as file: pickle.dump({ "result": 93 }, file) - dockerfile -
FROM python:3.9.17-slim-buster COPY app.py app.py CMD [ "sh", "-c", "python app.py" ] - and finally, the dag
from airflow.decorators import dag, task from datetime import datetime from airflow.providers.docker.operators.docker import DockerOperator @dag(start_date=datetime(2022, 1, 1), schedule="@daily", catchup=False) def docker_operator_example(): @task() def _t1(): pass t2 = DockerOperator( task_id="t2", image="docker-operator-example", docker_url="unix://opt/airflow/docker.sock", retrieve_output=True, retrieve_output_path="/tmp/app.out" ) _t1() >> t2 dag = docker_operator_example() - the xcom ui now -
![]()
Why Use Kubernetes Executor
- “celery executor” allows us to easily add workers as needed
- extra infrastructure like a queue for queueing up the tasks, celery related infrastructure like flower for monitoring, etc
- we need to ensure that the worker is bootstrapped with the right set of dependencies
- wasting resources - the workers sit idle in absence of tasks
- using “kubernetes executor”, we run one task in one pod. this way, even if a crash happens, only that pod is impacted, and it can be restarted
- this also allows us more fine grained control in terms of resources and memory at the task level
- the dags can be added to the pod in one of three ways -
- init containers
- volumes
- baked into the image itself
Kubernetes Pod Operator
- “kubernetes pod operator” - run a pod in a kubernetes cluster as part of a dag task
- if we use both kubernetes pod operators and “kubernetes executor” - first, a separate pod would be created for executing the task, and then this pod would spawn yet another pod for the kubernetes pod operator
- advantage - the task pod acts like a watcher or for workflow management, while the pod for pod operator performs the actual work. its image can be tweaked based on needs with the right dependencies and its versions, and it need not use the image used by the executors (prevent dependency hell)
- note - pods created by kubernetes executor have visibility into the airflow environment - like variables, connections, etc. pods created by kubernetes executor do not have access to these, so they can be forwarded these information using techniques like templating etc
- we can interact with the “kubernetes model api” to mount “config maps”, “secrets”, etc on pods, set “environment variables” on pod, etc and so on
volume = k8s.V1Volume( name="test-volume", persistent_volume_claim=k8s.V1PersistentVolumeClaimVolumeSource(claim_name="test-volume"), ) init_container_volume_mounts = [ k8s.V1VolumeMount(mount_path="/etc/foo", name="test-volume", sub_path=None, read_only=True) ] init_container = k8s.V1Container( name="init-container", image="ubuntu:16.04", volume_mounts=init_container_volume_mounts, command=["bash", "-cx"], args=["echo 10"], ) - steps to work with kubernetes pod operator setup on my local
- first, i copied the kube-config file as follows to where the compose file is -
cp ~/.kube/config kube-config - then, for docker-desktop, change the server as follows -
server: https://kubernetes.docker.internal:6443 then, i added the following volume to the
x-airflow-commonsection -- ./kube-config/:/home/airflow/.kube/config- creating pod operators should work now -
KubernetesPodOperator(
    image="hello-world",
    name="airflow-test-pod",
    task_id="task-one",
    get_logs=True,
)
- first, i copied the kube-config file as follows to where the compose file is -
Templating and Macros
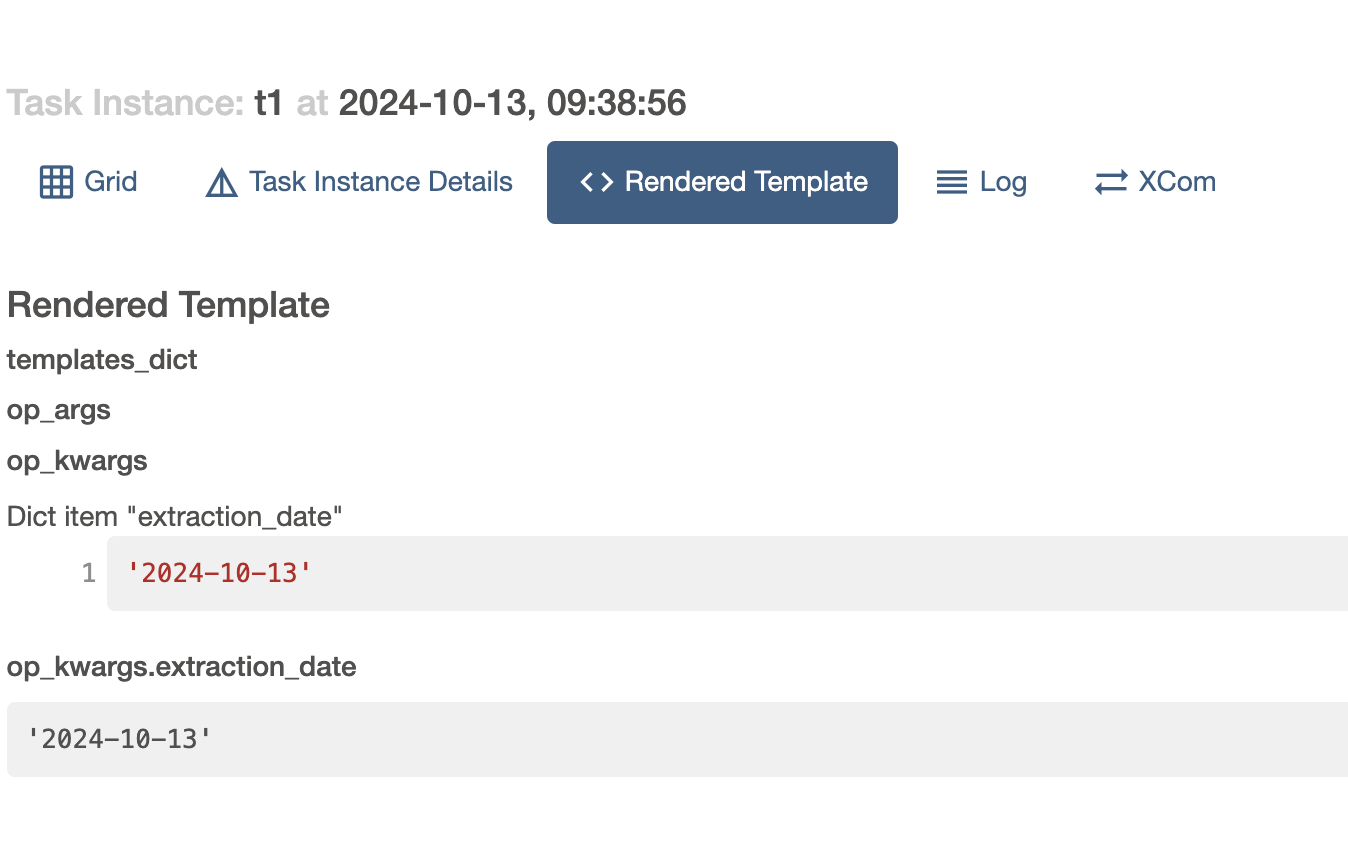
- assume we would like to extract data from directories, which is named using dates
![]()
- shortcoming of the solution below - we cannot for e.g. rerun it for a specific date if we want to
def process(extraction_date): print(f"executing for {extraction_date}") with DAG("template_example", start_date=datetime(2023, 1, 1), schedule="@daily", catchup=False) as dag: t1 = PythonOperator( task_id="t1", python_callable=process, op_kwargs={ "extraction_date": date.today() } ) - “templates” - allow us to inject “dag run” and “task instance” metadata into tasks
t1 = PythonOperator( task_id="t1", python_callable=process, op_kwargs={ "extraction_date": "(( ds ))" } ) t2 = BashOperator( task_id="t2", bash_command="echo executing for (( ds ))" ) - not all arguments in operators support templating. the documentation will mention things like “templated” for arguments that do
- we can look at the code too - every operator mentions whether or not they can be templated
- “template fields” - which operator parameters can use templated values
- “template ext” - which file extensions can use templated values
class BashOperator(BaseOperator): template_fields = ('bash_command', 'env') template_ext = ('.sh', '.bash') # ... - so, we can make an argument that is not templatable, templatable, by sub classing and then overriding it -
class CustomBashOperator(BashOperator): template_fields = ('bash_command', 'env', 'my_other_parameter') template_ext = ('.sh', '.bash') # ... - the ui shows the rendered templates too, available in the rendered template section of the task details screen -
![]()
- now, using “macros”, we can modify the output of these “variables” as well -
(( macros.ds_format(ds, '%Y-%m-%d', '%Y/%m/%d') )) - another example of macros, to use data inside xcom as a parameter -
task_2 = PythonOperator(
    task_id="task_2",
    python_callable=callable_2,
    op_kwargs={
      "file_name": "(( ti.xcom_pull(task_ids=['task_1'])[0] ))"
    }
)

Variables
- “variables” - allow us to store and retrieve data at runtime without exposing them inside the code
- we can create a variable using a “key”, “value” and optionally, a “description” of what the variable is about. go to admin -> variables in the ui
- we can also set airflow variables via the environment. my understanding - unlike above, they are not stored in the meta database. remember to set it on all the worker nodes
AIRFLOW_VAR_MY_VAR='{"key": "value"}' - setting it via environment variables can also improve performance (discussed few points later)
- note - for handling secrets, variables in airflow can also integrate with “secret backends” like aws secrets manager, aws ssm parameter store, google cloud secrets manager, and hashicorp vault
- we can fetch the variable anywhere in our dag code as follows -
from airflow.models import Variable # ... my_var = Variable.get("my_var", default_var="default_value") - if the value is a json, we can pass
deserialize_jsonas true toVariable.get. this way, the value returned is converted to a python dictionary i believe - order of resolution for variables in airflow -
- secrets backend
- environment variable - this option does not involve a network request
- meta database
- now, two of the above options involve network requests. this can cause performance problems
- additionally, the dags are parsed every 30s by airflow (this is what helps reflect our changes?). this means if we use
Variable.getoutside a task, it might cause further issues with performance. this is why we can cache the variables. note - this caches variables only when parsing dagsAIRFLOW__SECRETS__USE_CACHE=True AIRFLOW__SECRETS__CACHE_TTL_SECONDS=900 - now, we can also use it in templating as follows -
(( var.json.my_var.my_key )) - to hide values of variables from ui or logs, we use the parameter
hide_sensitive_var_conn_fields(it is set to true by default). this masks all airflow variables containing names like secret etc (full list here) - we can however add to this list using
sensitive_var_conn_names
Dynamic Tasks
- normal flow - airflow parses every 5 minutes for new dag files / every couple of seconds for changes in existing dag files. this then reflects in the airflow ui
- “dynamically mapped tasks” - “mapped task instances” are decided dynamically at runtime
- we can have files in s3, some records in a table, etc, and we want to decide the number of instances based on it
- advantage - we now have observability - what “mapped instances” failed, which ones need retrying, etc
- allows for filtering as well - e.g. skip files in s3 with certain prefix
- the idea is that now, we pass the non-changing parameters via
partialand dynamic parameters viaexpand - note - we can use the output of an upstream task to map over as well
- we can map over multiple parameters, but some parameters e.g.
task_idof the “base operator” cannot be mapped over - limit is 1024 by default -
max_map_length - we can map over lists or dictionaries
- example -
def _sum(x, y): print(f"{x} + {y} = {x + y}") return x + y with DAG("dynamic_tasks_example_1", schedule="@daily", catchup=False, start_date=datetime(2023, 1, 1)): PythonOperator.partial( task_id="dynamic_task", python_callable=_sum, op_kwargs={"y": 19} ).expand(op_args=[[1], [2], [3]]) - “expand” - only accepts keyword arguments. then, it would perform a cross product between all of these. e.g. we would get 6 mapped task instances below -
BashOperator.partial( task_id="expand" ).expand( bash_command=[ "echo hello $name", "echo namaste $name" ], env=[ { "name": "shameek" }, { "name": "priyanshu" }, { "name": "vivek" }, ] )![]()
- “expand_kwargs” - only accepts list of dictionaries. e.g. we would get 3 mapped task instances when using below -
BashOperator.partial( task_id="expand_kwargs" ).expand_kwargs([ { "bash_command" : "echo hello $name", "env": { "name": "shameek" } }, { "bash_command" : "echo hello $name", "env": { "name": "priyanshu" } }, { "bash_command" : "echo hello $name", "env": { "name": "vivek" } } ])![]()
- apparently, we can skip the partial call altogether if we do not have any static arguments for the operator
- “map” - slightly transform the outputs (e.g. change relative to absolute paths), skip some elements (e.g. skip paths with log in suffix), etc


Base Operator Concepts
- do not do multiple things in a single task - e.g. if we bundle extracting and processing data into the same python code run via the same python operator
- on failure of the processing of data, if we retry, we will end up retrying both things
- we should split them into separate python operators, so that only processing of data is retried on failure
- recall the three types of operators - “action”, “transfer” and “sensor”
- also, recall how our tasks should be “idempotent” so that we can easily retry the tasks etc
- all operators inherit from the “base operator” class
- the
executemethod of operator is what gets called when an operator gets executed - other methods -
pre_execute- called before execute. useful for establishing db connections etcpost_execute- called “right after” callingexecute- note it does not wait for the task to complete (i.e. the execute method to finish?)on_kill- if the task is killed, we can perform some cleanup hererun- my understanding - an alternative toexecute, with access tocontext. recall that context will have access to parameters like the dag execution date etc
- “task id” - should be unique across all the tasks in the same dag
- assume our dag has three tasks - task a, task b and task c. we have had some successful executions. later, assume we delete task b. this means that the ui will stop showing this task. additionally, we would not be able to see its past logs etc in the ui anymore as well. so, the solution is to “version” dags manually. instead of modifying such changes in the original dag directly, copy it into a new file, and append for e.g. v2 to the dag and file name. this way, we do not loose the history in the ui as well
- we can specify the parameter “owner” both at dag and task level. the owner of the dag is a “union” of the owners specified at the task level. this can help with debugging in multiple places, e.g. browse -> audit logs will show us “events” in airflow - triggering of a task, success of a task, etc, and the owner of that event
- “start date” - assume the start date is 1st of january, 2021 and the schedule is
@daily- the first dag run is triggered after start date + schedule i.e. at 2nd january 2021, and the execution date for it is set as 1st january 2021
- the second dag run is triggered on 3rd, with the execution date set to 2nd
- and so on…
- this is why, even if i set the catchup parameter to false, e.g. i am on the 20th of october, on enabling the dag, the dag will automatically run for the 19th of october
- dynamic start date - if we set the start date to
datetime.now(), our dag is never triggered, because our start date keeps moving forward as well - however, we can get some amount of dynamic nature by using
days_agofrom airflow.utils.dates import days_ago with DAG("base_operator_example", catchup=False, start_date=days_ago(3), schedule="@daily"): - however, avoid this, and try using the static date when possible
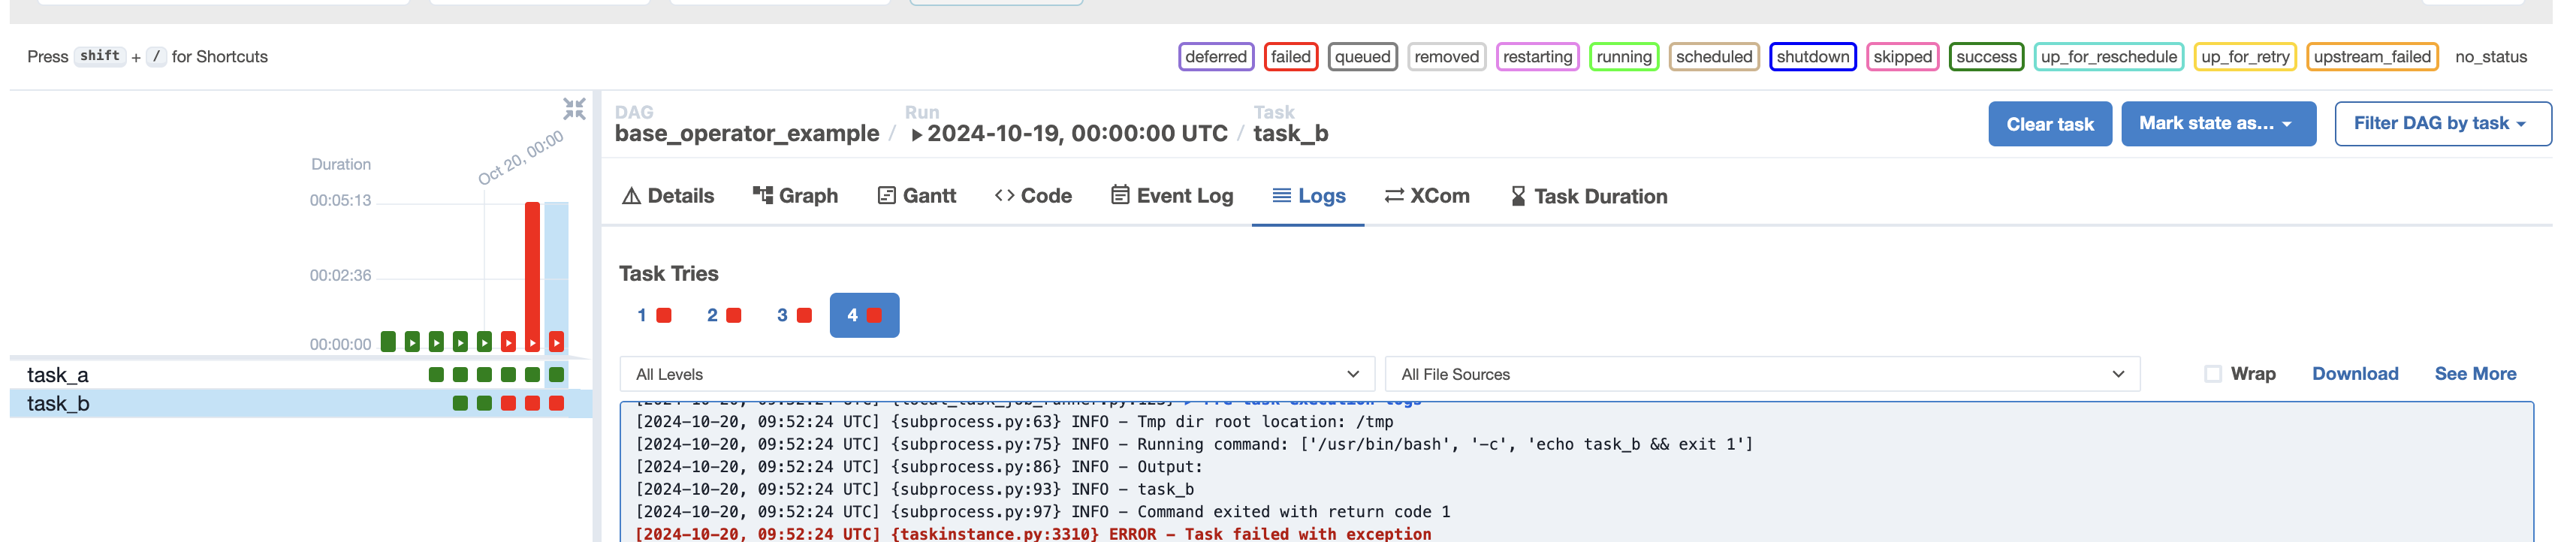
- we can configure “retries” on a task level
- e.g. of failing task -
task_b = BashOperator( task_id="task_b", bash_command="echo task_b && exit 1" ) - we can use “retries” - this comes from “base operator”, so it can be applied everywhere. we can also specify a
retry_delay, which defaults to 5 minutestask_b = BashOperator( task_id="task_b", bash_command="echo task_b && exit 1", retries=3, retry_delay=timedelta(seconds=10) ) - this is how the ui shows up now -
![]()
- additionally, we can also specify
retry_exponential_backoffas true. this is useful in case our task is making api calls etc, as our server might be down at the moment or experiencing huge amounts of load - in the code, we can also use templating to get the “current try number” as follows -
task_b = BashOperator( task_id="task_b", bash_command="echo (( ti.try_number )) && exit 1", retries=3, retry_delay=timedelta(seconds=10), retry_exponential_backoff=True ) - if we set “depends on past” for a task to true, the task will run only if its instance in the previous dag was successful or was skipped. otherwise, it would be just marked failed automatically. this basically helps us create a dependency between the dag runs
task_b = BashOperator( task_id="task_b", bash_command="echo hello && exit 1", depends_on_past=True ) - if “wait for downstream” is set to true, “depends on past” is automatically set to true. now, the task instance will not only wait for its task in previous dag run to have succeeded or skipped, but also the direct downstream tasks in the previous run to have succeeded or skipped. assume the following dependency - task a » task b » task c. if we pass “wait for downstream” as true for task a, it would wait for only task a and task b in the previous run to have succeeded, not task c
- e.g. use cases for these parameters - we have a pipeline like this - read -> write. we only want to read in the next dag run once write of the previous dag run has been completed successfully
- “pool” - allows us to limit the concurrency for a set of tasks
- by default, we can run 32 tasks at a time. but what if some tasks are really resource intensive?
- we can go to admin -> pools to view the pools. by default, we only see the
default_poolwith 128 worker slots - basically, each time a task executes, it consumes one of these slots
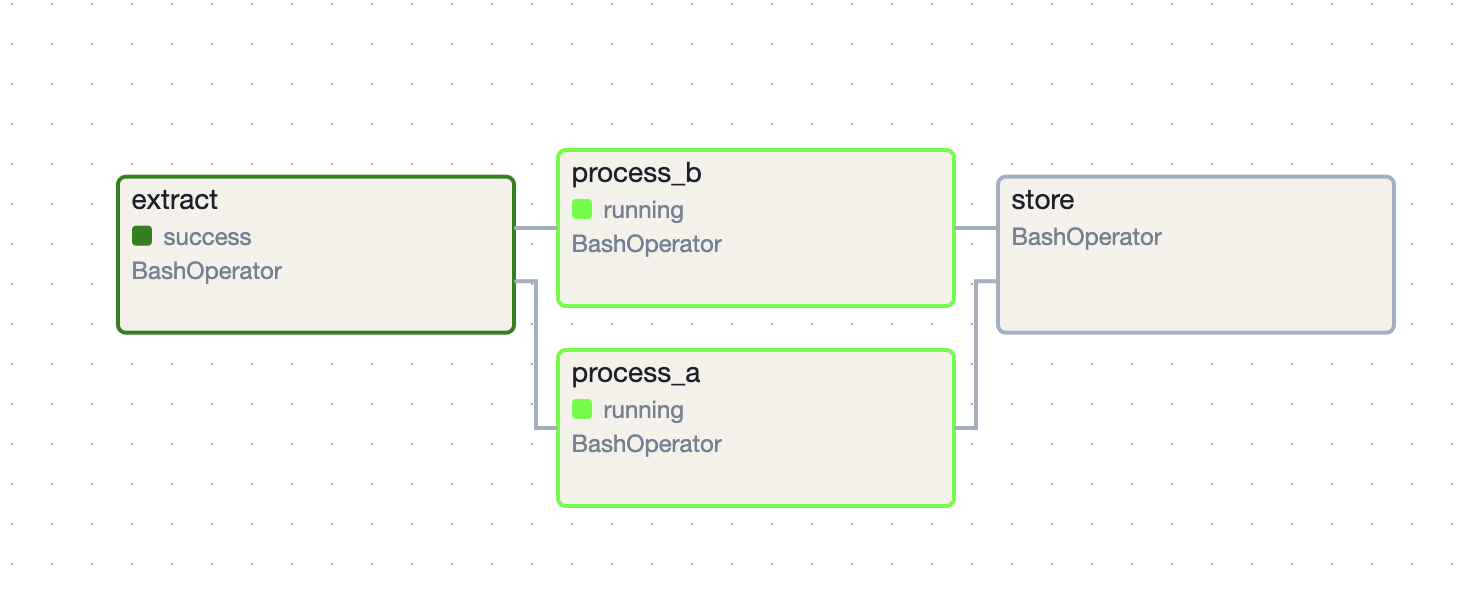
- so, the default behavior is as follows -
extract = BashOperator(task_id="extract", bash_command="echo extracting") process_a = BashOperator(task_id="process_a", bash_command="echo processing a; sleep 10") process_b = BashOperator(task_id="process_b", bash_command="echo processing b; sleep 10") store = BashOperator(task_id="store", bash_command="echo storing") extract >> [process_a, process_b] >> store![]()
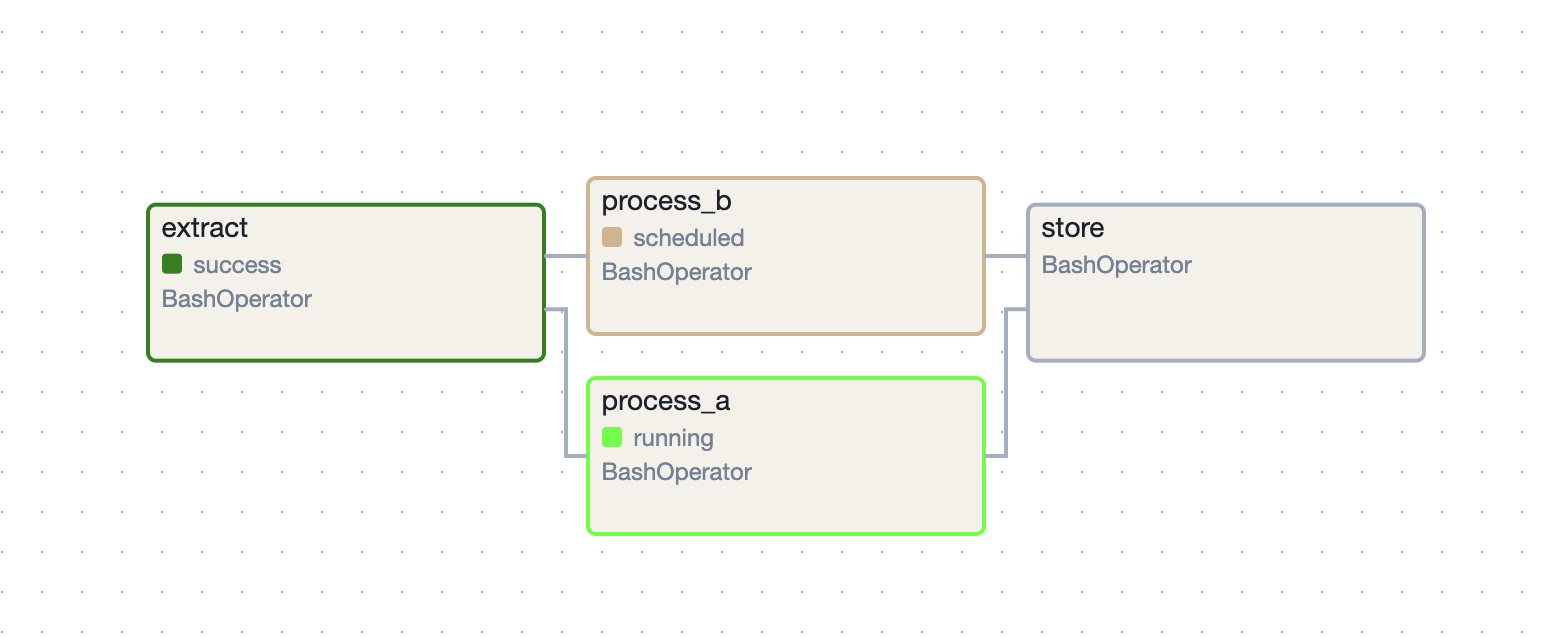
- so, i add a new pool called “processing” with just 1 slot, so that only one task using this pool can run at a time
![]()
- i add the pool to use to the processing tasks -
process_a = BashOperator(task_id="process_a", bash_command="echo processing a; sleep 10", pool="processing") process_b = BashOperator(task_id="process_b", bash_command="echo processing b; sleep 10", pool="processing") - now, only process a is executing first -
![]()
- “task priority” - certain tasks can be executed before the others
priority_weight- the higher the weight, the higher the priority. defaults to 1- note - priority will still respect the dependencies i.e. a downstream task with higher priority will not be executed before an upstream task
- also, priority only applies when tasks belong to the same “pool”, not across pools
- my understanding - let us say we have a pool with only 1 slot, and our dag only has two tasks, with no dependencies. this is when we see the priority kick into the picture - the task with higher priority will get the only available pool slot
- finally, there is another parameter -
weight_rule, which can be one of the three- “absolute” - priority is the same as the priority_weight assigned
- “upstream” - priority is the sum of priority_weight assigned to upstream tasks and itself
- “downstream” - priority is the sum of priority_weight assigned to downstream tasks and itself
- the diagram below tells us the weights that get used based on the given
weight_ruledefaultpriority_weightof 1![]()
- “trigger rules” - only verify the “direct upstream” tasks for a given task (not grand parent tasks). find the different trigger rules here
- “sla” or “service level agreement” - be warned if a task takes longer than expected
- set
check_slasto true inside airflow.cfg - we can be warned either by receiving an email, or by triggering a python callback
- note - sla does not check the time a task takes to run, but it checks the time elapsed since the
execution_dateof the dag. so, if a task has sla set to 3 minutes, and the schedule of the dag is daily, the task should have finished running by 12:03am?
- set
- why we need “timeouts” - assume a task gets stuck for some reason. it will occupy a slot of the pool. multiple such tasks would end up holding multiple slots, and thus, there would be no slots left for any of the other tasks. we just need to specify the “execution_timeout” parameter for this. unlike “slas” where we are warned, the task is instead failed in this case
- we can add different “callbacks” like “on_success_callback”, “on_failure_callback”, “on_retry_callback”, etc to the tasks (or even a dag directly) in airflow. documentation
- these callbacks receive the “context” object, with information related to the dag and task populated inside it, e.g. “on_failure_callback” receives the exception and so on


Cross Downstream and Chain
- they help build complex dag dependencies
- e.g. imagine we have the dag below -
![]()
- option 1 - we can define the dependencies as below -
t1 >> t4 t1 >> t5 t1 >> t6 t2 >> t4 t2 >> t5 t2 >> t6 t3 >> t4 t3 >> t5 t4 >> t6 - option 2 - using
cross_downstreamcross_downstream([t1, t2, t3], [t4, t5, t6]) - e.g. imagine we have the dag below -
![]()
- option 1 - using chain -
t1 >> [t2, t3] t2 >> t4 t3 >> t5 [t4, t5] >> t6 - option 2 - using
cross_downstreamchain(t1, [t2, t3], [t4, t5], t6)


Custom Docker Image
- “providers” - “providers” package is separated from the “apache core” package
- now, we can selectively install what we want
- e.g. to interact with aws, we need to install the aws provider
- available providers link
- step 1 - add requirements.txt -
apache-airflow-providers-dbt-cloud[http]=3.11.2 - step 2 - use a custom Dockerfile -
FROM apache/airflow:2.10.2 COPY requirements.txt . RUN pip install -r requirements.txt - step 3 - e.g. change the docker compose file on local to point to this custom docker image -
# image: ${AIRFLOW_IMAGE_NAME:-apache/airflow:2.10.2}
build: .
Python Operator
- python operator example -
with DAG("example_dag", catchup=False, start_date=datetime(2024, 1, 1)): task_a = PythonOperator( task_id="task_a", python_callable=_task_a ) - running the operator -
docker container exec -it airflow-instance-airflow-scheduler-1 /bin/bash airflow tasks test example_dag task_a 2024-01-01 - passing arguments using op_args (the order or arguments matters here) -
def _task_a(path, file_name): print(f"reading {path}/{file_name}") task_a = PythonOperator( task_id="task_a", python_callable=_task_a, op_args=["s3://bucket/data", "file.csv"] ) - passing arguments using op_kwargs -
task_b = PythonOperator( task_id="task_b", python_callable=_task_a, op_kwargs={ "file_name": "file.csv", "path": "s3://bucket/data" } ) - to fetch the arguments from variables, create variables inside airflow -
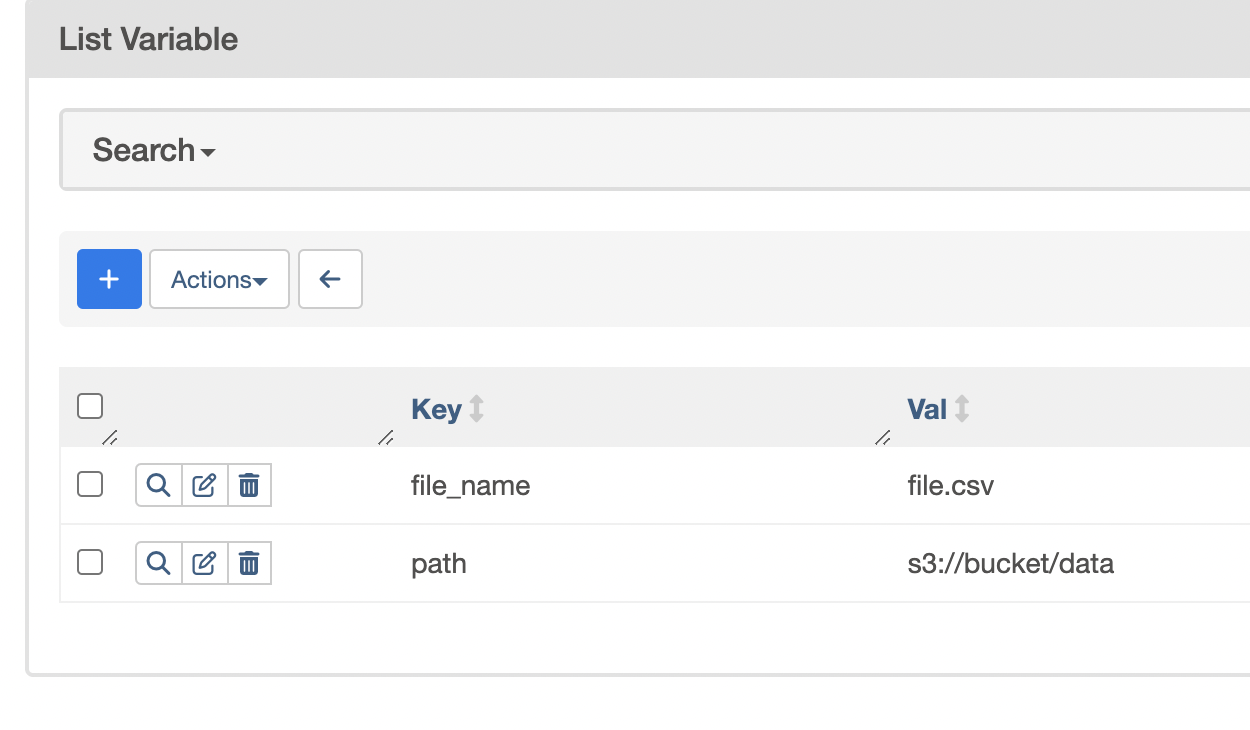
![]()
- then, use them inside the dag like so -
task_b = PythonOperator( task_id="task_b", python_callable=_task_a, op_kwargs={ "file_name": "(( var.value.file_name ))", "path": "(( var.value.path ))" } ) - issue - using the method above, we are making two connections to the meta database, because of the two different variables
- solution - we can also store variables using json format, and reference individual properties of it -
![]()
- we can then reference it inside the task like so -
task_b = PythonOperator( task_id="task_b", python_callable=_task_a, op_kwargs={ "file_name": Variable.get("settings", deserialize_json=True)["file_name"], "path": Variable.get("settings", deserialize_json=True)["path"] } ) - finally, we can access the context information in two ways -
- using keyword arguments -
def _task_a(path, file_name, **context): pass - using the name of the key inside context directly -
def _task_a(path, file_name, ds):
  pass
- using keyword arguments -
- “task flow api” - define tasks using decorators
- task id becomes the function name now -
@task def task_a(path, file_name): print(f"reading {path}/{file_name}") with DAG("example_dag", catchup=False, start_date=datetime(2024, 1, 1)): task_a( Variable.get("settings", deserialize_json=True)["path"], Variable.get("settings", deserialize_json=True)["file_name"], ) - however, how we access context inside the callable changes now -
from airflow.operators.python import PythonOperator, get_current_context


@task
def task_a(path, file_name):
  context = get_current_context()
  # ...

Dag Dependencies
- “trigger dag run operator” - trigger a dag from another dag
- we can send configuration for the downstream dag using “conf”
- we can set the “logical date” of the dag being triggered to the same date as the parent dag
- we can also specify the “reset dag run” parameter. it is false by default. i remember seeing this in the airflow backfill command as well. it clears the past dag run if it already exists
- by specifying “wait for completion”, the parent dag will wait for this child dag to be complete
- while this operator is not a sensor (recall operators can be “action”, “transfer” or “sensor”), it allows us to define a custom “poke interval” as well, which defaults to 60. why we should consider setting this parameter - e.g. no point of polling every 60 seconds, if we already know that the dag takes 30 minutes to finish executing
- e.g. notice how the schedule interval for the child dag has been set to
None-with DAG("parent_dag", catchup=False, start_date=datetime(2024, 1, 1), schedule="@daily"): TriggerDagRunOperator( task_id="external_dag", trigger_dag_id="child_dag", conf={ "path": "/some/path/here" }, execution_date="", reset_dag_run=True, wait_for_completion=True, poke_interval=120 ) with DAG("child_dag", catchup=False, start_date=datetime(2024, 1, 1), schedule=None): PythonOperator( task_id="child_task", python_callable=lambda arg: print(f"from child_task, arg = {arg}"), op_kwargs={ "arg": "" } ) - assume we have two partner dags - partner dag a and partner dag b
- we want to run another processing dag after both these dags are complete
- solution - we can have two “external task sensors” in this processing dag, and both wait on the their respective partner dags to be complete
- it is a sensor, so i am guessing it must have the usual parameters like poke interval, timeout, etc that sensors have
- option 1 - we get the logical dates to align, i.e. the partner dags and the processing dag should all have the same schedule interval. this way, they will all have the logical dates aligned automatically
- option 2 - we specify the parameter “execution delta”. say partner dag a is scheduled to run every hour at the 10 minute mark, while the processing dag is scheduled to run every hour at the 15 minute mark. this is how our sensor would look -
ExternalTaskSensor( task_id="external_task_sensor", external_dag_id="partner_dag_a", external_task_id="stop", execution_delta=timedelta(minutes=5) ) - this way, we tell the external task sensor to look at the dag run 5 minutes before
- obvious limitation - the above still relies on the fact that both dags are scheduled on the same cadence, e.g. every hour, albeit at different times of the hour. this is why, we have another parameter, called
execution_date_fn, which can handle more such complex requirements by running a python function to perform the calculation