Getting Started
- mcp servers can be run locally, or they can be deployed in the cloud and managed by someone else
- local quickstart example - download this repo
- i went into the weather-server-python folder and ran
uv sync - next, to configure talking to this mcp server from inside my vscode, i added the following to .vscode/mcp.json -
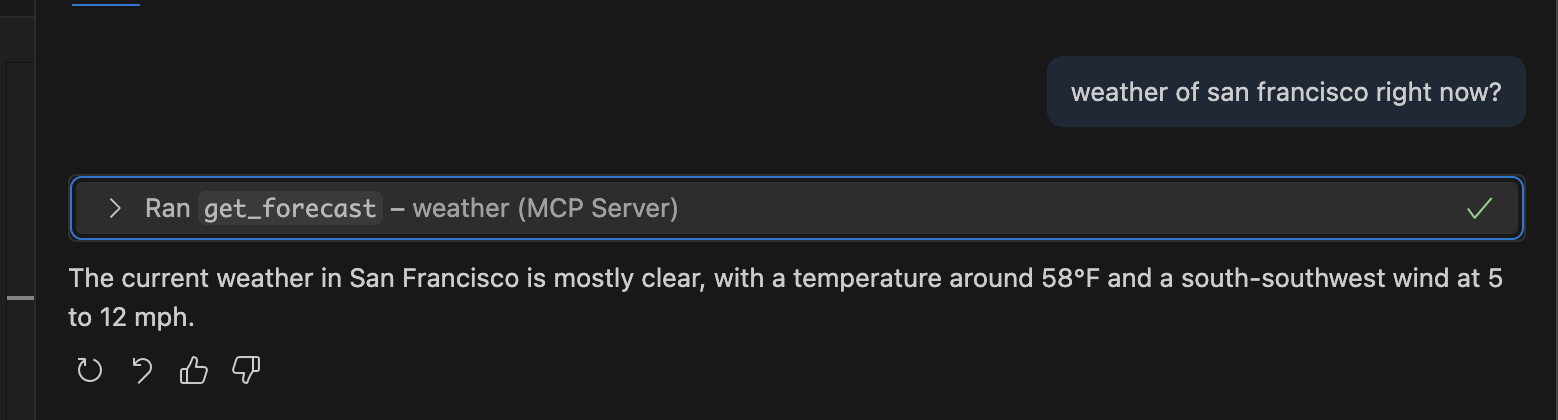
{ "servers": { "weather": { "command": "uv", "args": ["run", "python", "weather.py"], "env": {}, "cwd": "quickstart-resources/weather-server-python" } } } - now, i can interact with this mcp server in my vscode as follows -
![]()
- it asks for an “approval” before calling the mcp serer. this is because this is basically “rce” or “remote code execution”, and therefore has potential security concerns
- we first initialize the mcp server as follows -
mcp = FastMCP("weather") - the server is basically a lightweight program that exposes the various tools that can be used
- we decorate our functions with
@mcp.tool() - just like when using tools with llms, we need a good doc string for our functions, so that the llm knows how to use them effectively
- finally, we can run the server using
mcp.run(transport='stdio')- this means that all the communication between the mcp client and server would be via the standard input output channel
Architecture
- “mcp” or “model context protocol” - ensures easy interoperability between llms / agents and different external services like slack, gmail, different databases, etc
- “mcp host” - ai applications like claude desktop, ides like cursor or windsurf, an ai agent, etc
- these hosts are augmented with external services like slack, gmail, different databases, etc
- “mcp servers” - exposes the “resources”, “tools” and “prompts”. they are the proxy to the external services
- then, any mcp host can talk to the mcp server using the “mcp client” and “mcp protocol”
- “resources” - data that mcp clients can read. e.g. files, api responses, etc
- “tools” - functions that the llm calls
- “prompts” - pre written templates for specific tasks. it can have variables etc. feels similar to langchain hub prompts
- the “mcp server” can either be running on our local machine, or in remote machines
- when running in cloud, the server basically lives in the same machine as the client
- in this case, we basically provide the “mcp host” the details of how it can run the mcp server using the package manager like npm etc
- so, even on the same machine, if we have two mcp hosts, they will each have their own mcp server. so, there is a one to one connection between the “mcp client” and “mcp server”
- the transport in this case happens via the “stdio” or “standard input output” channel
- it is very unsecure, because it is basically rce (remote code execution)
- we can also run the mcp server in the cloud
- the transport mechanism in this case is via “streamable http”. note that “sse” was used earlier, but it has been deprecated
- in this case unlike in local, the same mcp server gets shared by thousands of clients
- one advantage - all the mcp hosts use the same version / code of the mcp server
- of course when getting started / for testing, the remote mcp server can be run locally i.e. on the same machine, so do not get confused
- for the different transport types, all we need to do is change the transport -
mcp.run(transport='http') - we can use the original low level implementation “server class” or the recommended abstraction “fast mcp” class or the “fast mcp 2.0”. we should try using the third one
MCP Working
- first, the ai application establishes a connection with the “mcp server” using the “mcp client”
- my understanding - this is 1:1 i.e. one mcp client per mcp server
- then, the mcp server responds to the client with the available “tools”, “resources” and “prompts”
- now, when a user sends a query to the ai application, it sends the query to the llm with the tools it got back
- now as usual, the llm can either craft a general response, or respond with a tool call
- if it is a tool call, the ai application calls the tool on the mcp server (handled via the mcp client)
- finally, the response of the tool is sent back to the llm
MCP Servers
- there are lots of mcp servers maintained by different companies and by community
- companies are now creating mcp servers of their own product as well, as it increases their usage
- “llms.txt” - fast growing standard as a website index for llms. e.g. llms.txt of langgraph can be found here. by querying for this file, the llms can for e.g. get the latest documentation for a website
- additionally, there is also a much more elaborate “llms-full.txt”. this has all the information, removing the need for additional navigation. however, llms would have to use techniques like rag to be able to use it, due to the huge amount of content in it
- find an example of using it via mcpdoc below
- we start the mcp server first. note - using the command below, we do not need to clone the repository, install the dependencies etc, because when using “uvx”, we are basically using a feature called “tools”. below, we are starting the mcp server as if its running remotely
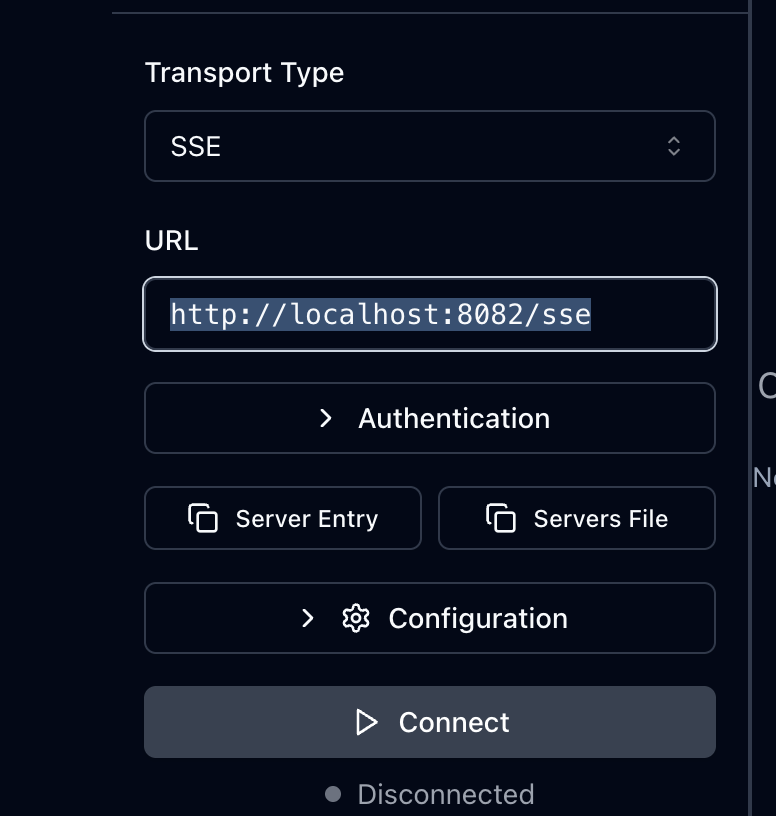
uvx --from mcpdoc mcpdoc \ --urls "LangGraph:https://langchain-ai.github.io/langgraph/llms.txt" "LangChain:https://python.langchain.com/llms.txt" \ --transport sse \ --port 8082 \ --host localhost - “mcp inspector” - for testing and debugging mcp servers. we can start it as follows -
npx @modelcontextprotocol/inspector - next, we connect to the mcpdoc mcp server as follows -
![]()
- to create an mcp server, we first create for e.g. a uv project and add the dependencies using
uv add "mcp[cli]" - this is how we can create a sample mcp server. the doc string is important, as it helps the llm decide whether the tool needs to be run
mcp = FastMCP("shell server") @mcp.tool() async def run_command(command: str) -> Dict[str, Any]: """ Run a shell command and return its output. Args: command (str): The shell command to run. Returns: Dict[str, Any]: A dictionary containing the command's output, error message and return code. """ try: result = await asyncio.create_subprocess_shell( command, stdout=asyncio.subprocess.PIPE, stderr=asyncio.subprocess.PIPE ) stdout, stderr = await result.communicate() return { "output": stdout.decode().strip(), "error": stderr.decode().strip() if stderr else None, "return_code": result.returncode } except Exception as e: return { "error": str(e), "return_code": -1 } - finally, this is how we initialize the server -
if __name__ == "__main__": mcp.run(transport="stdio") - finally, add it to claude desktop as follows. go to settings -> developer -> edit config to open the json file -
{ "mcpServers": { "shell_server": { "command": "/Users/sagarwal/.local/bin/uv", "args": [ "--directory", "/Users/sagarwal/Desktop/apps/mcp-eden-marco", "run", "shell_server.py" ] } } } - a “resource” can be exposed by the mcp server as follows. imagine we want to expose a readme file in the same folder. we simply use the
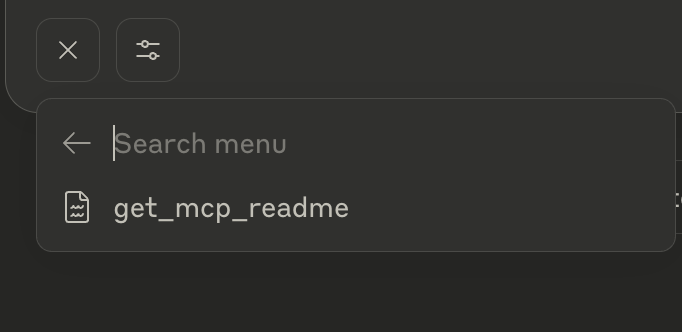
mcp.resourceheader in the readme, and the remaining code is just usual python code -@mcp.resource("file://mcp-readme") async def get_mcp_readme() -> str: """ Serve the MCP README file containing comprehensive documentation about the MCP Python SDK. Returns: str: The contents of the mcp_readme.md file. """ try: readme_path = os.path.join(os.path.dirname(__file__), "mcp_readme.md") with open(readme_path, "r", encoding="utf-8") as f: return f.read() except Exception as e: return f"Error reading mcp_readme.md: {str(e)}" - now, when we click on the
+resource in claude desktop, it allows us to add this readme file as context i believe to the chat![]()
Docker
- advantage - when we run our mcp server in a docker container, we get advantages like isolation - e.g. if a malicious activity like removing a file is performed, it stays within that container, and other benefits like consistency across environments, easy scaling, etc
- this is what my dockerfile looks like -
FROM ghcr.io/astral-sh/uv:python3.13-bookworm-slim ENV PYTHONUNBUFFERED=1 ENV PYTHONDONTWRITEBYTECODE=1 WORKDIR /app COPY . . RUN uv sync --frozen CMD ["uv", "run", "shell_server.py"] - this is what the mcp server registration for claude desktop looks like. notice the extra environment variable etc -
{
  "mcpServers": {
    "shell_server_docker": {
      "command": "docker",
      "args": [
        "container",
        "run",
        "-i",
        "-e",
        "DOCKER_CONTAINER=true",
        "mcp-eden-marco"
      ]
    }
  }
}
Langgraph and MCP
- ai applications are wrappers around an llm. llms can only output text / generate tokens
- so, e.g. if we want the weather - instead of hallucinating, it outputs that it needs to call a tool, using a specific format that we have to parse
- mcp helps us write those tools and wrap them in a server
- now, mcp needs to be supported by the ai applications
- mcp vs langchain - the notion of “tools” is similar in both. an mcp is basically a collection of tools, while we use
bind_toolsin langchain - difference - we typically attach mcp servers to the ai applications, but bind tools attaches it to the llm directly. however, in both cases at the end, we inject the tool description, input arguments and output return value to the llm
- the location of execution of the tools is also kind of different - in langgraph, it is within the application itself, while it is in the mcp server in case of mcp. this allows isolation, monitoring, scalability, etc of tools
- “langchain mcp adapter” - seamless integration of langchain with mcp
- we can add the dependency like this -
uv add langchain-mcp-adapters - we create an mcp server for stdio -
from mcp.server.fastmcp import FastMCP mcp = FastMCP("math server") @mcp.tool() async def add(x: int, y: int) -> int: return x + y @mcp.tool() async def mul(x: int, y: int) -> int: return x * y if __name__ == "__main__": mcp.run(transport="stdio") - we also create another mcp server for sse. only the transport changes, rest everything stays the same. my understanding - we also need to run this separately, e.g. using
uv run servers/weather.pyfrom mcp.server.fastmcp import FastMCP mcp = FastMCP("math server") @mcp.tool() async def get_weather() -> str: return "its always pleasant in bangalore" if __name__ == "__main__": mcp.run(transport="sse")![]()
- now, we write the client side code i.e. the langchain / langgraph code
StdioServerParametershelps us specify command and arguments for the stdio mcp server. on the other hand,stdio_clienti believe helps us spawn the mcp server process. usingClientSessionhelps us create the mcp client. remember - we need to create a new mcp client for every server connectionstdio_server_params = StdioServerParameters( command="uv", args=[ "run", "/Users/sagarwal/Desktop/apps/mcp-eden-marco/servers/math_server.py" ] ) async def main(): async with stdio_client(stdio_server_params) as (read, write): async with ClientSession(read_stream=read, write_stream=write) as session: await session.initialize() # ... continue code here ... if __name__ == "__main__": asyncio.run(main())- we can list the tools that the mcp server exposes -
mcp_tools = await session.list_tools() - however, for the langchain version of these tools, we use the
load_mcp_toolsand finally, we use the “prebuilt reach agent” graph (note - remember this prebuilt graph)langchain_tools = await load_mcp_tools(session) agent = create_react_agent(llm, langchain_tools) agent.get_graph().draw_mermaid_png(output_file_path="mcp_langgraph.png") - example invocation of the graph -
message = "what is 2 + 3 * 5?"

res = agent.invoke({"messages": [HumanMessage(message)]})

for message in res["messages"]:
  message.pretty_print()
