DBT Introduction
- initial architecture was to load the transformed data into warehouses using etl
- the recent addition of cloud data warehouses led to promotion of elt - blast the data into the warehouse, and then use warehouse compute to perform transformations on top of that
- the different roles in a data team -
- data engineers - build and maintain infrastructure, overall pipeline orchestration, integrations for ingesting the data, etc
- analytics engineers - generate cleaned, transformed data for analysis
- data analysts - work with business to understand the requirements. use dashboards, sql, etc to query the transformed data
- dbt sits on top of the cloud warehouses like snowflake / redshift / big query / databricks. it is used for the t of elt by the analytics engineers
- we can manage, test and document transformations from one place
Getting Started
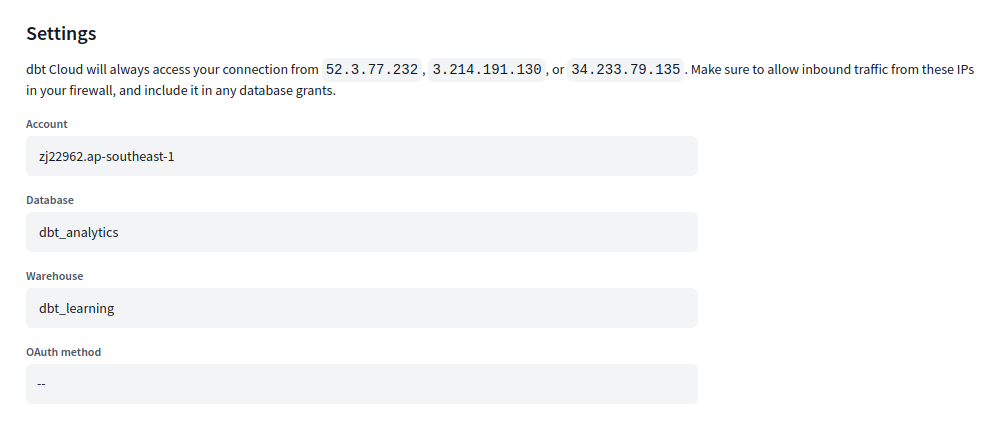
- create a connection. we need to specify -
- the snowflake account url
- the database where the models should be created
- the warehouse to use
![]()
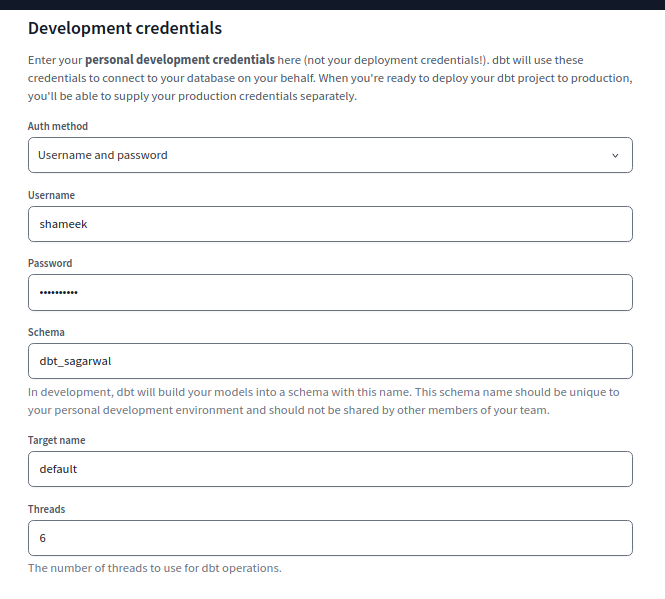
- then, we can create a project. we specify
- name of project
- development credentials
- our credentials, used by dbt to connect to snowflake on our behalf
- target schema each dbt developer should use their own unique schema to be able to work simultaneously
![]()
- we then hit test connection for dbt to test the connection, and hit next
- can leverage git to version control the code
- for this, we can either use managed repositories, or one of the supported git providers like github, gitlab, etc
- during the setup, dbt tells the ips it tries connecting using, our firewall needs to allow these ips for dbt to be able to connect to snowflake
Models
- models are like layer(s) of transformations
- important - they are typically just sql select statements, and the corresponding ddl / dml statements are generated for us automatically bts
- in the models directory, create a file called customers.sql with the following content -
with customers as ( select * from dbt_raw.jaffle_shop.customers ), customer_orders as ( select user_id, min(order_date) as first_order_date, max(order_date) as last_order_date, count(*) as number_of_orders, from dbt_raw.jaffle_shop.orders group by user_id ) select customers.*, customer_orders.first_order_date, customer_orders.last_order_date, coalesce(customer_orders.number_of_orders, 0) as number_of_orders from customers left join customer_orders on customers.id = customer_orders.user_id - important note - this file is using cte (common table expressions), and can be run using snowflake as well
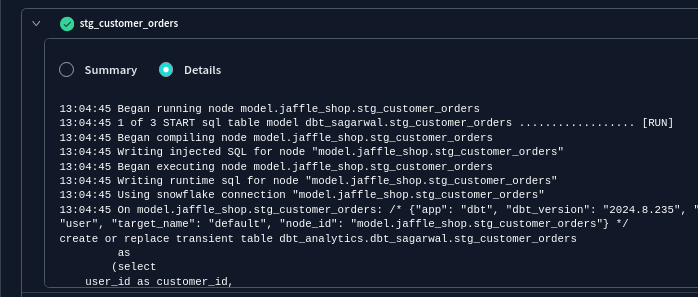
- now, when we run the command
dbt run, it creates a view with the name customers in the database / schema we specify when creating the project - we can see the corresponding ddl for a particular model in the logs
![]()
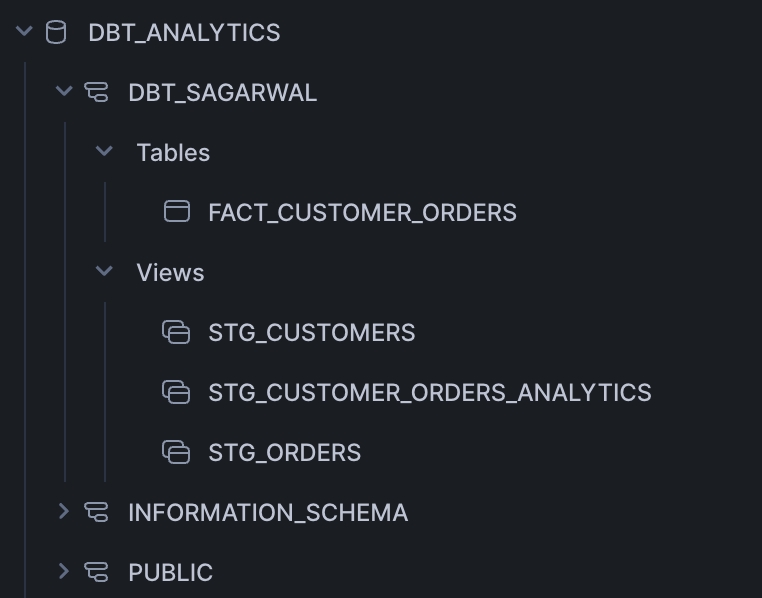
- use the preview tab in the ide to see the actual data in table format
- we see that a view has been created inside the target schema we had specified in the development credentials
- we can configure the way our model is materialized using the following snippet at the top of the sql file for the model -
(( config( materialized='view' ) )) - when we delete models, it does not delete them from snowflake. so, we might have to delete them manually
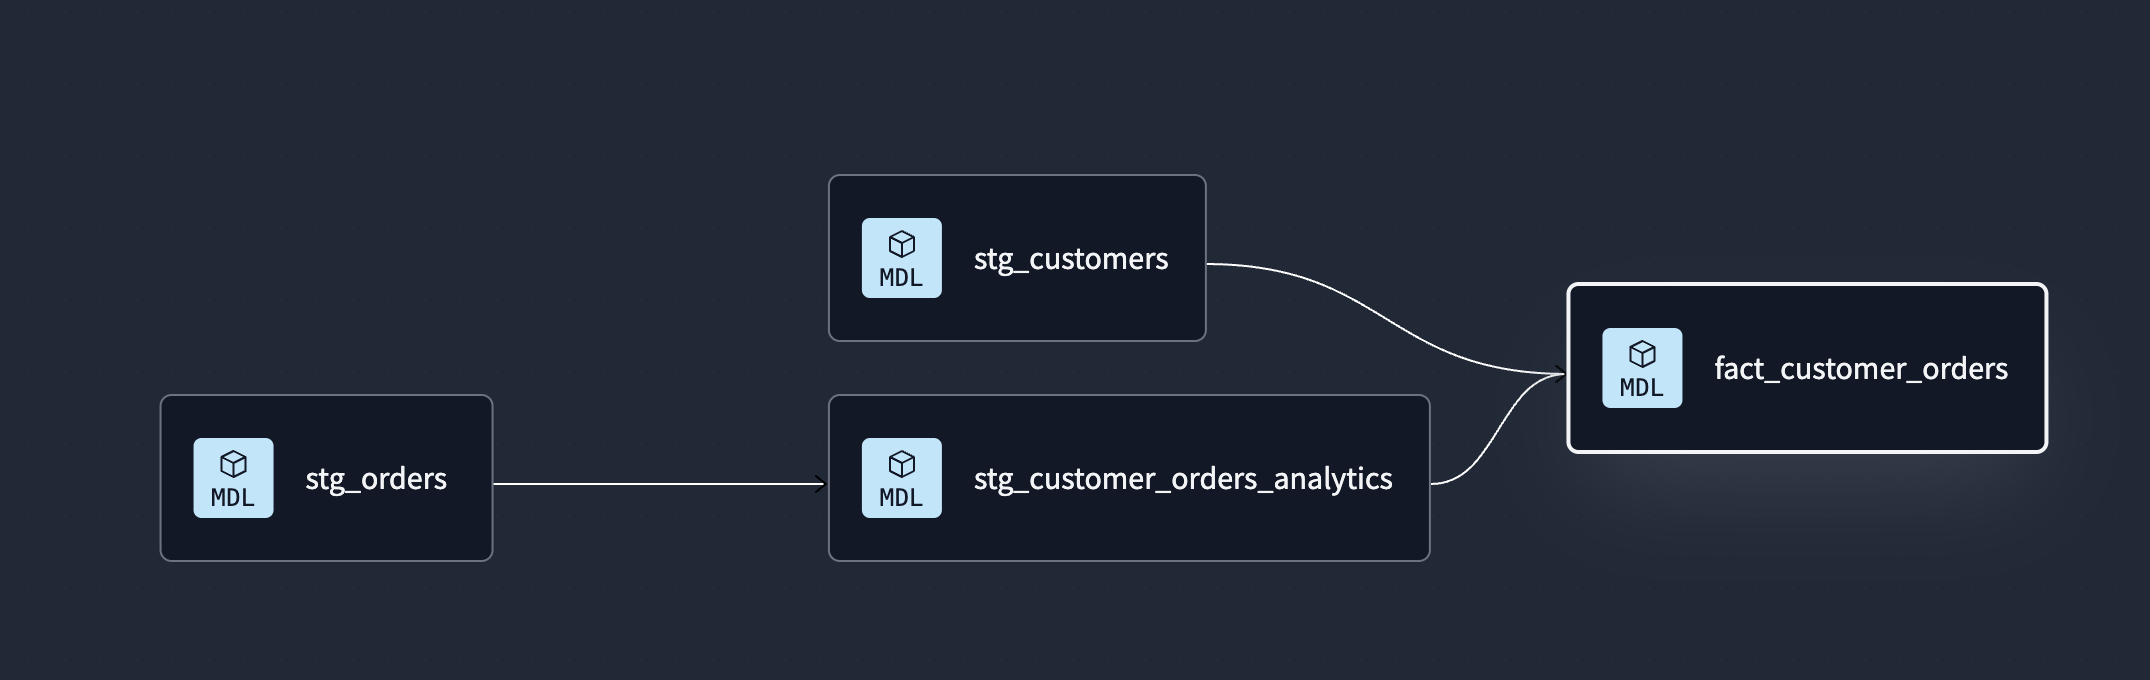
Modularity
- breaking things down into separate models. it allows us to for e.g. reuse the smaller models in multiple combined models
- models/staging/stg_customers.sql -
select * from dbt_raw.jaffle_shop.customers - similarly, we have staging models for orders and payments
- ref macro - allows us to reference staging models in our actual models
- dbt can infer the order to build these models in by creating a dag based on these macros
- models/marts/dim_customers.sql -
with customers as ( select * from (( ref('stg_customers') )) ), order_analytics as ( select user_id customer_id, min(order_date) first_order_date, max(order_date) last_order_date, count(*) number_of_orders, from (( ref('stg_orders') )) group by customer_id ), select customers.*, order_analytics.first_order_date, order_analytics.last_order_date, coalesce(order_analytics.number_of_orders, 0) as number_of_orders from customers left join order_analytics on customers.id = order_analytics.customer_id - now, we might want our staging models to be materialized as views and our facts / dimensions to be materialized as tables
- we can configure this globally in
dbt_project.ymlinstead of doing it in every file like we saw here as follows -name: 'jaffle_shop' models: jaffle_shop: marts: +materialized: table staging: +materialized: view - output for our materialization -
![]()
- when we go to the compile tab, we see the jinja being replaced with the actual table name
with stg_customers as ( select * from dbt_analytics.dbt_sagarwal.stg_customers ), -- ...... - understand how it automatically adds the schema name based on our development credentials. so, the code automatically works for different developers
- remember - the compile tab does not contain the actual ddl / dml, it only contains the transformed jinja for instance. the actual ddl / dml comes up in the logs
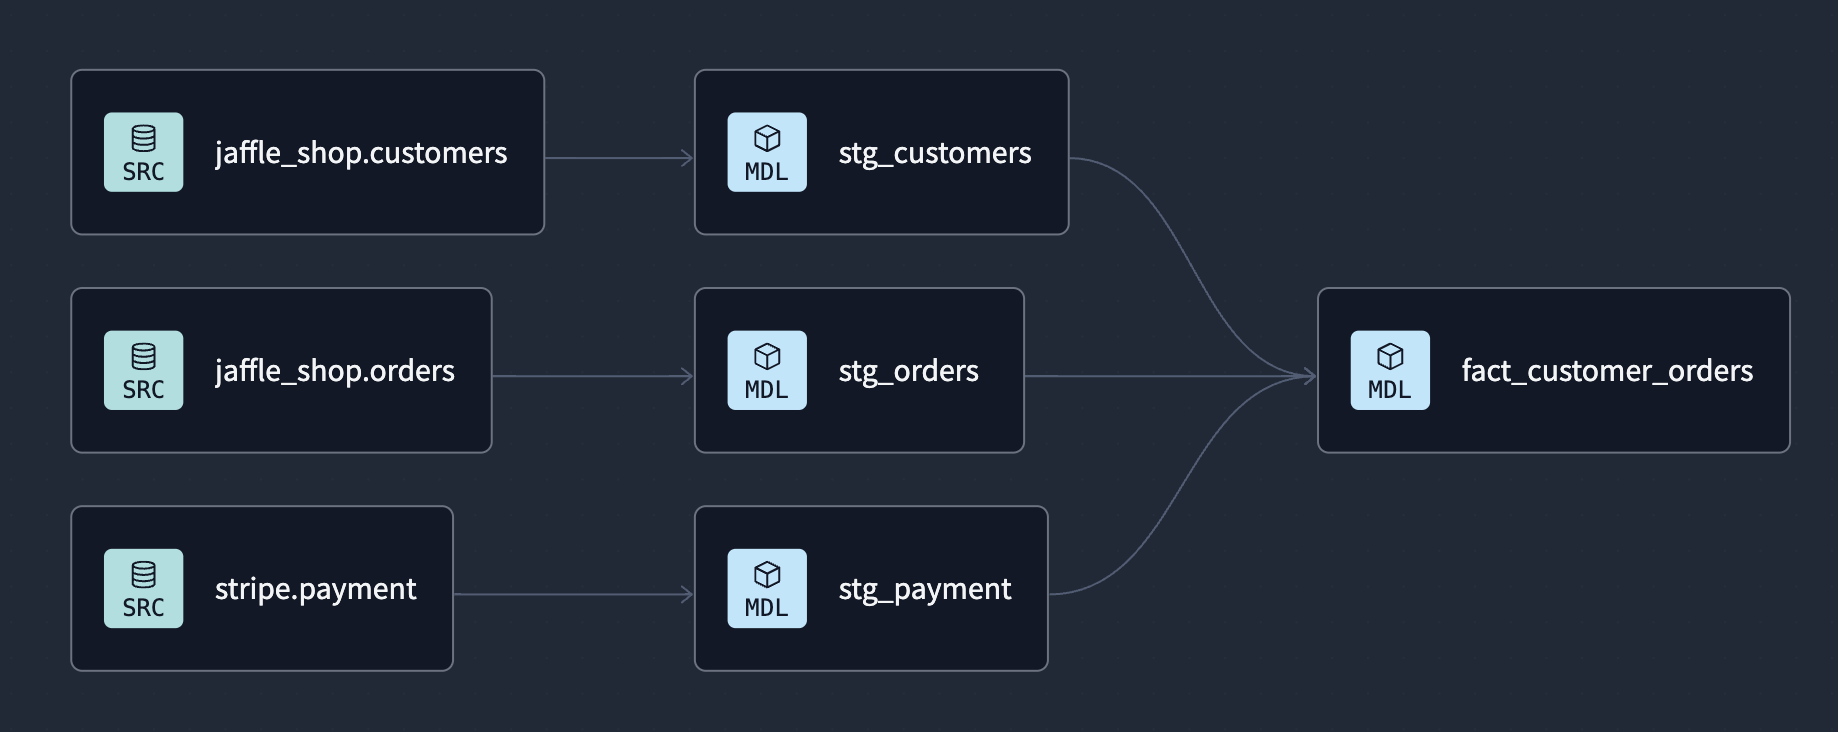
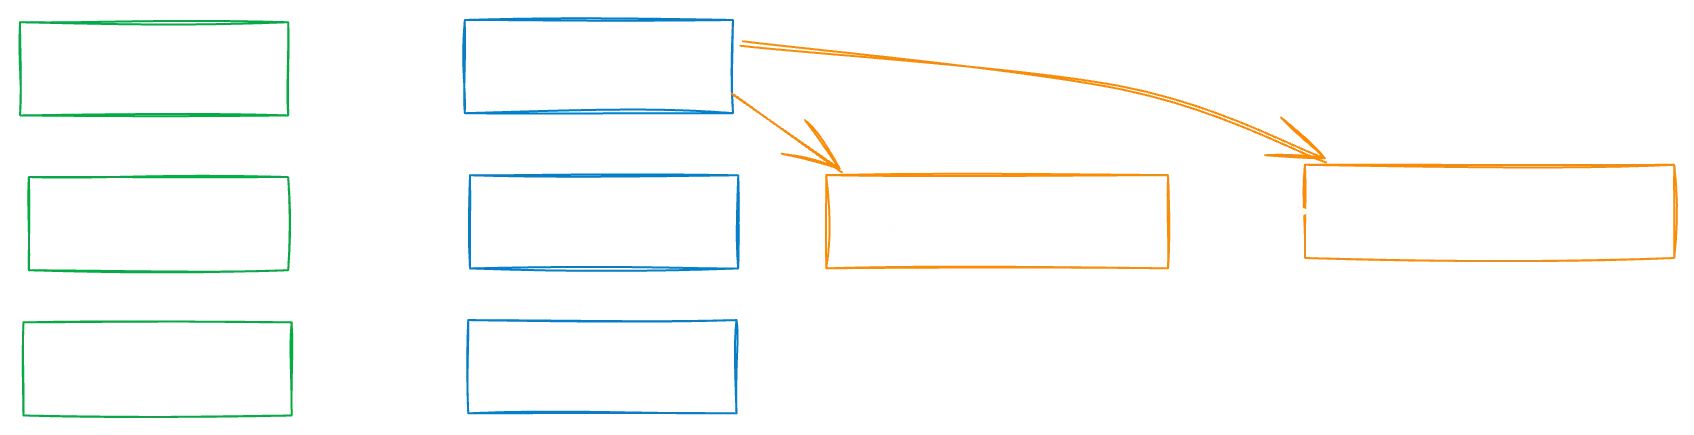
- we can also look at the lineage tab, which shows us the dag (directed acyclic graph). it tells us the order the dbt models should be built in
![]()
- the graph is interactive - double click on the node to open the corresponding model file automatically
Sources
- sources - helps describe data loaded by extract phase by data engineers
- some advantages of using sources over referencing table names directly -
- helps track lineage better when we use source function instead of table names directly
- helps test assumptions on source data
- calculate freshness of source data
- create a file called sources.yml under the models directory
- put the following content inside it -
version: 2 sources: - name: jaffle_shop database: dbt_raw schema: jaffle_shop tables: - name: customers - name: orders - finally, change the stg_customers.sql / stg_customer_orders.sql as follows -
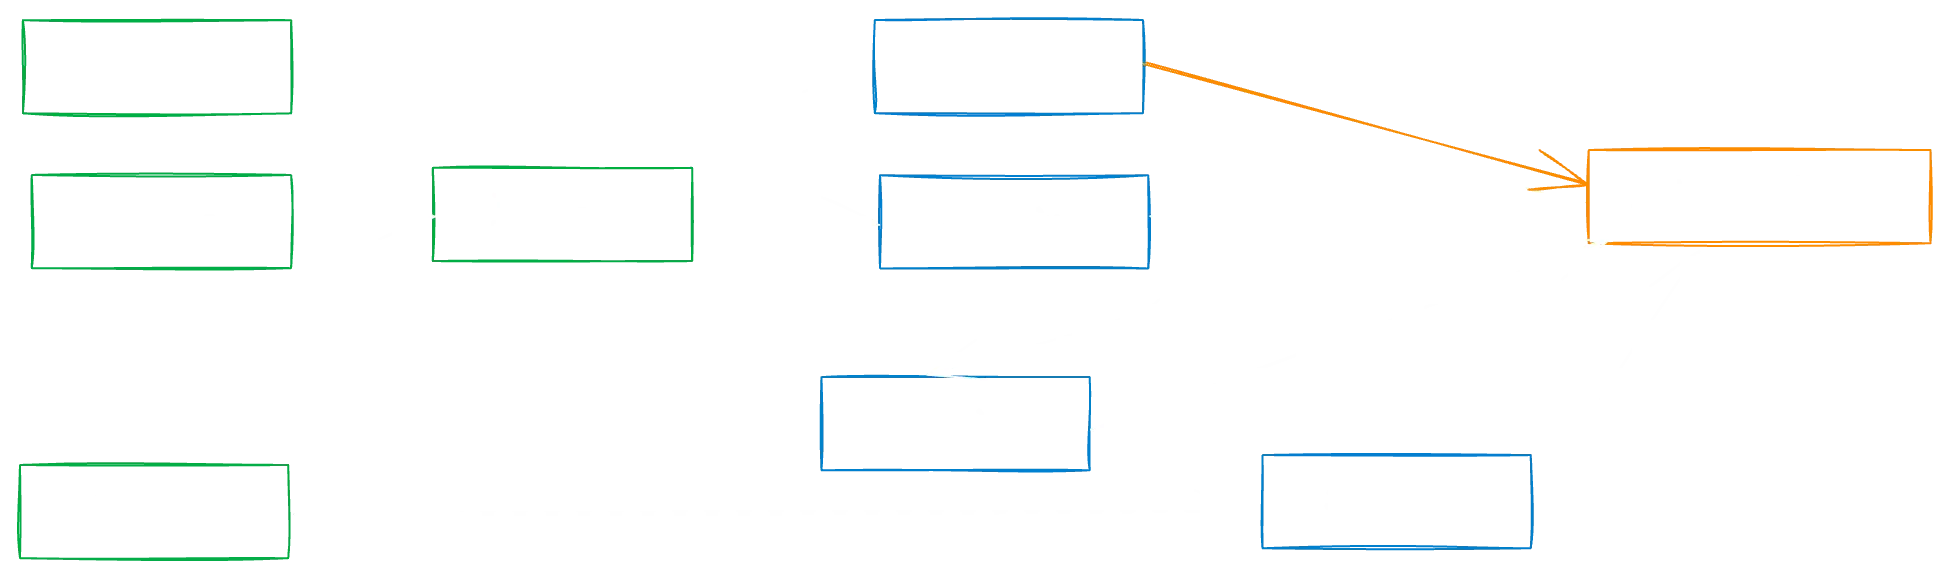
select * from (( source('jaffle_shop', 'customers') )) - the graph starts showing the sources in the lineage as well -
![]()
freshness - we can add freshness to our sources table as follows -
- name: orders loaded_at_field: _etl_loaded_at freshness: warn_after: count: 6 period: hour error_after: count: 12 period: hour- we run the command
dbt source freshnessto check the freshness of our data, and we will automatically get a warning or error based on our configuration - e.g. a warning is raised if the greatest value in
_etl_loaded_atis more than 6 but less 12 hours - note - the
freshnessandloaded_at_fieldconfiguration can also be added at each source level i.e. alongside database / schema to apply to all tables
Tests
- tests in analytics engineering are our about making assertions on data
- we write tests along with our development to validate our models
- these tests are then run these in production
- we use the command
dbt testto run all of our tests - generic tests - applied across different models
- generic tests are of four types - unique, not null, accepted values, relationships
- unique - every value in a column is unique
- not null - no value in a column is null
- accepted values - every value in a column exists in a predefined list
- relationships - every value in a column exists in the column of another table to maintain referential integrity
- we can also use packages / write our own custom generic tests using jinja and macros
- e.g. create a file called models/staging/staging.yml -
version: 2 models: - name: stg_customers columns: - name: id tests: - unique - not_null - name: stg_orders columns: - name: user_id tests: - relationships: field: id to: ref('stg_customers') - the logs on running dbt test show us what the actual sql for the test looks like. if any rows satisfy the condition, our test fails. e.g. not_null_stg_customers_id uses the following sql -
select count(*) as failures, count(*) != 0 as should_warn, count(*) != 0 as should_error from ( select id from dbt_analytics.dbt_sagarwal.stg_customers where id is null ) dbt_internal_test - singular tests - use custom sql scripts, which is not otherwise possible using the generic tests that dbt ships with
- in the tests directory, create a file tests/assert_stg_payment_amt_is_positive.sql with the following content (the tests directory is configured in dbt_project.yml) -
select order_id, sum(amount) total_amount from (( ref('stg_payment') )) group by order_id having total_amount < 0 - we can also apply tests to our sources directly. it is done in the same way as models - using custom sql scripts in the tests directory for singular tests or using the yml file for generic tests
version: 2

sources:
  - name: jaffle_shop
    database: dbt_raw
    schema: jaffle_shop
    tables:
      - name: orders
        columns:
        - name: status
          tests:
          - accepted_values:
              values: [returned, completed, return_pending, shipped, placed]
dbt build- how it works- run
dbt teston sources - run
dbt runand thendbt teston 1st layer of our models - run
dbt runand thendbt teston 2nd layer of our models - and so on…
- run
- this way, our downstream models are never even built if the upstream models fail tests
- understand how doing this manually using
dbt runanddbt testwould require configuring multiple commands, and would be very cumbersome - the skip tab will show us the models which were for e.g. skipped due to failing tests
- it supports all the flags that test, run, snapshot and seed support. when we pass a flag, it is passed down to all the commands that support it. e.g. full refresh will be applied to both models and seeds
Documentation
- we maintain documentation along with code to make maintaining documentation easier
- by using macros like
sourceandref, our dags are generated - along with this, we can document things like ‘what does this model mean’, ‘what does this field mean’, etc
we can add descriptions to our models / statuses as so. we continue doing this in the same file we added tests to i.e. models/staging/staging.yml -
models: - name: stg_customers description: one unique customer per row columns: - name: id description: primary key- sometimes, we might want more extensive documentation, which is not possible using just yaml. we can do so using doc blocks
- create a file models/staging/documentation.md with the following content -
(% docs order_status %)

status can take one of the following values

One of the following values:

| status         | definition                                       |
|----------------|--------------------------------------------------|
| placed         | Order placed, not yet shipped                    |
| shipped        | Order has been shipped, not yet been delivered   |
| completed      | Order has been received by customers             |
| return pending | Customer indicated they want to return this item |
| returned       | Item has been returned                           |

(% enddocs %)
then, reference it inside staging.yml as following -
- name: status description: "(( doc('order_status') ))"- just like we documented models, we can also document our sources
- to generate the documentation, we use
dbt docs generate - by looking at our dag / lineage graph, we can guess the concurrent threads we can have at a time
Deployment
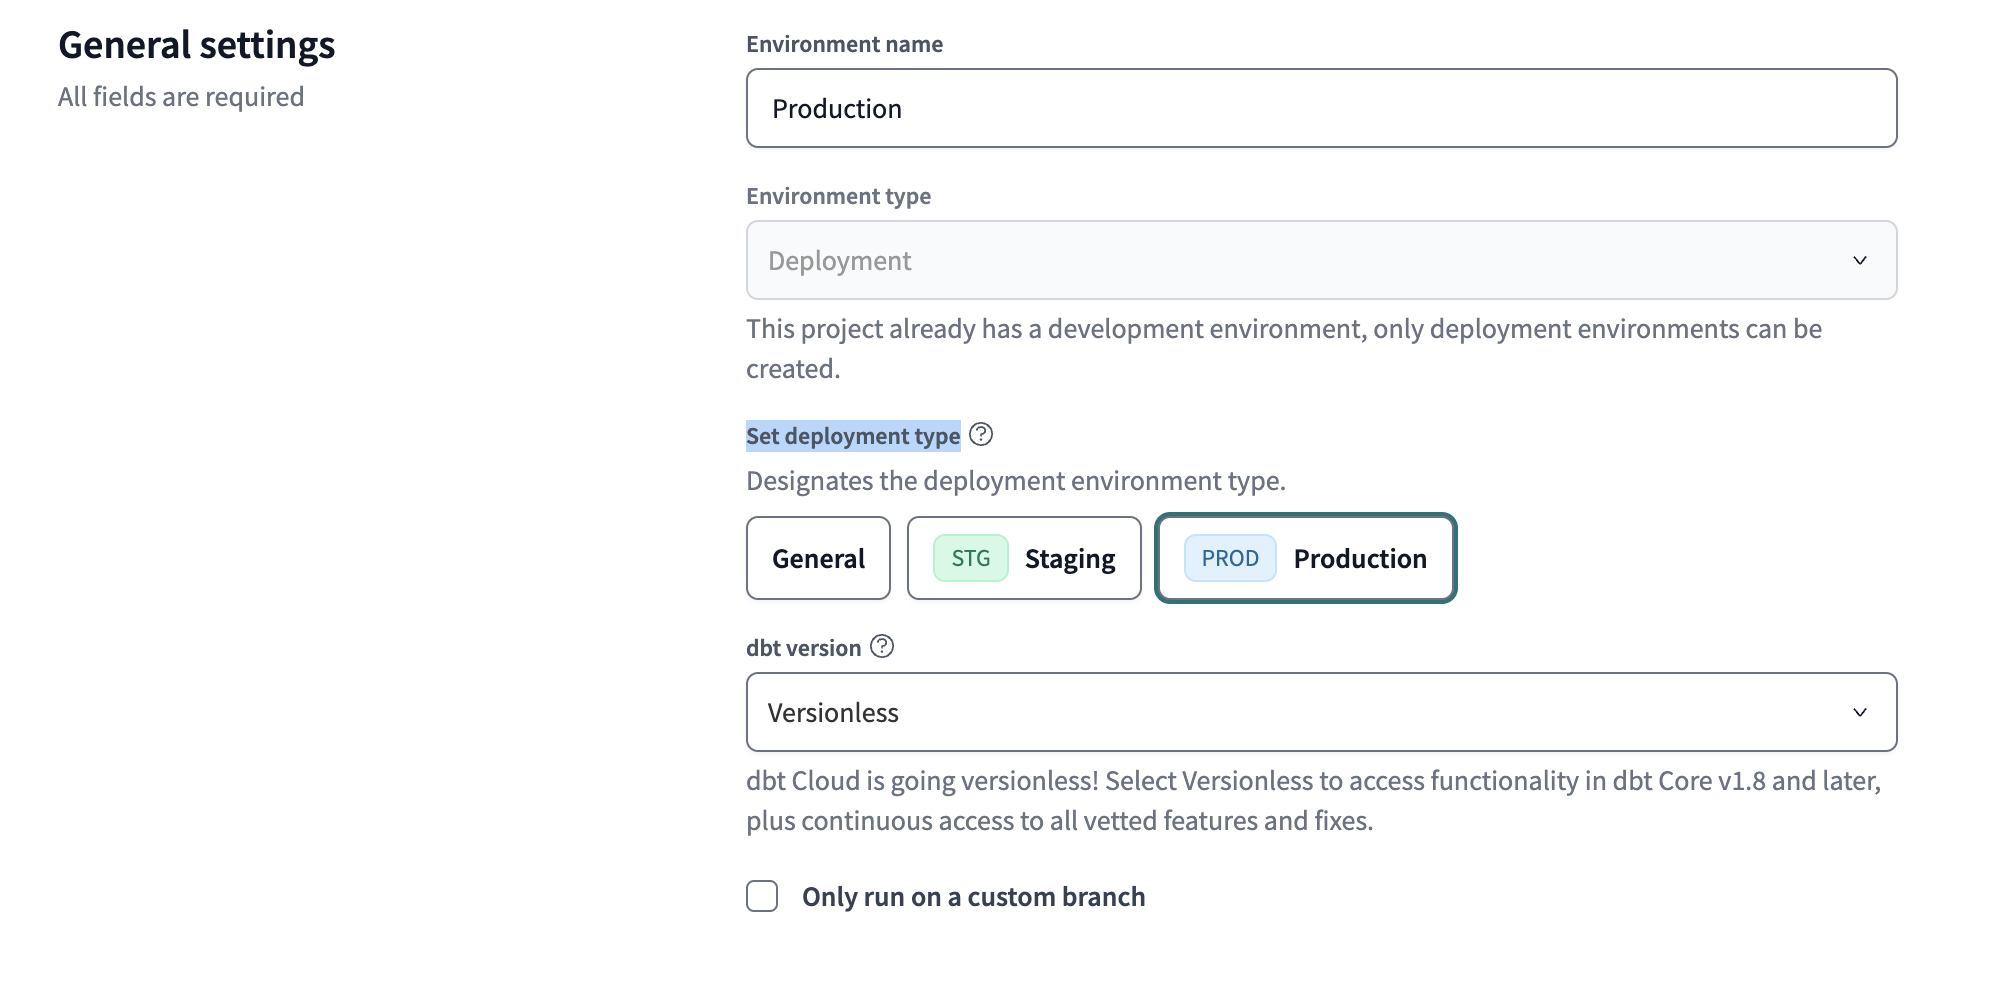
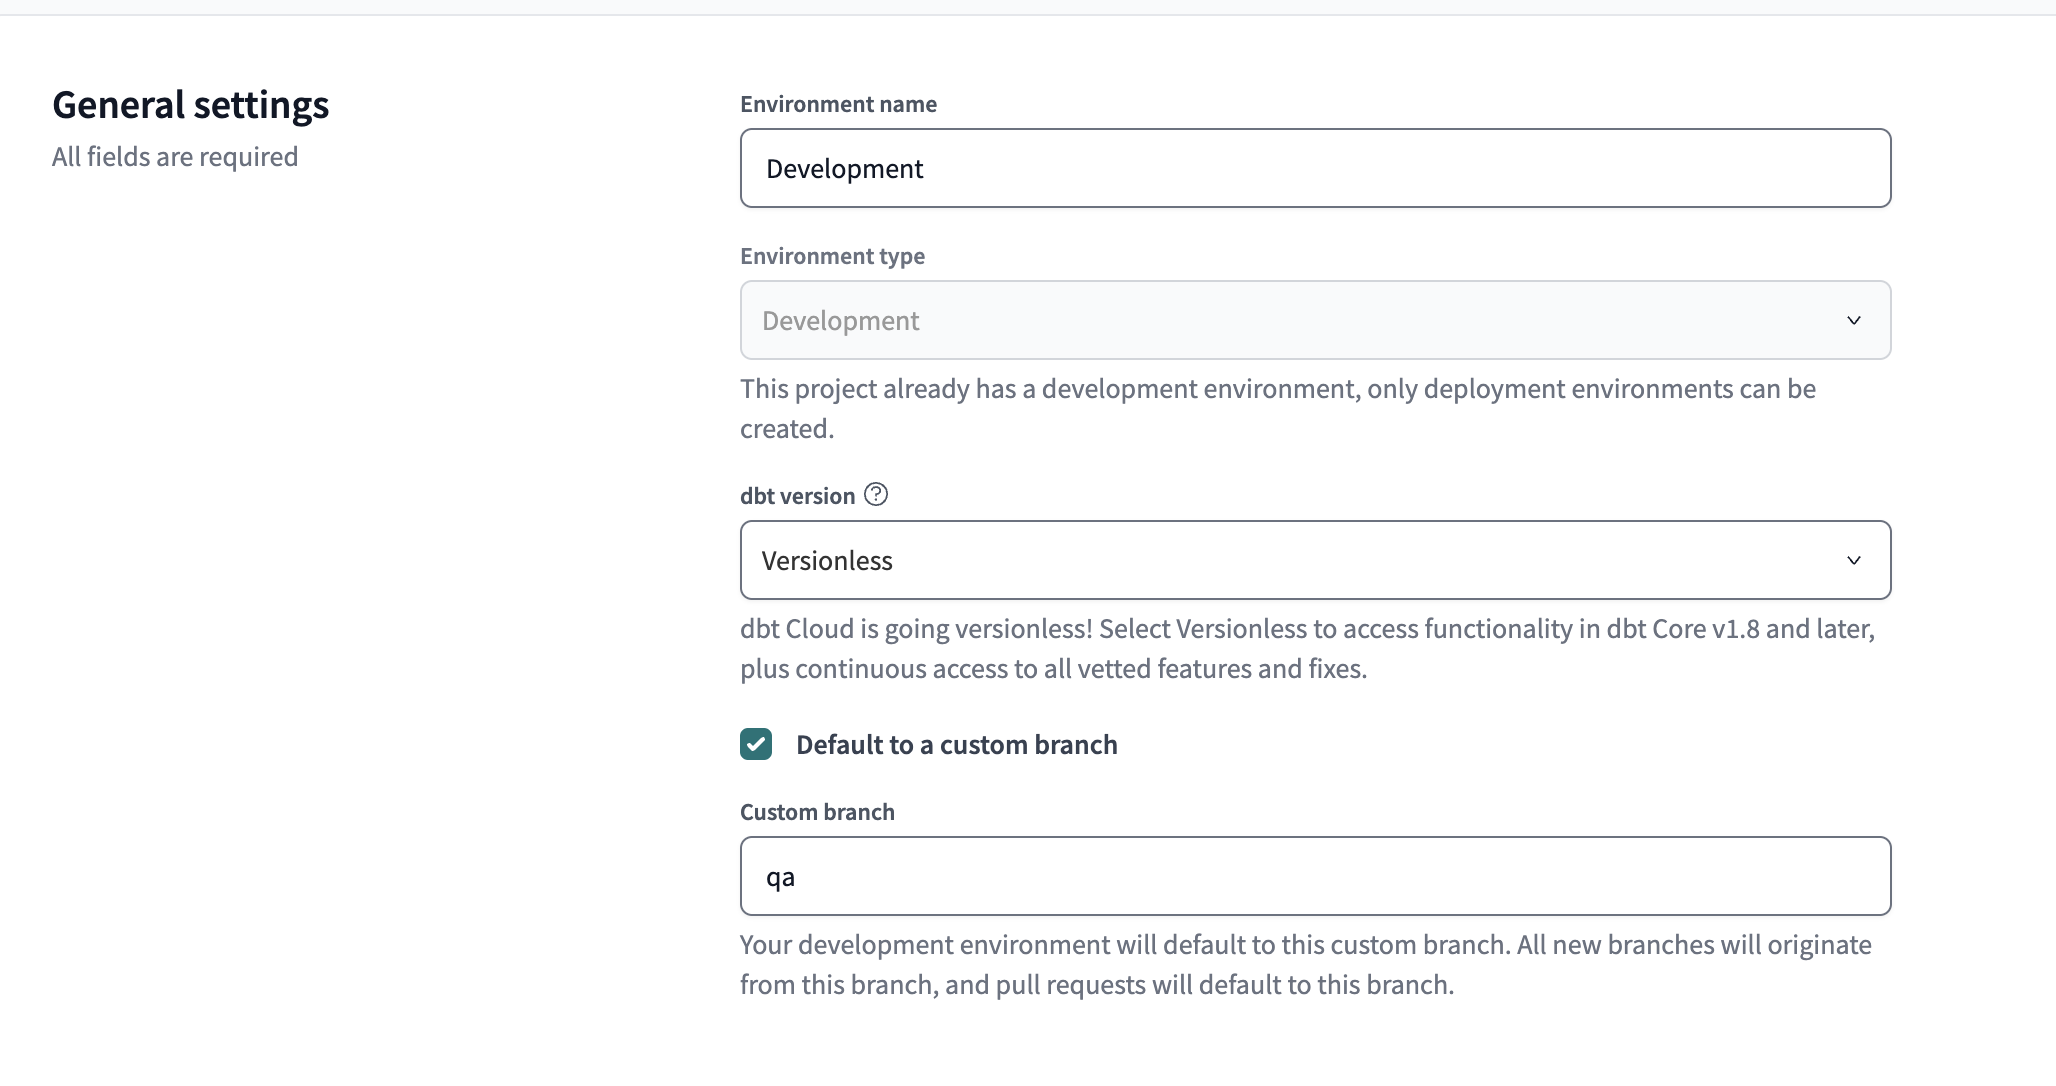
- by default, a development environment is already created for us
- go to deploy -> environments and create a new environment
- environment type can be development or deployment
- we select deployment here, since development is already there, and only deployment environment is allowed
- then, we select a deployment type - typically production
- just like we saw in getting started, we need to set the connection, wherein we specify snowflake account url, database, warehouse
- we enter deployment credentials instead of development credentials like in getting started
- the right way would be to create and use a service user’s credentials instead of our own credentials here
- also, the models now are created in a dedicated production schema which only this service user has access to, not a user specific target schema
- after configuring all this, we can create our environment
- then, we can create a job of type deploy job for this environment
- here, we can enter a schedule for this job
- we can also configure the set of commands that we would want to run on that cadence
- by default,
dbt buildis present, and we are allowed to check options for running freshness checks on sources and generating docs - after configuring all this, we can create our job
- we can trigger this job manually by hitting run now whenever we want, apart from relying on the schedule to trigger it
- dbt cloud easily lets us access our documentation, shows us a breakdown of how much time the models took to build, etc
Setup Folder Structure
- by maturity
- two folders are created - staging and marts
- staging - has models that represent the source data itself. perform some basic cleaning. prefixed with
stg_ - marts - all the business logic is here. combines staging models. prefixed with
fact_ordim_ - optionally, we can have an intermediate folder inside marts for maintaining models between staging and marts i.e. models which are not used by / exposed to consumers directly. can be prefixed with
int_
- by domain
- imagine we have three teams - finance, sales and marketing
- we create three folders representing each of the teams in this case
DBT Explorer Features
- feels like a superset of features available in documentation
- models tab - shows us the status of models - success, error, skipped. it will also show us the last executed date of the model. we can click on a model to inspect its performance, the sql code for it, its lineage, etc
- sources tab - freshness of sources etc
- tests tab - status of test (pass or fail), what model and column it ran on, etc
- performance tab - which models took the longest time to run, which models were executed the most, which models fail the most
- recommendations - gives suggestions around models with missing documentation, models with missing test coverage, documenting primary keys (unique and not null), etc. it also categorizes them as high, medium, etc
- in the lineage graph, we can type the select syntax -
stg_customers- highlights thestg_customersmodel+stg_customers- highlightsstg_customersalong with all of its upstream dependenciesstg_customers+- highlightsstg_customersalong with all of its downstream dependencies
- after entering our select statement, we hit the update graph button / hit enter key to show only nodes related to our query
- union - we can extract dags for all models combined by separating using a space -
+stg_customers+ +stg_orders+ - intersection - we can extract the shared upstream between all models by separating using a comma -
+stg_customers+,+stg_orders+ - to get only the sources of a model, we can use
+dim_customers,resource_type:source - unlike the documentation, dbt explorer also supports column level lineage. this way, we can for e.g. easily view the affected downstream models when we for e.g. change the column name
- we can also see the lineage of our projects. we can see the parent and child project lineage, how many models a project has, the public models exposed by the projects, etc
- explorer supports advanced searching - e.g. if we just type
order_idin the search bar, it will automatically give us all the models, sources, etc with that column - the search also supports a lot of filtering - e.g. we can filter out only tests, sources, etc. if we select models, we can also filter by modelling layer (staging, marts, intermediate), materialization type (table, view, incremental)
DBT Mesh
- a technique for breaking down large dbt projects into multiple projects. some advantages -
- helps collaborate efficiently - e.g. avoid conflicts due to analytics engineers working on different features
- reduce costs by for e.g. building small parts at a time instead of the entire stack
Model Contracts
- if someone makes breaking changes to an upstream model, it will break the downstream models and in turn the reporting
- we can avoid this using model contracts
- using model contracts, we can ensure - column names, data type of each column, etc
- we need to add set
contract.enforcedto true as shown below - then, we can list the column names and their data types
- finally, we can list the constraints like not null
models: - name: trilogy config: contract: enforced: true columns: - name: number_in_trilogy data_type: float constraints: - type: not_null - we need to add set
- note - this is specific to the data warehouse we use, e.g. different data warehouses will have different data types
Versioning
- sometimes, breaking changes are unavoidable
- we can collaborate changes in model contracts easily using versioning
- we can now test pre release versions in production - basically old one is left untouched, and a new version is created
- we can offer a “migration window” for downstream users before making the change official (e.g. changing the
latest_versionproperty to the latest version) - create a new file, say fct_orders_v2.sql with the new updated sql
- we rename
order_totalasorder_amount - we change data type of
location_opened_atto date
- we rename
now, we modify our corresponding configuration for model file as follows
models: - name: fct_orders config: contract: enforced: true columns: - name: order_total data_type: number - name: location_opened_at data_type: timestamp_ntz versions: - v: 1 - v: 2 columns: - include: all except: [order_total] - name: order_amount data_type: number - name: location_opened_at data_type: date- note - we do not enter anything for v1 because our actual definition is for v1. so, we enter our changes in v2
by default, these will be materialized under
fct_orders_v1andfct_orders_v2. to ensure that for e.g. v1 is materialized underfct_ordersitself, we can do the following -- v: 1 config: alias: fct_orders- downstream users can reference a specific version using
(( ref('fct_orders', v=1) )) if downstream users do not specify a version i.e. they use
(( ref('fct_orders') )), the latest version will be used by default. to change this behavior, we can configure what version should be used by default usinglatest_versionmodels: - name: fct_orders latest_version: 1- now, this becomes a pre release of sorts. once we are sure that our changes are stable, we can remove this line / change its value to 2
- when we run
dbt run --select fct_orders, all versions are run - to run a specific version, use
dbt run --select fct_orders_v2ordbt run --select fct_orders.v2 - to run the latest version, use
dbt run --select dim_customers,version:latest
Model Group and Model Access Modifiers
- model groups - set of models related to one another. e.g. owned by a specific team / business use case. e.g. employee data
- each model group will have an owner
e.g. groups.yml file -
groups: - name: finance owner: name: Firstname Lastname email: finance@jaffleshop.com slack: finance-data github: finance-data-team- each model can only belong to one model group
- model access modifiers - how models outside a group can access (reference) models in a group
- public - can be accessed by models in any group or project. e.g. staging models can be used across different projects to help with collaboration
- protected - can be accessed by models in same group or project. this is the default
- private - can only be accessed by models in same group
we can edit the configuration for our models to specify the group they belong to and their access modifier as follows -
models:
  - name: finance_model
    access: private
    group: finance
Cross Project Reference
- check 1 - ensure that models in the upstream project are public
- check 2 - there should be at least one successful run in the production environment before we can start importing across projects
create a file called dependencies.yml
projects: - name: core_platform- then, we can reference the models in these projects using the cross project reference macro, which looks a lot like the usual reference macro
(( ref('project_name', 'model_name') )) - explorer can show us how different downstream projects reference a public model
- random thought - this feature is only available in enterprise dbt cloud. if using dbt core, the workaround would be to think of models in upstream project as source in the downstream project. this way, i guess we loose out on capabilities like versioning, lineage across projects, etc
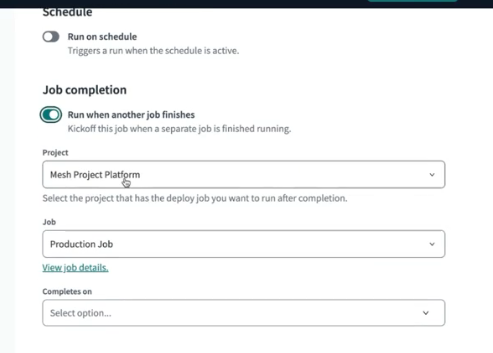
Cross Project Orchestration
- we would want our downstream projects to build automatically after the upstream projects finish building
- we do not have to rely on brittle time based dependency now
- also by using dbt mesh, we are now breaking big long running jobs into multiple short jobs
- while creating a job, instead of running it on a schedule, we can configure it to run on job completion i.e. run when another job finishes
- here, we can select the upstream project, the upstream job, and the statuses of the upstream job on which this job should be triggered - on success, on success and on error, all statuses, etc. here, since we depend on the models being built by the upstream project, we check on success
Analyses and Seeds
- analyses - sql files in the analyses folder in dbt project
- they are not models or tests, so they do not get run - when we for e.g. run
dbt runordbt compile, we see the compiled output inside the target folder, but unlike models they do not get materialized - they support jinja, and we can see the actual sql code it compiles down to
- use cases - store one off queries which can be run manually, e.g. creating users etc
- seeds - csv files that live in seeds folder in dbt project
- purpose - take a short amount of data, and manifest that in the data warehouse as a table
dbt seedcan materialize this as a table in our data warehouse- we can then reference them using the same
reffunction we use to reference models - use case - static data, e.g. mapping country code to actual names of the countries
- finally, we can add descriptions and tests to seeds just like our regular models
Jinja
- python based templating language
- e.g. when we use the
reffunction, it swaps it with the table name prefixed with the target schema based on development credentials - jinja is used, which is a pythonic language. everything inside curly braces is jinja, and the rest of it is regular sql. note - replaced curly with round braces, because it was not showing up otherwise
(% for i in range(5) %) select (( i )) as number (% if not loop.last %) union all (% endif %) (% endfor %) - this results in a table containing one column number, with values 0-4
- we see two basic forms of jinja syntax above -
(% %)- operation is happening inside the jinja context. it is invisible to the end user after the code is compiled(( ))- pulling it out of the jinja context and actually outputting it
- we use the if condition so that union all is not added after the last select. this is what the compiled tab shows -
select 0 as number union all select 1 as number union all select 2 as number union all select 3 as number union all select 4 as number - we can use set to set a variable - the compiled output just has my name
(% set my_name = 'shameek' %) (% set my_surname = 'agarwal' %) (( my_name )) (( my_surname )) -- shameek agarwal - we might see a lot of blank lines in our compiled output, because the jinja percentage blocks are not part of the compiled output
- to prevent this, we can use
(%- -%)instead of(% %) - comment is done using
(# #)i believe. note - using--comments in sql. i was stuck on this for a while. basically the sql comment does not work for jinja i.e. if we comment using--, while our ide will show it as a comment because its an sql file, commenting jinja using it will have no effect and the jinja code would still be executed
Macros
- macros - help us write generic logic that is then reusable across the project
- they are actually a feature of jinja - so we can find relevant documentation in both jinja and dbt
- in the macros directory, create a file called cents_to_dollars.sql
(% macro cents_to_dollars() %) amount / 100 (% endmacro %) - now, we can use it in our model as follows -
select id as payment_id, orderid as order_id, paymentmethod as payment_method, status, -- amount is stored in cents, convert it to dollars (( cents_to_dollars() )) as amount, created as created_at from (( source('stripe', 'payment') )) - if we hit compile, we can see the sql being compiled down to
amount / 100 as amount,correctly - however, this relies on the fact that our column was named
amount. we can use arguments to make the column name configurable - apart from that, lets say we want to allow rounding up as well, with the argument defaulting to 2
- we change the macro to the following -
(% macro cents_to_dollars(column_name, precision=2) %) round((( column_name )) / 100, (( precision ))) (% endmacro %) - now, we can use the macro as follows -
(( cents_to_dollars('amount') )) as amount,
(( cents_to_dollars('amount', 3) )) as precise_amount
the compiled sql looks as follows -
round(amount / 100, 2) as amount, round(amount / 100, 3) as precise_amount - now, worth thinking about - macros in this case might be reducing readability as it requires jumping around. it is a trade off between dry vs readability
Packages
- packages - import models and macros into our dbt projects
- so basically, packages are just like another dbt project, whose models and macros we can use inside our project
- model package example - someone has already modelled facebook adds, stripe data, etc, and we can directly start using it using
ref - macro package example - dbt utils. e.g. it has the date spine macro, which can create a long table of dates with whatever difference we configure between each of the dates
- dbt hub has all the packages. we can import from here or from github directly
we add dependencies to packages.yml file at the root. clicking on the links on dbt hub will give us the snippet with package name and version to copy to this file -
packages:
  - package: dbt-labs/dbt_utils
    version: 1.3.0
we add a github package as follows -
versionchanges torevisionpackages: - package: git@github.com:dbt-labs/dbt-utils.git revision: masterfinally, we can also use packages in local i.e. relative to our dbt_project.yml file like so -
packages: - local: sub_project- we run
dbt depsto clone and install all the dependencies required for our running our project e.g. of using
date_spinemacro(( dbt_utils.date_spine( datepart="day", start_date="to_date('01/01/2023', 'mm/dd/yyyy')", end_date="dateadd(week, 1, current_date)" ) ))- we can look at the complex compiled sql result, view the actual logic in the package under macros, etc
- another macro example -
surrogate_keycan accept different columns and spit out a unique hash of these columns. when we have a composite primary key, we can use this to get a unique value per row. we can place the generic test ofuniqueon this columnselect (( dbt_utils.surrogate_key(['customer_id', 'order_date']) )) as id, customer_id, order_date, count(*) from (( ref('stg_orders') )) group by 1,2,3 - packages like dbt utils work across warehouses - we could be using this in bigquery or in snowflake, and it would spit out the right sql for us automatically
- till now, we saw how we can use macros from packages, but we can also use models from packages
e.g. the below package gives us models which can help us understand spending in snowflake
packages: - package: gitlabhq/snowflake_spend version: 1.3.0- setup instructions can be found here, e.g. we need to seed with effective rates (per credit price, which depends on our choice of cloud provider, region, etc)
Jinja, Macros and Packages Examples
Example 1
- the below example helps us grant permissions to the tables
- note - the
setblock helps us set contents of the block to a variable. jinja calls it block assignment i believe - we can execute jinja code using
do - we can run some sql using
run_query. we can find the available macros in dbt jinja functions - the
targetvariable contains information about things like warehouse, database, etc in the form of a dictionary - these are defined / derived from the settings we specify under the (development / deployment) environment, credentials, connection, etc
- to access its values, i entered
(( target ))in a file and compiled it. the compilation output gave me this{ "account": "tp279l2.ap-southeast-1", "user": "shameek", "database": "analytics", "warehouse": "transforming", "role": "accountadmin", "schema": "dbt_sagarwal", # .... more stuff - the schema here for e.g. is the user specific schema we specify as the target schema in development credentials
- we use this as the default arguments for our macro
- the other function we use is log. by setting info as true, we see the log in both summary and details, otherwise we only see it under details
- create a file macros/grant_select.sql with the following content -
(% macro grant_select(schema=target.schema, role=target.role) %) (% set query %) grant usage on schema (( schema )) to role (( role )); grant select on all tables in schema (( schema )) to role (( role )); grant select on all views in schema (( schema )) to role (( role )); (% endset %) (( log("granting view access on " ~ schema ~ " to role " ~ role, info=True) )) (% do run_query(query) %) (% endmacro %) - we run models using
dbt run - however in this case, we want to run a specific macro and not a model. we can do this using
dbt run-operation grant_select - we can pass in variables to the macro using args, which is like a dictionary -
dbt run-operation grant_select --args '{ 'role': 'xyz' }'
Example 2
- using the results of a query, we would like to build out our sql dynamically
- compilation is done in two phases. execute is false the first time around, and true the second time. basically, no sql is executed the first time, but it is executed the second time. during the first pass, only building of dags etc happen
- so, this might give us issues like null pointer exception for the second line below, because results is None -
(% set results = run_query(query) %) (% set values = results.columns[0].values() %) - so, we do something like this instead -
(% set results = run_query(query) %) (% if execute %) (% set values = results.columns[0].values() %) (% else %) (% set values = [] %) (% endif %) - we get back the table object from
run_query, and we access the values of the right column from it to set ourstatusesvariable - now, assume we have a table like this - stg_orders(order_id, customer_id, order_date, status)
- we want a row for every customer, and a column for every status. the column will tell us how many orders with that particular status a customer has
- we can construct the model as follows -
(% set query %) select distinct status from (( ref('stg_orders') )) (% endset %) (% if execute %) (% set statuses = run_query(query).columns[0].values() %) (% else %) (% set statuses = [] %) (% endif %) (( log("calculated statuses = " ~ statuses, info=True) )) select customer_id, (%- for status in statuses %) sum(case when status = '(( status ))' then 1 else 0 end) (( status )) (%- if not loop.last %),(% endif -%) (% endfor %) from (( ref('stg_orders') )) group by customer_id - the compiled code looks as follows -
select
    customer_id,
    sum(case when status = 'returned' then 1 else 0 end) returned,
    sum(case when status = 'completed' then 1 else 0 end) completed,
    sum(case when status = 'return_pending' then 1 else 0 end) return_pending,
    sum(case when status = 'shipped' then 1 else 0 end) shipped,
    sum(case when status = 'placed' then 1 else 0 end) placed
from
    analytics.dbt_sagarwal.stg_orders
group by
    customer_id
Unit Testing
- test driven development - forces us to write tests before code. this forces us to think about edge cases upfront
- regression testing - helps catch mistakes in breaking changes
- we use unit testing during test driven development, wherein we mention the set of inputs and expected outputs for the given piece of code
- these tests should be run as a part of continuous integration to catch any future bugs containing breaking changes
- unit tests are run before the node is built, constraint tests are run after the node is built but before it is materialized, data tests are run after the model is materialized
- unit tests test our complex sql logic, constraint tests check shape of data, while data tests check content of data
- we also save on resources and money, since these tests are run before the models are materialized with millions of rows
- we can configure unit tests using yaml. we can either specify inputs and outputs in yaml directly, or we can leverage csvs for this to keep the yaml smaller
- in the inputs and outputs, we only need to mention the columns of interest
- assume we remap our status column in the following way -
select
    id as order_id,
    user_id as customer_id,
    order_date,
    (
        case
            when status like '%pending%' then 'placed'
            when status like '%return%' then 'returned'
            else status
        end
    ) status
from
    (( source('jaffle_shop', 'orders') ))
in the
givensection, we specify the data for all the input that might be used in our models, e.g. only one source is being used in this caseunit_tests: - name: stg_orders_status_cleanup model: stg_orders given: - input: source('jaffle_shop', 'orders') rows: - ( id: 1, status: returned ) - ( id: 2, status: return_pending ) - ( id: 3, status: completed ) - ( id: 4, status: pending ) - ( id: 5, status: shipped ) - ( id: 6, status: placed ) expect: rows: - ( order_id: 1, status: returned ) - ( order_id: 2, status: returned ) - ( order_id: 3, status: completed ) - ( order_id: 4, status: placed ) - ( order_id: 5, status: shipped ) - ( order_id: 6, status: placed )- we can run just the unit tests by using just
dbt test --select test_type:unit - otherwise, we can rely on our regular old
dbt build - let us say our logic involves current timestamp
datediff('days', order_date, (( dbt.current_timestamp() ))) days_since - we cannot unit test on this easily, because current timestamp will change everyday, and hence our assertion will have to change
so, we override the value returned by the macro by hardcoding it instead
- name: stg_orders_days_since_calc model: stg_orders overrides: macros: dbt.current_timestamp: date('2019-01-01') given: - input: source('jaffle_shop', 'orders') rows: - { order_date: 2018-01-01 } expect: rows: - { order_date: 2018-01-01, days_since: 365 }- just like macros, we can override variables and environment variables as well
- a good practice might be to avoid running unit tests in production environment. unit tests only need to be run as a part of development environments / continuous integration environments. we can do this by setting the variable
DBT_EXCLUDE_RESOURCE_TYPEtounit_test
Webhooks
- webhooks vs polling - webhook is push based i.e. data is pushed to the receiving app. polling is pull based i.e. the receiving app asks for the data from the source
- webhooks is much more immediate and less resource intensive as compared to polling
- if using webhooks, we have two kinds of webhook - outgoing webhook to send the data, incoming webhook to receive the data
- dbt currently only supports outgoing webhooks for when jobs are started / completed (with job status)
- e.g. use case - create pager duty alarms when dbt jobs fail
- go to account settings -> webhooks -> create webhook. here, enter the -
- webhook name and description
- events to trigger this webhook for - run started, run completed (any status), run completed (errored)
- jobs - trigger this webhook for all jobs or some specific job(s)
- finally, we enter the endpoint that dbt should call
Materialization
- materialization - how dbt builds the models. remember - we just write select statements, and dbt generates the right ddl / dml on top of that for us
- five types of materialization
- can be configured inside dbt_project.yml to configure at a model level / inside the individual model itself using a config block at the top
- table - actual table is built
- views - we would be rerunning the query every time. this is the default
- ephemeral - take our select statements and use it as a cte in the downstream models. so, nothing exists in our database. hard to debug as we cannot query or inspect them directly
- small note - if we change the materialization of a model for e.g. from table to a view, the table will be dropped and a new view would be created in its place. this is because dbt generates commands like this -
create or replace. however, if we go for e.g. from a table to ephemeral, the table still stays there - now, we discuss incremental and snapshot
Incremental
- we end up reprocessing years worth of data (which should not ideally change) when using materialization of type table
- so, the idea is that we just add the new records and keep the old table as is, because historical data typically cannot / should not change
- we save on processing time, resources and money this way
- start with view. if querying it takes too long, switch to table. if building it takes too long, switch to incremental
(( config(materialized = 'incremental') )) - we have the source table, and an already built table which we want to modify
- we use the way below to identify the new data in our source. note - this should only apply to subsequent runs. for the first run, this filtering should not happen
with events as ( select * from (( source('snowplow', 'events') )) (% if is_incremental() %) where t_stamp >= (select max(t_stamp) from (( this ))) (% endif %) ) - notice the use of
thisto reference the already existing and built model. we cannot useref(model)in the model itself, since it will become a cyclic dependency - the first time around, it will run the usual
create or replace table. second time around though, it runscreate or replace temporary tableand inserts records from this temporary table into the model usinginsert into - when we add the
--full-refreshflag, it will build from scratch using thecreate or replace tablecommand like the first time around - issues - what if data showed up in our warehouse late? e.g. we always use the latest time as the cutoff, but events can appear out of order - we have already processed events up to 11.30, but in the next incremental run, we receive an event which happened at 10.30
- so, we can change the sql to following -
(% if is_incremental() %) where t_stamp >= (select dateadd('day', -3, max(t_stamp)) from (( this ))) (% endif %) - we move the cutoff to three days back
- now, the current issue - we can end up with duplicate records. solution -
unique_keys. it helps update the existing records(( config( materialized = 'incremental', unique_key = 'page_view_id' ) )) - with this, the command that was doing
insert intofrom the temporary table to the model now changes tomerge into - note - advantage of dbt - dbt automatically used
merge into, since snowflake supports it. different warehouses might have different ways of achieving this, which dbt can handle for us automatically - how to decide three days - set the cutoff based on the two parameters below -
- ask for tolerance for correctness
- perform analysis on ‘how late’ can say 99 percentile of data be
- prioritizing correctness can negate performance gains
- secondly, remember we can always run a
--full-refreshon a weekly basis - another issue - assume our ‘unique key’ has records in both - current table and the 3 day current window we are processing
- we end up overwriting the old data using our new batch
- my understanding of one potential fix - we change our filter. instead of filtering based on time, filter in this way i.e. retrieve all records having page view id in the batch being currently processed -
(% if is_incremental() %) where page_view_id in ( select distinct page_view_id from (( source('snowplow', 'events') )) where t_stamp >= (select dateadd('day', -3, max(t_stamp)) from (( this ))) ) (% endif %) - issue - this subquery for finding all the distinct page view ids can become very slow
- we should avoid such fixes if we have truly huge amounts of data, as these optimizations can become very slow
- good candidates for incremental models - immutable events, like page views on our browser
- if they are mutable - we need fields like updated at to be able to filter easily
Snapshot
- think slowly changing dimensions (type 2)
- we run them using
dbt snapshot, as they run separately from our models - we now get four new columns -
dbt_scd_id- a totally unique identifierdbt_updated_at- a mirror of theupdated_atfielddbt_valid_fromanddbt_valid_tofields
- we use a different target database and schema, which is different from what we use in profiles / environments. this is because we want it to be independent from our models, since they cannot be reproduced. it is source data, which is not something we otherwise have access to
- just like incremental models, we need to specify the unique key
- we can specify a strategy and the field for this strategy, which is timestamp and updated at in our case
(% snapshot snap_products %) (( config( target_database = 'xyz', target_schema = 'pqr', unique_key = 'id', strategy = 'timestamp', updated_at = 'updated_at' ) )) select * from (( source('abc', 'def') )) (% endsnapshot %) - we pretend that this snapshot is actually available in the source itself, and use it like that
- sometimes however, we might have these snapshots at the end of our reported data, to view the changes easily
- nothing changes as such, we select from
refinstead ofsource, thats all
Advanced Testing
- there are four use cases of testing -
- tests on one database object - constraints on table, what can be contained inside a column, etc. e.g. unique, not null, etc
- how one database object refers to another. the idea is that the other table is less modified and is closer to the source of truth. e.g. relationship tests
- singular tests, which are unique to our business logic
- source freshness tests
- test coverage - inside dbt_project.yml, we can enforce that all models have tests and documentation
- for this, first add the meta testing package
- then, add the below to dbt_project.yml
models: project: +required_docs: true marts: +required_tests: { "unique.*|not_null": 1 } - this way, we are saying all models should have docs, and all models inside the marts folder should have unique and non null tests
- then, we can run these checks using
dbt run-operation required_tests - this package also allows us to override on a per model basis using the config block
(( config(required_tests=None) )) - note - verify if the features in this package are already included as a part of dbt project evaluator
- we can also use dbt coverage to compute coverage
- one technique - we can use
dbt build --models state:modified+in for e.g. our prs. it will compare manifest.json to the last successful job, and test and build all those models and all its downstream - different ways of running tests -
- run all tests -
dbt test - run tests for a specific model only -
dbt test --select model. understand how it will automatically run singular tests for the model as well. maybe it can do so because we useref - run tests for all models in a subfolder -
dbt test --select marts.core.* - recall - space is for union. so,
dbt test orders customerswill run tests for both models - recall - comma is for intersection. so,
dbt test orders, test_type:singularwill run singular tests on orders - like singular, for running generic tests only, we can use
dbt test orders,test_type:generic - run tests for sources only using
dbt test --select source:* - run tests for everything but sources only using
dbt test --exclude source:* - run tests for a particular source only -
dbt test --select source:jaffle_shop - run tests for a particular table only -
dbt test --select source:jaffle_shop.orders
- run all tests -
- we select multiple models to build using the select syntax. assume one of the models fail to build. we can supply it with the
--fail-fastflag to ensure that the other running models are cancelled - recall how tests in dbt typically work - some sql is run, and this returns the records that fail these tests. we can add the
--store-failuresflag to the test command. this way, a table is created for the each failed test, containing the records that failed the tests. these tables have descriptive names as well, and querying these tables is easier than looking through the logs
Custom Tests
- recall custom singular tests - we create sql files in the tests folder. the test fails if the results returned by our sql is non empty
- we can disable singular tests by placing the below at the top -
(( config(enabled = false) )) - we can also have custom generic tests. it looks like a macro, but the macro tag changes to a test tag
- these are stored under the tests/generic folder
- we write the custom generic test as follows -
(% test greater_than_x(model, column_name, x) %)
    select
        (( column_name ))
    from
        (( model ))
    where
        (( column_name )) < (( x ))
(% endtest %)
we can use the test like this -
columns: - name: amount tests: - greater_than_x: x: 0- we can overwrite the 4 built in generic tests using the above method as well, just keep the name same
Tests in Packages
- dbt utils has several key functions and tests that we typically use
we can see the list of generic tests it supports here
- name: orders columns: - name: amount tests: - dbt_utils.expression_is_true: expression: ">= 0"- we can inspect the macro under dbt_packages/dbt_utils/macros/generic_tests/expression_is_true.sql
dbt expectations also has a lot of common tests that we typically use
- name: orders columns: - name: amount tests: - dbt_expectations.expect_column_values_to_be_between: min_value: 0 row_condition: "order_id is not null"- using
row_condition, we only consider orders with non null ids - use audit helper to help compare the results returned by two different queries. e.g. we are performing some refactoring, but would like to ensure that the results have not changed
- they are only run in the ide, and not in the ci environment. so, we can store it inside the analyses folder / as a macro and run it manually
- the
compare_relationsfunction can give us a summary about how many rows / what percentage of rows matched vs mismatched(% set old_relation = adapter.get_relation( database = "old_database", schema = "old_schema", identifier = "fct_orders" ) %) (% set dbt_relation = ref('fct_orders') %) (( audit_helper.compare_relations( a_relation = old_relation, b_relation = dbt_relation, exclude_columns = ["loaded_at"], primary_key = "order_id" ) )) - the
compare_column_valuesfunction can be used to compare the values of a particular column in the two relations - a technique can be to use the below code to obtain all columns of a relation, and iterate over it one by one and run the
compare_column_valueson all columns(% set columns_to_compare=adapter.get_columns_in_relation(ref('orders__deprecated')) %) - there are more functions, refer docs for the complete list
Test Configuration
if we have
not_nulltest, it is going to stop any further testing. we can change this behavior as follows -- not_null: config: severity: warn- understand that this effectively means that if we were running
dbt build, the building process would continue building the models downstream using the configuration below, test passes by default, a warning is thrown if we have more than 10 violations and an error is thrown if we have more than 30 violations
- not_null: config: severity: warn error_if: ">30" warn_if: ">10"- for a singular test, we can use the config block for configuring this
we can add the where clause for running the test on a subset of records only -
- unique:
    config:
      where: "order_date > '2018-03-01'"
we can limit the failures we return. i guess it can save us on the compute costs, reduce the amount of data stored if we store for failing tests, etc
- unique:
    config:
      limit: 10
storing the failing records of a test - we can also configure the schema suffix. by default, it is
dbt_test_auditi believe i.e. if my development credentials store the target schema asdbt_sagarwal, the test failures would be stored under the schemadbt_sagarwal_dbt_test_audit- unique: config: store_failures: true schema: xyzwe can configure our tests at a project level using dbt_project.yml -
tests:
  jaffle_shop:
    +store_failures: true
Deployment Architectures
- deployment architecture / git workflow - method of organizing automatic execution of dbt tests and code from development to production
- direct promotion / one trunk - merge feature branches into the main branch / production directly
- developers will create new feature branches from the latest version of the main branch, make changes and test and finally open a pr
- continuous integration - pull requests will trigger some automated testing
- the changes can be reviewed and merged
- continuous deployment - any new jobs in dbt that pulls from the main branch will include these changes
- risk - faulty code might go directly into production
- indirect promotion / many trunks - merge feature branches into a staging branch / environment for additional testing before merging into the main branch / production
- the prs are created against the staging branch instead
- advantage - during development, we only test that features work good in an isolated manner. the staging branch helps us test these features together, before we merge it into production
- when creating a deployment environment, we can select the deployment type. i think we choose production / staging here based on our git workflow
![]()
- for the indirect promotion strategy, we need to edit the existing development environment, and set its branch - this basically means which branch developers create branches from / merge branches to (look at the bottom of the image below)
![]()
- in a similar way, we need to set the branch for the staging environment as well, to indicate that jobs for this environment should look at the staging branch
- we do not have to set this branch for the production environment, since it will look at the default branch of our repository, which is main
- remember to set a different schema for the two environments under deployment credentials as well
Advanced Deployments
- 4 types of jobs seen typically have been described below
- standard job -
- build the entire project
- for incremental models, only process the new / updated data
- typically runs daily
dbt build
- full refresh jobs -
- same as standard job, but rebuild incremental models from scratch as well
- typically runs weekly
dbt build --full-refresh
- time sensitive -
- sometimes, standard jobs may not be frequent enough for us
- so, we run parts of the dag only (maybe using
--selectsyntax?) - typically runs hourly
dbt build --select +fct_orders+
- fresh rebuild -
- leverages the source freshness feature
- only models relying on refreshed sources are run
- supported in newer versions of dbt
dbt build --select source_status:fresher+
- standard job -
- some solutions to run selective models -
- tag models to run models with specific tags
- setup a directory structure to run models inside a specific directory
- only build models which are upstream of an exposure
- run only jobs where sources have changed (discussed in fresh rebuild)
- common pitfall -
- we run a large number of specific jobs - all sales models in one job, all marketing models in another job and so on
- issue - we end up running the overlapping bits of these models multiple times
- solution - use union and intersection
- rather than running multiple one off jobs, we are basically running a single unified job, thus avoiding rebuilding
- when running a job, we can use deferred. i think this means that it will observe the manifests of the other job and accordingly determine what to run. e.g. in slim ci, our pr jobs will look at the manifests produced by the last production / staging job (depending on our git strategy) to determine what has changed
- we can trigger jobs using one of the following ways -
- manually
- on a schedule
- using webhooks - e.g. whenever pr is created in github / gitlab, we run this job. typically uses slim ci
- send requests to dbt cloud api - airflow can use this i guess. we need to specify the account id, job id and a token
- cron in dbt -
- cron expression - minute, hour, day of month, month, day of week
*for all,,for multiple values,/for steps,-for a range of values- assume we have a time sensitive job and a full refresh job, and we want to avoid collision between them
- we can build this using three different jobs
- for time sensitive jobs -
*/30 * * * 1-6- every 30 minutes, monday-friday*/30 0-4,8-23 * * 0- every 30 minutes, from 0-4 and 8-23, sunday
- for the full refresh job -
0 5 * * 0
- in dbt cloud, we can only have only one active run for a job at a time. this means that if a second run is triggered while another one is still running, it will be queued and run only after the initial run is finished
- another issue - every time we make a commit to our pr / feature branch, it rebuilds the whole dag, which can be computationally expensive
- slim ci - identify what has changed, and only build these and its downstream
- command -
dbt build --select state:modified+ - when creating a job for an environment, we are presented with three options - deploy jobs (run on a schedule), continuous integration job (run on pull requests) and merge job (run on merges to git branches). the second one is what we need to select i assume
- my understanding - the two later types of jobs (ci and merge) were called the webhook method of running jobs in the past i believe. refer above where we saw there are 4 methods of triggering jobs
- note - i think jobs of type ci create a new schema with the pr number appended to it to avoid conflicts
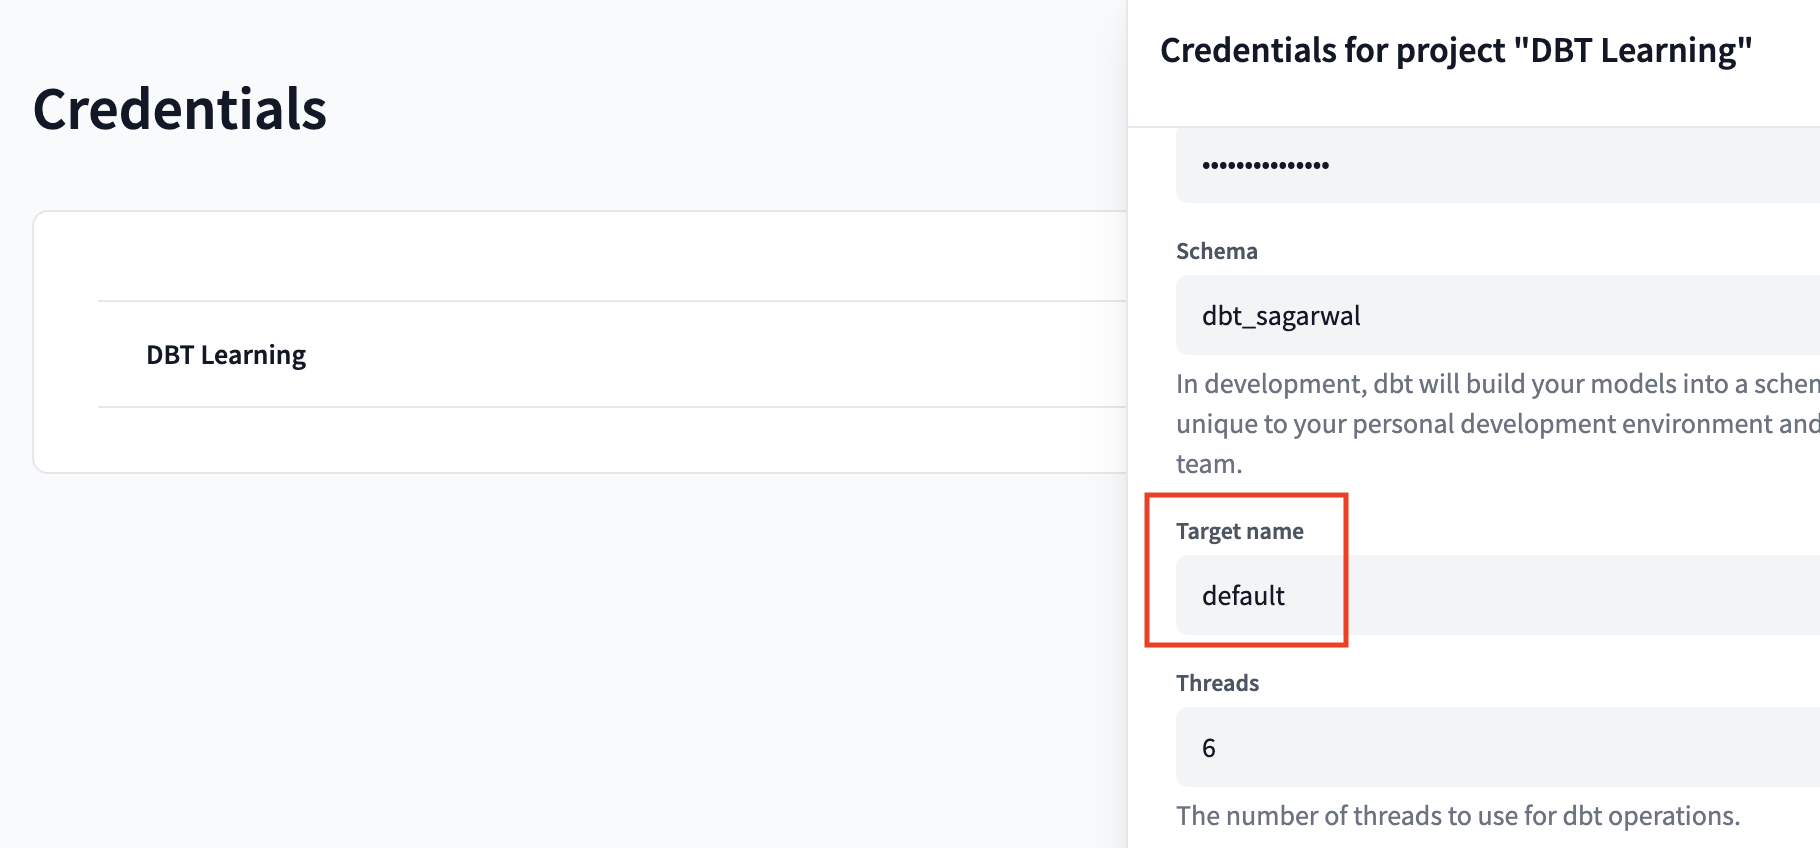
- target can be accessed in any jinja block etc. it contains various information about the warehouse, schema, etc. i created a file called target.sql inside the analyses folder. it just contains one line -
(( target )). the compiled result contains the object below{ 'account': 'zj22962.ap-southeast-1', 'user': 'shameek', 'database': 'analytics', 'warehouse': 'transforming', 'role': 'accountadmin', 'schema': 'dbt_sagarwal', ... - we can set the value of
namein this target object at job level / inside developer credentials. it isdefaultby default![]()
- it is generally advised to leave it as default for developer credentials, otherwise all the developers would be expected to set this. we can however, set it for the jobs based on use case
- environment variables - can be set at project level, environment level, and finally job level or personal developer level
- order of priority - check at job level / personal developer level, then the environment (deployment or development) and finally at the project level
- all environment variables must start with the prefix
DBT_ - we can then access them using
(( env_var('DBT_XYZ') ))or(( env_var('DBT_XYZ', 'default') )) - variables starting with
DBT_ENV_SECRET_are used for sensitive configurations - e.g. use case - git access tokens for private packages
- they should only be used inside profiles.yml and packages.yml, nowhere else, e.g. not in dbt_project.yml
- they are for e.g. hidden using
*****from logs
DBT Project Evaluator
- it has five main categories -
- modelling - e.g. every raw source table should have a one to one with a staging table to centralize data cleanup
- testing - e.g. every model should have a tested primary key
- documentation - e.g. every model should have a description
- structure - e.g. intermediate model is in the intermediate sub directory
- performance - e.g. models used by an exposure are materialized as a table
- first, it looks at our artifacts and converts it into a queryable table, to run queries against it
- then, it will also record the violations in a table. this table is then queried to give us the exceptions
- we can refer the documentation for each exception that we get, and how we can resolve them
- i think just adding the package is enough,
dbt buildstarts showing us the issues in our project using “warnings” - we can specifically run the evaluator using
dbt build --select package:dbt_project_evaluator - we can avoid running it multiple times by disabling it in our regular build, e.g. the slim ci build now changes to this -
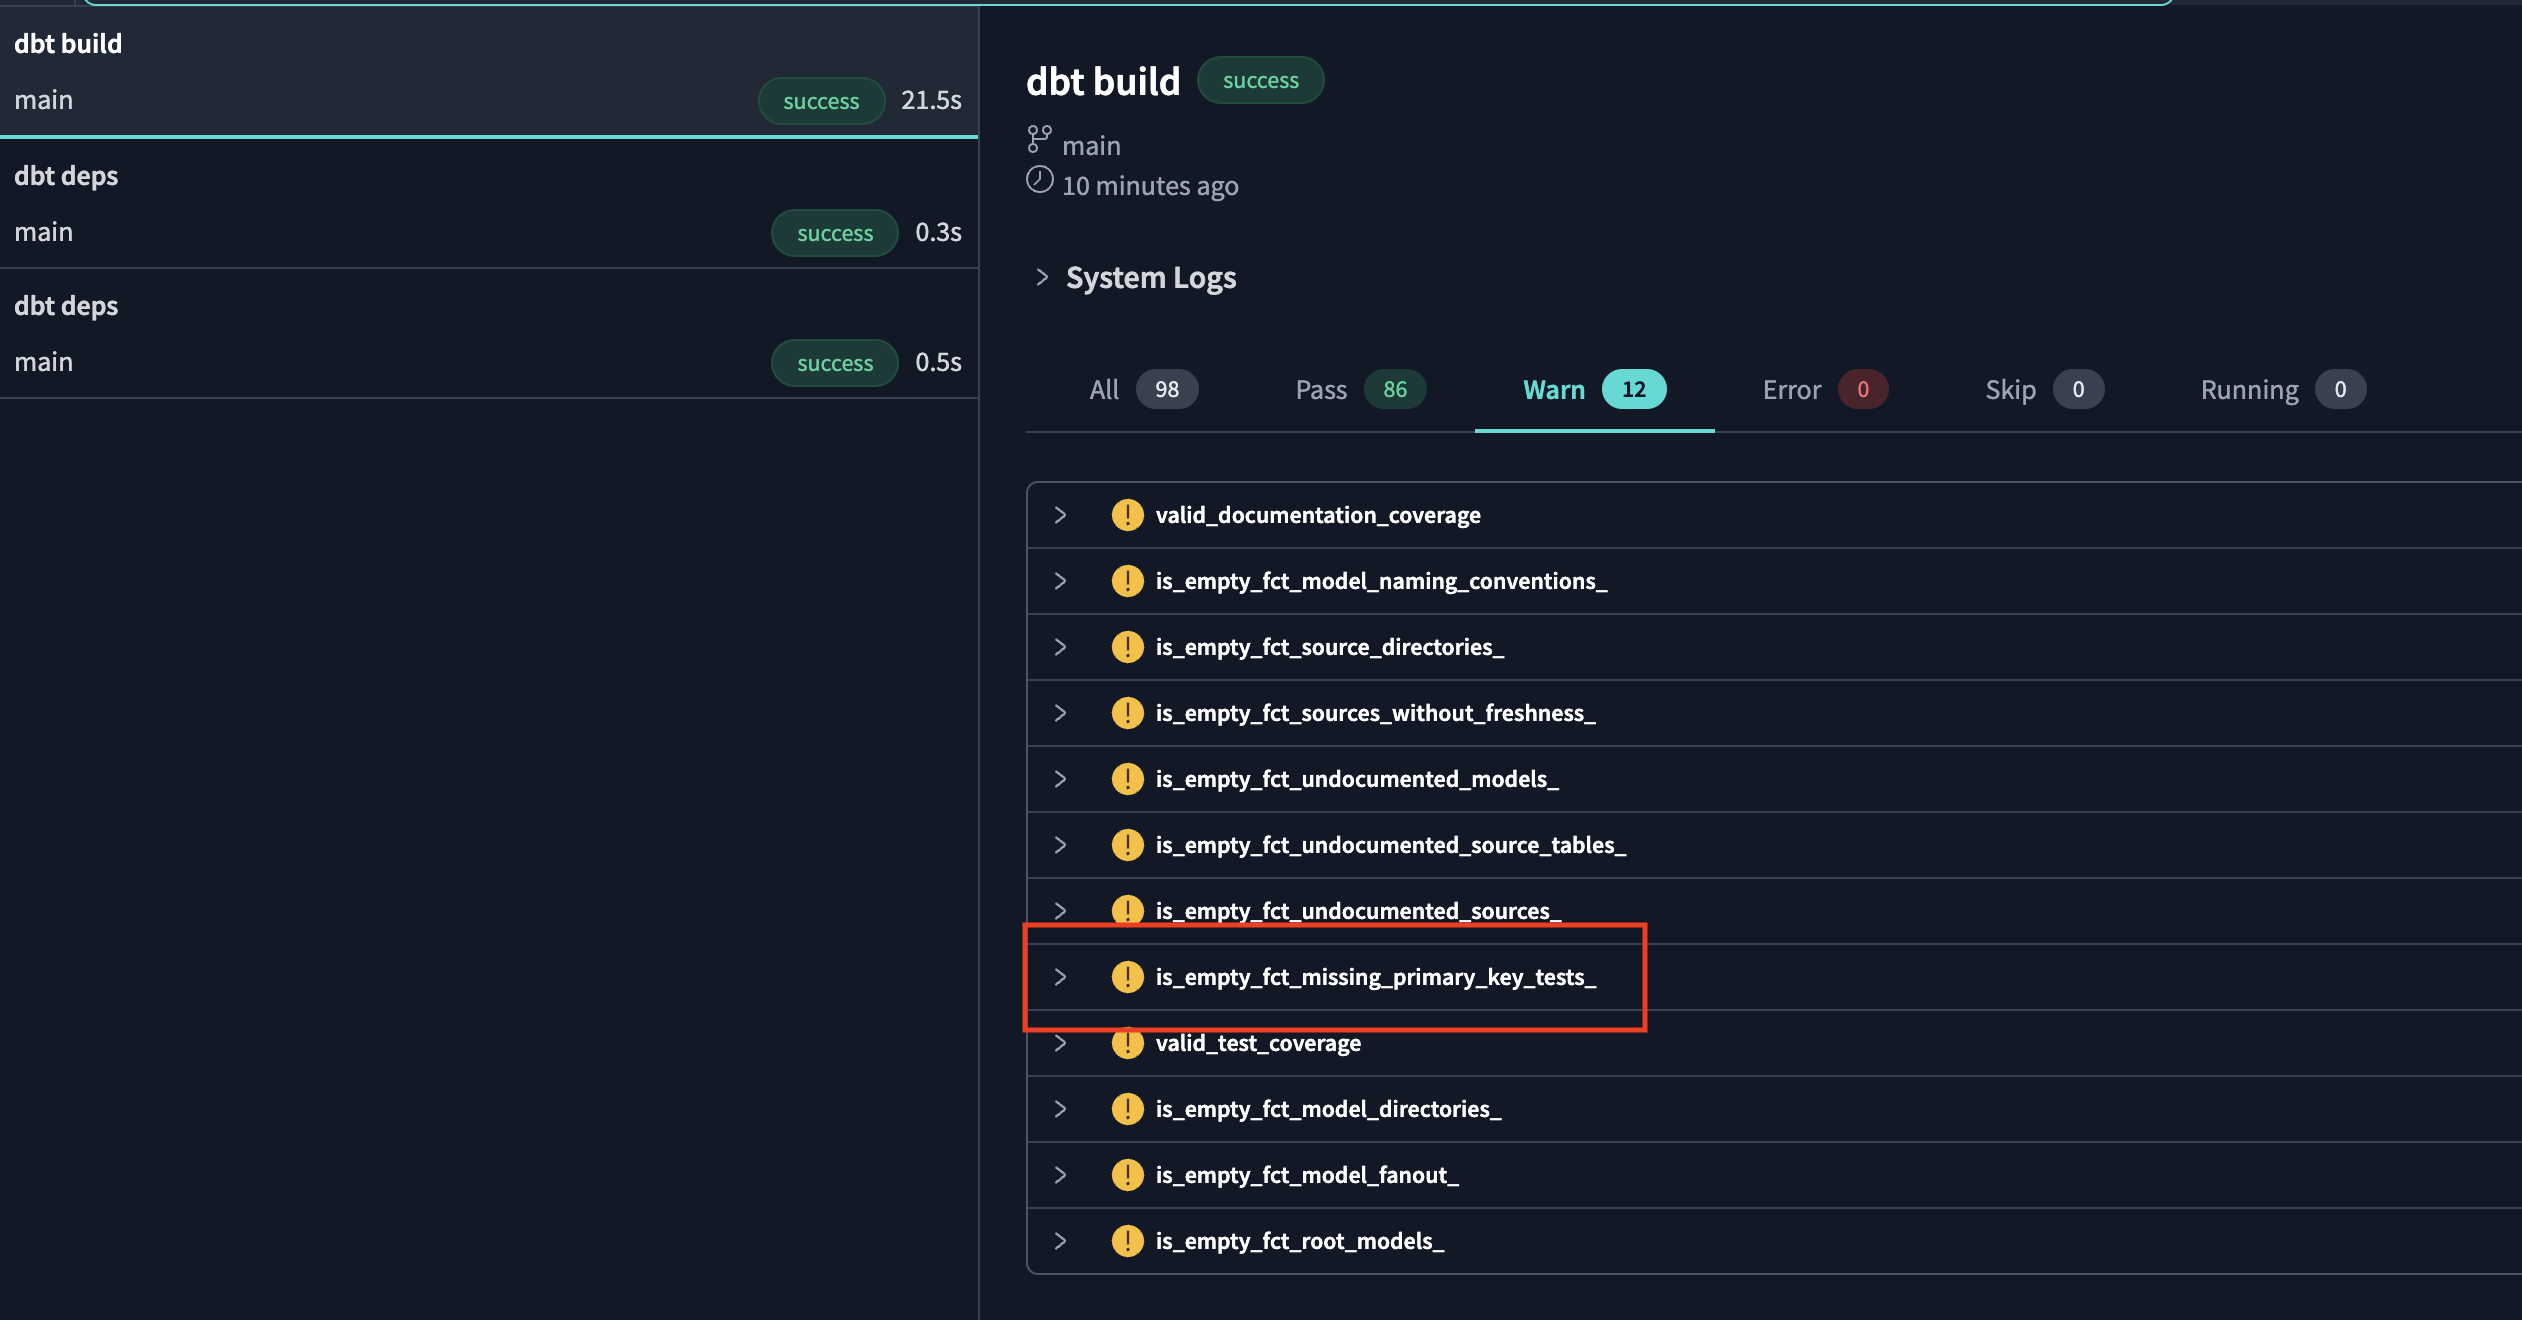
dbt build --select state:modified+ --exclude package:dbt_project_evaluator - e.g. we see that we get the exception
is_empty_fct_missing_primary_key_tests_![]()
- in the documentation, we see that the project evaluator model corresponding to this test is
fct_missing_primary_key_tests - we can now write the query below to see which of our models violate the rule. recall that we can reuse macros or models of packages
select * from (( ref('fct_missing_primary_key_tests') )) - sometimes, there can be acceptable violations to these rules
- the exceptions can be recorded under the seed named dbt_project_evaluator_exceptions.csv
- it contains the following columns -
- fct_name - the fact name, e.g. fct_missing_primary_key_tests above
- column_name - the column name of fct_name
- id_to_exclude - the model to exclude. can use like pattern as well, e.g.
stg_%_union - comment - why we chose to make this exception
- finally, only a single seed can exist with a given name, so we need to disable the default empty seed of the evaluator project using the following -
seeds: dbt_project_evaluator: dbt_project_evaluator_exceptions: +enabled: false - now, to run the evaluator and the seed, use
dbt build --select package:dbt_project_evaluator dbt_project_evaluator_exceptions - we might want to configure the severity of this as error in ci jobs, but as warn in others to ensure best practices. we can configure this using environment variables, and then use it inside our dbt_project.yml as follows -
tests:
  dbt_project_evaluator:
    +severity: "(( env_var('DBT_PROJECT_EVALUATOR_SEVERITY', 'warn') ))"
Defer and Clone
- we already saw slim ci -
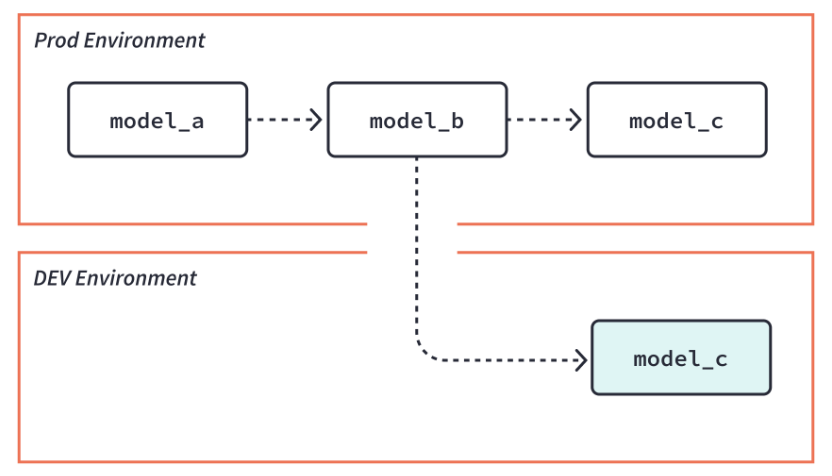
dbt build --select state:modified+ - however, when doing this, our upstream models would not even exist - so we can use
dbt build --select state:modified+ --defer. this way, our models can directly reference the existing models in for e.g. the prod environment![]()
- now, another issue - a lot of our final facts and dimensions do not exist because we are using slim ci
- so, this might break our downstream dashboards which we might want to test
dbt clone- it will use cloning if our warehouse supports cloning (e.g. big query, snowflake), else create passthrough views (e.g. redshift) i.e. views that areselect *pointers to the production objects- remember that in warehouses that support cloning e.g. snowflake, we typically only pay for the diff. the underlying storage points to the same data, hence we save on those costs
- the clone command can perform the cloning of various objects in parallel as well using multithreading
- till now, we saw one use case of clone - used to avoid breaking downstream bi dashboards etc in ci / sandbox environments
- another use case of clone - use for blue green deployments. my guess - the idea might be to use clone for blue environment, run dbt build on it, which runs the tests, and if the tests pass and everything looks good, swap the blue and green environments. we ended up paying very less for the additional blue environment by using cloning
- another use case of defer - support multiple dynamic sources - because we can defer to different environments easily
Exposures
- define downstream uses of project. advantages - run, test, list resources depending on exposures, better documentation
nametype- dashboard, notebook, analysis, ml, applicationowner- name or email is required, can contain additional propertiesdepends_on- list of nodes that can be referenced -ref,sourceormetricmaturity- high, medium, lowversion: 2 exposures: - name: weekly_jaffle_metrics label: Jaffles by the Week type: dashboard maturity: high url: https://bi.tool/dashboards/1 description: > Did someone say "exponential growth"? depends_on: - ref('fct_orders') - ref('dim_customers') - source('gsheets', 'goals') - metric('count_orders') owner: name: Callum McData email: data@jaffleshop.com
Miscellaneous Notes / Questions for Certification
- specifying config for materialization at the top of the model file takes precedence over specifying it inside dbt_project.yml
- we can use python models, when simple sql is not enough for our use case. now, we can use all kinds of python packages as well. it only supports materialization types of table (default) and incremental. it makes sense, because view anyway cannot support any complex operations and should be executable by the data warehouse
- python models operate on dataframes, and return a final dataframe
- it can be a spark dataframe, pandas dataframe or snowpark dataframe, depending on our warehouse and performance needs
- example -
def model(dbt, session): my_sql_model_df = dbt.ref("my_sql_model") final_df = ... # stuff you can't write in SQL! return final_df - dbt - a class compiled by dbt core, unique to each model, enables you to run your python code in the context of your dbt project and dag. e.g. we are able to use
dbt.ref - session - a class representing your data platform’s connection to the python backend. the session is needed to read in tables as dataframes, and to write dataframes back to tables
- what is the best practice when dealing with a large feature in dbt that spans multiple git branches and requires a coordinated merge into the main branch?
- merge the branches into a single feature branch, then merge this branch into the main branch
- coordinate the merge of each branch into the main branch in a sequence that respects their dependencies
- in a dbt project, you have multiple feature branches that need to be merged into the main branch. which git strategy would be most appropriate to ensure a smooth integration of these features while maintaining the integrity of the main branch?
- merge all feature branches into a staging branch, resolve conflicts, and then merge into the main branch
- directly merge each feature branch into the main branch sequentially
- both above questions answer differently. i think it is about understanding the language of the question. one is about coordinating merge, another about maintaining integrity of main branch. also, one mentions staging branch, feature that terminology over a feature branch
- for the multi tenant architecture, we need to ensure that a separate schema gets used for every tenant. for this, we can use the
generate_schema_namemacro to generate schema names dynamically based on things like tenant identifier dbt debug- helps check the database connection and working of credentials, dbt version, etc- use subset of production data inside development to mitigate risk
- to run a specific model, use
dbt run --select model_name. this select syntax can also be used for specifying packages, tags, path to directories, etc - full refresh can be passed via -
- cli flag -
--full-refresh - dbt_project.yml
models: resource_path: +full_refresh: false - model config block itself
(( config(full_refresh=false) ))
- cli flag -
- some issues flagged by dbt project evaluator
- rejoining of upstream concepts - if a model has two children, and one of them is also the parent of the other. e.g. solution - expand a model so that all necessary data is available downstream
![]()
- model fan out - 3 or more direct leaf children. solution - bi tool itself should handle these minor customizations
![]()
- staging models dependent on other staging models. solution - change to an intermediate model etc
![]()
- rejoining of upstream concepts - if a model has two children, and one of them is also the parent of the other. e.g. solution - expand a model so that all necessary data is available downstream
- dbt’s built in profiling feature can be used to fix performance bottlenecks. it gives the breakdown of the time spent in parsing sql, running the query, materializing the result, etc
- partial parsing - dbt stores a manifest in target/partial_parse.msgpack, and uses it to determine which files have changed since the project was last parsed. in case of issues, we can delete this file to clear out of date / corrupted data
- the solution to the problem below is to update the dbt_utils package in packages.yml to the latest version available on the dbt hub
Running with dbt=xxx Runtime Error Failed to read package: Runtime Error Invalid config version: 1, expected 2 Error encountered in dbt_utils/dbt_project.yml - hooks - run sql statements at certain points of the dbt lifecycle
- pre hook - executed before a model, seed or snapshot is built
- post hook - executed after a model, seed or snapshot is built
- on run start - executed at the start of
dbt run,dbt seed,dbt snapshot - on run end - executed at the end of
dbt run,dbt seed,dbt snapshot
- the first two are also called model hooks, the remaining are also called global hooks
- we can either specify the sql directly, or call a macro inside dbt_project.yml
on-run-start: "(( insert_audits('run_started') ))" on-run-end: "(( insert_audits('run_ended') ))" models: pre-hook: [ "(( insert_audits('run_started') ))" ] post-hook: [ "(( insert_audits('run_ended') ))" ] - the corresponding macro can look like this -
(% macro insert_audits(audit_type) %) insert into hooks_demo.audit (audit_type) values ( '(( audit_type ))' ); (% endmacro %) - working of scheduler -
- if all run slots are occupied, the job will be queued to wait. this shows up under wait time i believe
- if there is already an instance of the job running, the new run is queued to avoid collisions
- if both conditions above pass, dbt creates a pod, sets the environment variables, sets the credentials, authenticates the git provider, etc. this shows up under prep time i believe
- now, the total time spent by a job in the queue is a sum of wait time + prep time. e.g. if a job was scheduled to start executing at 2.00, but starts executing at 2.15, and we know that the prep time is typically 5mins, we can conclude that the wait time was 10mins
- “over scheduling” can occur when jobs take longer than their scheduled frequency. the scheduler can cancel scheduled jobs in such cases. to keep the backlog from ever expanding, the scheduler will cancel previously queued runs when a new run is scheduled
- note - however, the scheduler never cancels the jobs triggered by api, only the scheduled ones
- the 403 error stating ‘forbidden: access denied’ when using service tokens in dbt cloud is typically related to ip restrictions. identify the network addresses (cidrs) of your third-party integrations that use the service token, and add them to the ip allowlist in dbt cloud to ensure they are recognized as authorized sources of traffic
- in dbt cloud, ci jobs do not consume run slots unlike our typical deployment jobs. so, deployment jobs do not have to wait for the ci jobs to complete
- also, recall how ci jobs are built into schemas with the pr number appended, so multiple ci jobs do not interfere with each other and can be executed concurrently
- the access_token error in the dbt cloud ide is typically related to authentication issues with the data warehouse connection. go to “developer credentials” to rectify / reauthenticate using sso
- handling of changes to snapshots -
- new columns are added
- removed columns are not deleted. i guess maybe because it tries to preserve the history, and it sets the values to null in new incoming records
- it also does not handle changes to the data type of columns - it can only handle expansion for varchar related columns
- uninstall packages using
dbt deps -r - note - i think dependencies.yml can house both the project dependencies (dbt mesh)?, and packages. packages.yml can however only contain packages
- using dependencies.yml is recommended now as it eliminates the need for using multiple yml files
- however, unlike packages.yml, dependencies.yml does not support secret environment variables. so, we should continue using packages.yml if we have for e.g. git access tokens stored inside secret environment variables
- .gitignore should contain the following - target/, dbt_packages/, logs/
- we should only use one secret environment variable per configuration value
- good -
host: "(( env_var('DBT_ENV_SECRET_HOST') ))" - bad -
host: "www.(( env_var('DBT_ENV_SECRET_HOST_DOMAIN') )).com/(( env_var('DBT_ENV_SECRET_HOST_PATH') ))"
- good -
- tags accumulate hierarchically, e.g. tags at project / folder level are combined with tags at model / seed level
- “model timing dashboard” in dbt cloud - breakdown of which model took how much time. we can identify performance bottlenecks using this
- “run history dashboard” in dbt cloud - useful for detailed views of specific job runs
- “deployment monitor dashboard” in dbt cloud - success rates, run durations and trends of jobs over an extended period, like a month
env_varis allowed wherever we can use jinja - so most yml files, sql files, etc- applied state - the state the warehouse is in after successful run of the dbt models
- definition state - reflects the state of the project code, which may not have been executed yet
- we can query these two using discovery api
- discovery api gets its definition from the latest manifest generated in a deployment environment. so, all things like source freshness can be outdated depending on what order the jobs were run, whether
docs generatewas run or not, etc - the “runtime error: could not find profile named ‘user’” typically indicates an issue with missing or stale credentials / authentication
- in a job - go to the deployment environment settings, re-enter your credentials (private key/private key passphrase or username and password), and initiate a new job run
- in the ide - navigate to the profile settings where your development credentials are configured, and re-enter or re-authorize your credentials
- word play - this option was marked as true for a use case of versioning - “to bump the latest version as the canonical source of truth”. i think reason is, by default, recall how by default if not specified, the latest version is used unless we specify
latest_version - currently, all columns have to explicitly specified if using model contracts
- number of concurrent threads supported on a dbt job are unlimited - but it might increase the load on our warehouse, which might affect other applications
- when should you create a new version of a model? select all that apply
- when adding a new column to the model
- when fixing a bug in an existing column’s calculation
- when recalculating a column in a way that substantially changes results for downstream queriers
- when making intentional changes to column names or data types
- solution was to only pick breaking changes i.e. the second two
- for complex documentation inside the yml file itself, use
>for multiple lines / use|for - “dbt explorer” updates after each job run in the production / staging environment.
- profiles.yml is not necessary in dbt cloud, as dbt cloud manages database connections and credentials through its own secure platform settings while working on a dbt project, you encounter a model failure: sql compilation error: column ‘customer_id’ does not exist in table ‘orders’. considering this scenario, which of the following steps should you take first to identify and resolve the issue?
- directly check the ‘orders’ table schema in the database to verify if the ‘customer_id’ column exists
- review the dbt model code and check for any custom macros or incorrect references to the ‘orders’ table
- first, we check if it is an sql issue, then we check if it is a dbt specific issue
- using the
--fail-fastflag, dbt will stop the execution of the dag as soon as it encounters an error. this can be useful for quickly identifying and addressing issues without running the entire dag
Semantic Layer
- “semantic layer” - abstraction on top of our data warehouse that allows us to centrally define metric logic
- by using dbt semantic layer, we ensure that the metric definitions live alongside our models, and different bi applications use the same metric definitions, instead of each of them using their own versions of it
- “dbt semantic layer” uses “metric flow” underneath
- it also gives us features like “metrics lineage”
- with the dbt semantic layer, we define metrics alongside our models
- “semantic models” - the core portion. we define them using a yaml like structure as well - ```txt semantic_models:
- name: order_item
…
```
- name: order_item
- they have the following components - “entities”, “measures” and “dimensions”
- these give “metric flow” the ability to navigate schemas and tables dynamically to construct queries
- each semantic model is 1:1 a dbt model i.e. 1 dbt model can have 1 semantic model
- however, we can create multiple semantic models for 1 dbt model
- each semantic model can have one primary / natural key, just like dbt models
- “entities” - real world business concept, e.g. customers, transactions, etc
- they are id columns in our semantic models that serve as join keys to other semantic models ```txt semantic_models:
- name: orders
…
entities:
- name: order_id type: primary
- name: customer expr: customer_id type: foreign ```
- name: orders
- we either specify the column name using “name”, or specify it using “expr” and the “name” becomes an alias
- we define entities using different types -
- “primary” - has only one record for each row in the underlying table. it includes every record in the underlying table. since it is a primary key, it has to be unique and non null
- “unique” - while it too has only record for each row, it can include only a subset of the rows and need not have all rows. also, it allows for null values
- “foreign” - uniquely identify a row in another table. it links the data in the two tables. again it works like a foreign key - it can be null, can include 0 or multiple instances of the same row, etc
- “natural” - column / combination of columns to uniquely identify a row
- “dimensions” - helps us filter data, group data, etc
- dimensions are pre specified and can therefore be standardized
- they usually contain “categorical” or “time related” information. so, the type can be “categorical” or “time”
- “expr” - underlying column / sql query for a dimension. i believe if not specified, the group name is used ```txt dimensions:
- name: is_bulk_transaction type: categorical expr: case when quantity > 10 then true else false end ```
- with the time dimension, we can specify “granularity” as well. this i assume will run something like “date_trunc” behind the scene for us
- “measures” - sql aggregations performed on columns of our model ```txt measures:
- name: food_revenue agg: sum expr: case when category = ‘food’ then price else 0 end ```
- if for e.g. our aggregation requires arguments (e.g. percentile), we specify it using
agg_params - “metrics” - the language that the business users speak for measuring performance, e.g. new customers, total revenue, etc
- “simple metrics” - reference a single measure without any additional measures ```txt metrics:
- name: order_total label: order_count type: simple type_params: measure: order_total ```
- “ratio metrics” - the ratio between two metrics
type: ratio type_params: numerator: avg_order_amount denominator: max_order_amount - we have “cumulative” metrics as well
- we can specify a “window”, like 1 month, 1 year, 7 days. e.g. 1 month would mean trailing metric aggregation over the last month
- instead of window, we can also specify “grain_to_date” like month, year, etc, so that the accumulation resets at the start of every grain period
type: cumulative type_params: measure: order_total cumulative_type_params: window: 1 month - “derived metric” - created by defining an expression using other metrics. refer the example below -
type: derived type_params: expr: revenue - cost metrics: - name: order_total alias: revenue - name: order_amount alias: cost - the idea is that the supported bi tools like google sheets point to the dbt cloud apis. the dbt cloud inturn executes the sql queries against the configured data platform, e.g. spark
- “saved queries” - used for commonly used semantic queries, again defined using yaml
- idea is to write commonly used metrics, dimensions and filters
- “exports” - write commonly used queries into the data platform ```txt saved_queries:
- name: order_metrics query_params: metrics: - # … group_by: - # … where: - # … exports:
- name: order_metrics config: export_as: table # … ```
- name: order_metrics query_params: metrics: - # … group_by: - # … where: - # … exports: