Langchain Basics
- open source framework with tools and abstractions for building llm applications
- llama index is an alternative to langchain. but langchain is more popular
- below, we discuss some of its useful modules
“chat models” - abstracts the concept of interacting with different llms, so we are not vendor locked. notice how we call
invokeirrespective of the llm providerfrom langchain_anthropic import ChatAnthropic from langchain_openai import ChatOpenAI from langchain_ollama import ChatOllama llm = ChatAnthropic(model='claude-3-opus-20240229') llm = ChatOpenAI(model="gpt-4o", temperature=0) llm = ChatOllama(model="llama3.2") llm.invoke("tell me a joke")“prompt templates” - e.g. dynamically inject user inputs into prompts
from langchain_core.prompts import PromptTemplate

prompt_template = PromptTemplate.from_template("Tell me a joke about {topic}")

# ...

prompt_template.invoke({"topic": "cats"})
“document loaders” - helps us load different kinds of documents, like csv, notion database, and even emails. again, irrespective of the source, we use
load, just like in chat modelsfrom langchain_community.document_loaders.csv_loader import CSVLoader loader = CSVLoader(...) data = loader.load()- setup for uv and adding langchain -
uv init langchain-democd langchain-demouv add langchainuv syncsource .venv/bin/activateuv add langchain-community,uv add langchain-openai
- the name “lang chain” because we chain together different components to build the llm applications
i believe the creation of the chain below is an example of lcel (lang chain expression language) -
from langchain_core.prompts import PromptTemplate system_message = """ given the information {information} about a person, i want you to create: 1. a short bio 2. two interesting facts about them """ system_prompt_template = PromptTemplate.from_template(system_message) llm = ChatOpenAI(model="gpt-4o-mini") chain = system_prompt_template | llm res = chain.invoke({ "information": information }) print(res)- we can use ollama to avoid making requests to the first tier llm models. it is built over llama.cpp, and helps us run llms locally
- run
ollama run llama3.2in terminal to interact with it - install using
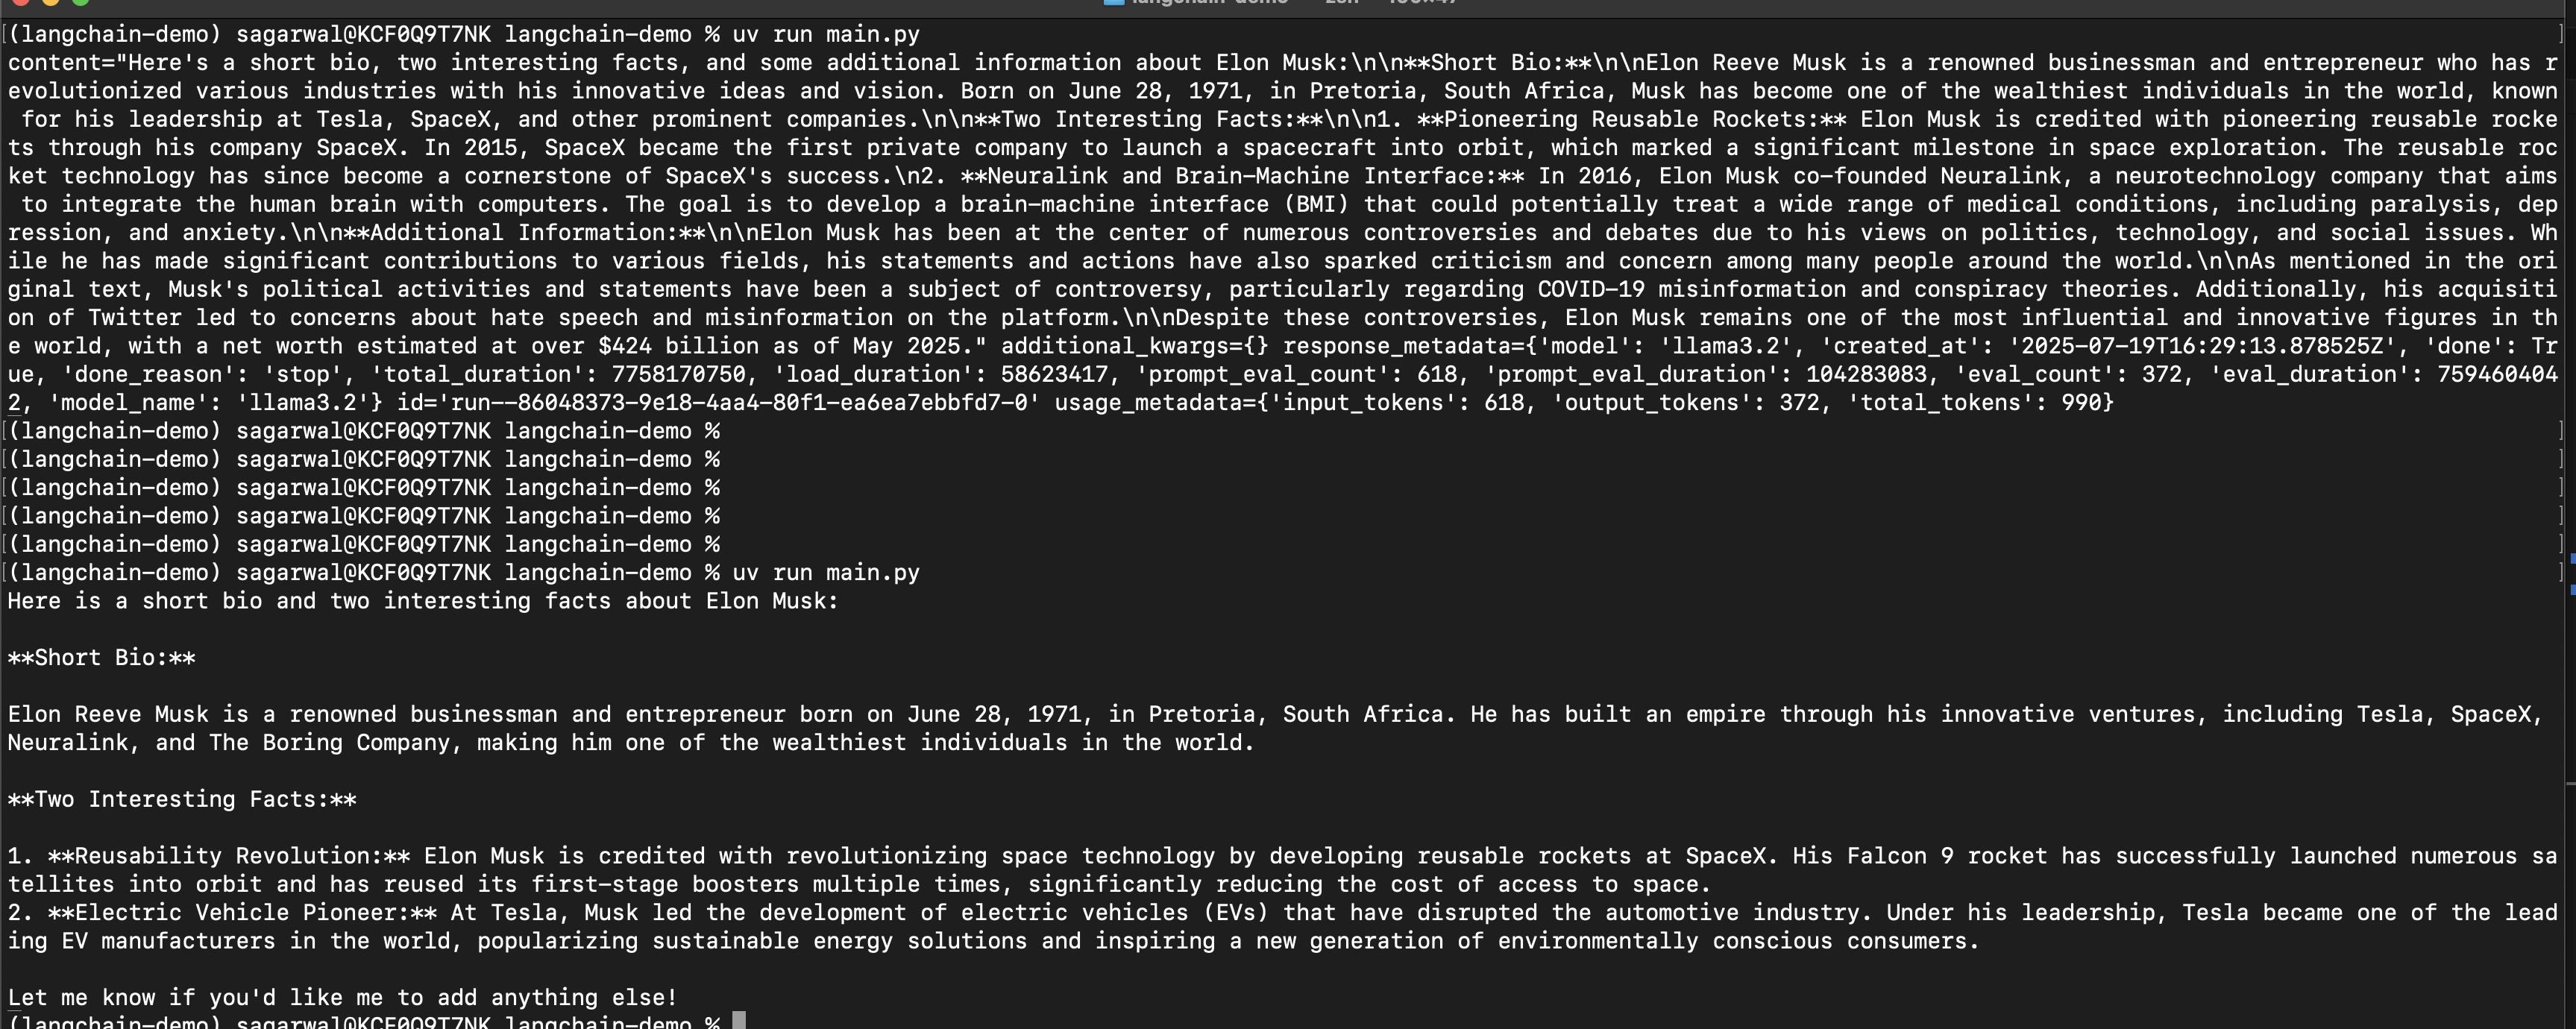
uv add langchain-ollama llm = ChatOllama(model="llama3.2")we see that the output is a part of something called the “ai message object” (look at the screenshot before and after). we can either access its
contentattribute directly, or use “parsers” from langchainfrom langchain_core.output_parsers.string import StrOutputParser chain = system_prompt_template | llm | StrOutputParser()![]()
- by default, llms cannot answer questions like current exchange rate, weather, etc. this is where “agents” come in. ability to interact with multiple “tools”, make multiple llm calls, etc with complete “autonomy”
“tools” - “description” and the actual implementation. the description helps the llms understand what a tool does and use it. the func can be passed any function that we like
linkedin_lookup_tool = Tool( name="linkedin lookup", description="useful for getting the linkedin page url", func="?" ) tools = [linkedin_lookup_tool]- we can also use third party tools. tavily search is a search tool optimized for llms. it comes with a generous free tier. set
TAVILY_API_KEYenvironment variable for it to work -search_tool = TavilySearch() tools = [search_tool] - “langchain hub” - helps us use pre made prompts made by the community
- when we ask an agent to do something - it breaks the task down into smaller “subtasks”. it will perform those subtasks and then return the final answer. the ability of llms to break tasks into subtasks is called “chain of thought”. it is a prompt engineering technique that allows llm to reason and show us its reasoning. and once it breaks down into subtasks, it can perform those subtasks using tools. this is also called “react” or reasoning-action, reasoning-action
- note - we are using harrison chase’s prompt for the “react agent”, the co-founder of langchain. note how it injects our tools and their names in the prompt
react_prompt = hub.pull("hwchase17/react")
llm = ChatOpenAI(model="gpt-4o-mini")
agent = create_react_agent(llm=llm, prompt=react_prompt, tools=tools)
the llm will basically take this with the “scratchpad”, where it notes what has happened so far. it will either respond with the final answer, or the tool it wants to use next, with the arguments to that tool. in this example, we give the name of the person, and try to find the corresponding linkedin profile for them. understand how we created the “react agent” and now, we create a runtime, that helps run the agent in loop for instance. this way, our executor will keep running until the agent returns a final answer. it will call the tools, because recall that the llm just tells that it want to call a tool, it does not call the tool itself. and all of this is abstracted away from us. this is why we provide the list of tools to both the agent and the executor
prompt = """ given the full name {name}. i want you to get me a link of their linkedin profile. your answer should only contain the link. """ # ... agent_executor = AgentExecutor(agent=agent, tools=tools, verbose=True) prompt_template = PromptTemplate(template=prompt).format_prompt(name=name) result = agent_executor.invoke(input={ "input": prompt_template }) return result["output"]- now, due to the verbosity we enabled, we can also see the entire chain of thought in the logs - how the llm decides it needs to call the tool and then how it calls the llm
- e.g. there are two shameek agarwals, and to get more accurate results, i tried to type “shameek agarwal new relic”. in fact, when i tried “eden maro udemy” (it is supposed to be marco and not maro), it still worked. it browsed through multiple eden marcos before picking up the right one
“output parsers” - get structured output from llms. we use pydantic models in this case. note how we instantiate the parser as well
from pydantic import BaseModel, Field
from typing import List
from langchain_core.output_parsers import PydanticOutputParser


class Person(BaseModel):
  summary: str = Field(description="A short summary of the person")
  facts: List[str] = Field(description="A list of interesting facts about the person")


person_parser = PydanticOutputParser(pydantic_object=Person)
additionally, we also need to change our prompt to ask the llm to include the instructions on how to format the output. we do it using the above parser as follows -
prompt = """ ... {format_instructions} """ res = chain.invoke({ # ... "format_instructions": person_parser.get_format_instructions() })- in lang chain prompts, we have “partial variables” (when we know beforehand / at compile time how to format the prompt, e.g. in case of the output format above). the other kind is “input variables”, which we can pass at runtime, e.g. user input
- “chat models” - helps interact with different llms. llms nowadays receive a list of messages. each message can represent the system prompt, human message or ai response, tool response, etc. they also support structured outputs like we saw earlier. finally, llms nowadays can also support images, audios etc. this is called “multi modality”. we interact with a standard interface via this chat model - irrespective of the provider, we do things like providing the temperature, stop sequence, etc in the same way. additionally, it supports features like batching (multiple requests at once), streaming the responses, concurrent calls, etc
- “message” - have “role” and “content”. again - we use the same interface irrespective of the llm provider. e.g. some llms might not support certain roles / have different names for the roles, but langchain abstracts this away from us. roles - “system” (initial context), “user” (human message), “assistant” (ai response. it also contains information around tool calls etc), “tool” (we give the llm the response of the tool). they are all represented as
SystemMessage,HumanMessage,AIMessageandToolMessage
React Agent Implementation
- the idea has already been discussed here. our special “react agent” is basically an llm - that determines whether to call a tool, what tool to call, and how to call it. the output of the tool is then again passed back to the llm, which can then decide whether to call another tool or return the final answer
- defining a tool - the doc string is important, as it gets used by the llm -
@tool
def get_text_length(text: str) -> int:
  """
  Returns the length of the given text.
  """
  return len(text.strip('"').strip("'").strip())
we can call it like any function, or using
invoke. invoke is what things like the “lang chain expression language” use -print(get_text_length("Hello, world!")) print(get_text_length.invoke(input={ "text": "Hello, world!" }))then, we copy harrison chase’s react prompt as is to react_prompt variable below, and generate the full prompt to configure our react agent. however, remove the last part i.e.
{agent_scratchpad}from it just for now. we use “partial variables” to tell it about the different tools -tools = [get_text_length] prompt_template = PromptTemplate( template=react_prompt, partial_variables={ "tools": render_text_description(tools), "tool_names": ",".join([tool.name for tool in tools]), } )- next, we define the llm. note how we define the stop sequence, because according to the react prompt, the observation result comes from running the actual tool, and if it comes from the llm, it is actually a “hallucination”. note - sometimes, depending on the frontier model, the stop sequence might change, e.g. some might use with vs some without the new line character
llm = ChatOpenAI( temperature=0, stop_sequences=["\nObservation", "Observation"] ) - “lcel” or “lang chain expression language” - the “pipe” operator takes the output of the left side, and passes it to the right side
chain = prompt_template | llm res = chain.invoke({ "input": "what is the length of the text 'i am shameek'" }) print(res.content)![]()
- we can see that the “action” part of the react agent clearly states the name of the tool to call, and the “action input” contains the inputs to this tool
now, we actually need to execute this tool. but first, we need to parse the above the output of the llm to know which tool to call. this again, can be done using langchain’s output parser, instead of using complex regex ourselves. note the attributes of res
toolandtool_inputthat have what we need -from langchain.agents.output_parsers import ReActSingleInputOutputParser chain = prompt_template | llm | ReActSingleInputOutputParser() res = chain.invoke({"input": "what is the length of the text 'i am shameek'"}) print(res) # tool='get_text_length' # tool_input="'i am shameek'" # log="I should use the get_text_length function to find the length of the given text.\nAction: get_text_length\nAction Input: 'i am shameek'"now, we need to call the function. in python,
globals()is a dictionary that contains all the global variables (including functions). so, we can use it as follows -tool_output = globals()[res.tool](res.tool_input) print(f"{tool_output=}") # tool_output=14- the idea now is to bring back that
agent_scratchpadand keep iterating, till we get the final answer. not adding that part, since this is enough to drive the point home. e.g. we need to check that the agent output is an instance ofAgentActionorAgentFinish

RAG
- pinecone is a vector database. it has a managed solution with a generous free tier
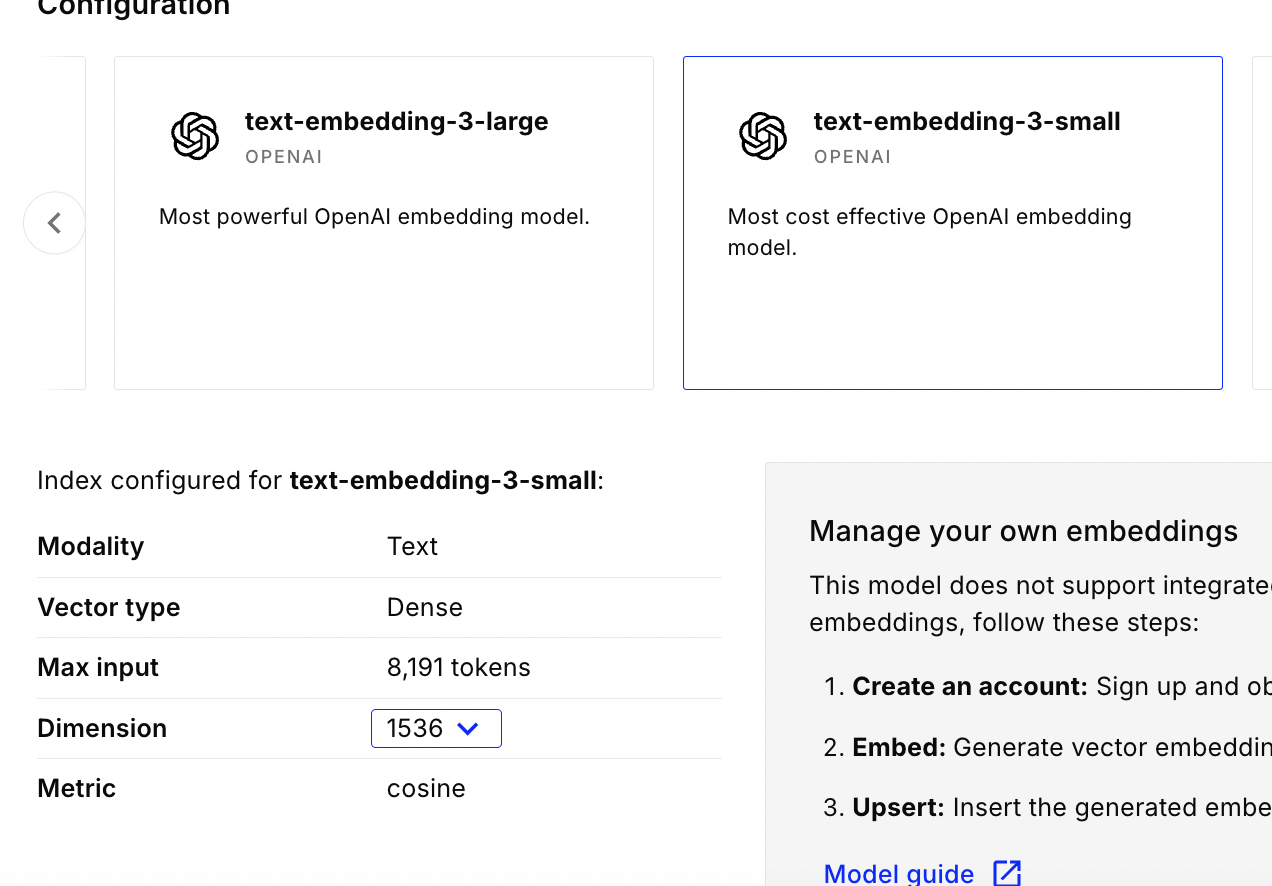
- we create an “index” and choose the configuration - e.g. i chose openai embeddings, 1536 dimensions and the “cosine” metric
![]()
- we will ingest a text file that contains for e.g. contents of this medium blog
- step 1 - take the data and load it into a “document object”. we can find the implementation of the different document loaders like whatsapp, csv, etc here. thanks to langchain, irrespective of the loader, the interface of running load, the documents etc stays the same
- step 2 - split it into smaller “chunks”. we cannot send the entire documents to the llm, as it would surpass the token limit. note - there are multiple splitting strategies, heuristics around choosing the right chunk size (e.g. a chunk in itself should have some semantic value), etc. “overlap” can help us add more chunks to the context, thus not loosing the actual context. “length function” can have different strategies like counting by length by characters, by number of tokens, etc. this is also needed because in llms “garbage in = garbage out”, so adding only relevant context is important
- step 3 - embed the “chunks” into “vectors”. this is usually a black box that converts chunks into vectors in a vector space. usually, the embedding model and providers expose an api we can use to help us do this embedding. again thanks to langchain, switching between embedding providers is very simple
- step 4 - store the vectors in the “vector store”. we want to add vectors, search for similar vectors, etc. we can do this using for e.g. pinecone
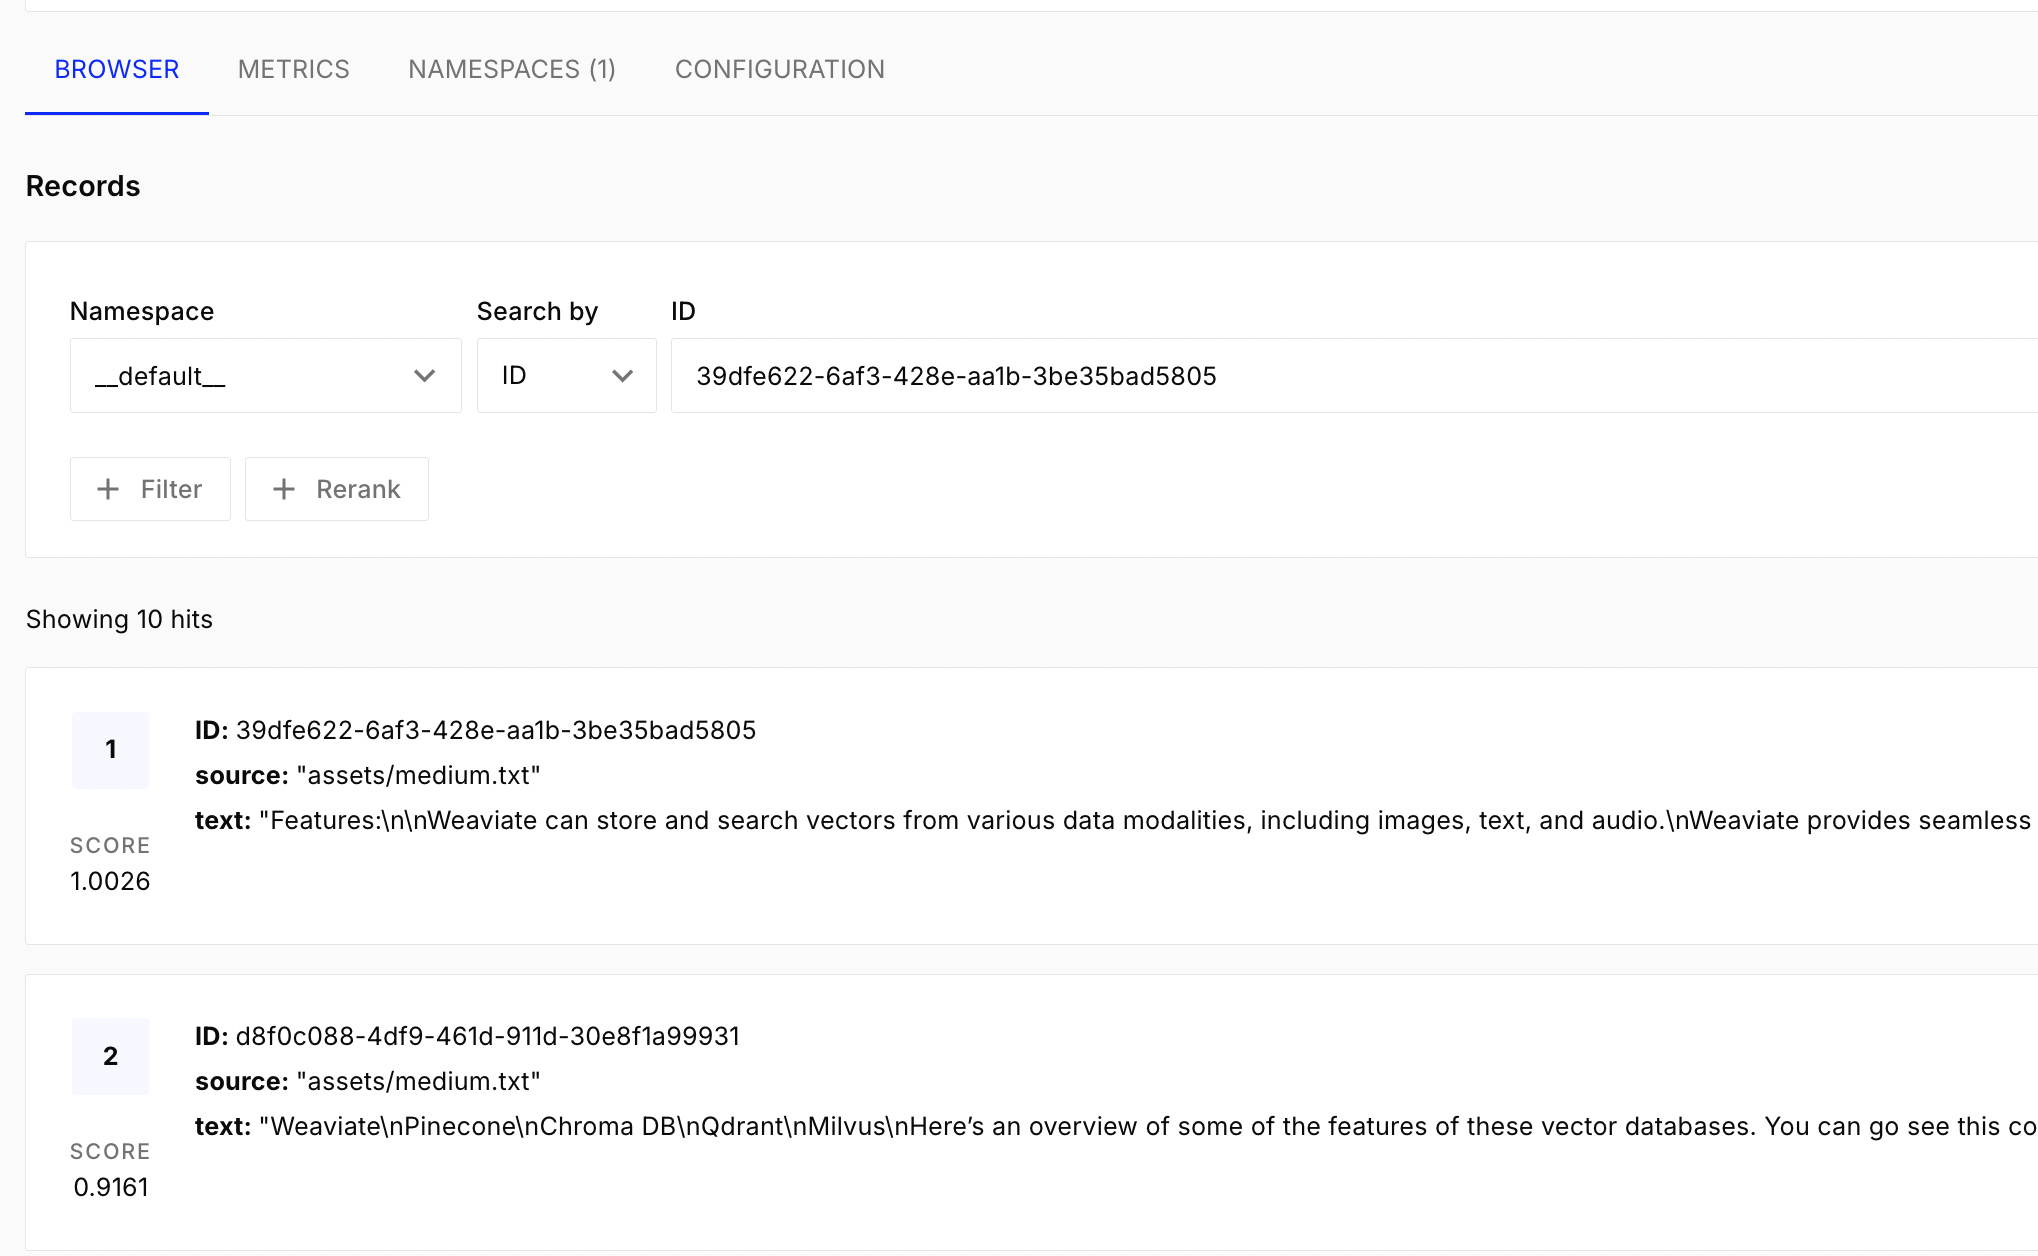
each document looks like this -
[Document(metadata={'source': 'assets/medium.txt'}, page_content='....')]. note - chunks are also a list of documents, just that they have smaller page contentstext_loader = TextLoader("../assets/medium.txt") documents = text_loader.load() text_splitter = CharacterTextSplitter(chunk_size=1000, chunk_overlap=200) chunks = text_splitter.split_documents(document) embeddings = OpenAIEmbeddings() PineconeVectorStore.from_documents( documents=chunks, embedding=embeddings, index_name="langchain-demo", )![]()
- step 5 - convert the user input / prompt into a vector
- step 6 - search similar vectors in the vector store
- step 7 - convert the vectors returned from the vector store back to chunks
- step 8 - augment the original prompt with these chunks
- first, we create a “document chain”. it receives as input the list of documents, and simply shoves all of it into the prompt. hence the name “stuff document chain”. we can use more convoluted techniques, like summarizing of each document before adding them to the prompt. we use the retrieval qa prompt, which for e.g. reduces hallucinations
qa_prompt = hub.pull("langchain-ai/retrieval-qa-chat") combine_documents_chain = create_stuff_documents_chain( llm=llm, prompt=qa_prompt ) - next, we create a “retrieval chain”, that fetches the documents from the vector store and passes it on to the document chain we created above
retrieval_chain = create_retrieval_chain( retriever=vector_store.as_retriever(), combine_docs_chain=combine_documents_chain ) - finally, we invoke the retrieval chain as follows -
retrieval_chain.invoke(input={"input": prompt}) - faiss - “facebook ai similarity search” library. faiss has an option to actually store everything in our ram / local storage. this helps us avoid using pinecone
Custom Prompt
for clearing concepts more, we try to use a custom prompt below. rest everything stays the same
template = """
answer any question based solely on the context below:
{context}

question:
{question}

if you do not know the answer, say so.
always say 'i hope this helps' at the end of your answer in a new line.
"""

def format_documents(documents):
  return "\n".join(doc.page_content for doc in documents)

prompt_template = PromptTemplate.from_template(template=template)
chain = (
    {
        "context": vector_store.as_retriever() | format_documents,
        "question": RunnablePassthrough()
    }
    | prompt_template
    | llm
)

res = chain.invoke(prompt)

Advanced Agents
- “recursive character text splitter” - the idea is to split into smaller chunks based on the semantic meaning of the separator. e.g. first split by new paragraphs (
\n\n), then new lines (\n), and so on. useful in rag workflows when splitting documents into smaller chunks - actually, there is a playground by langchain for us to try out different text splitters, change overlap, size, etc
“langchain experimental” - e.g. for python repl tool. note - these are dangerous, as it can execute arbitrary code. even recently saw news of repl deleting the whole database. an example of using this can be seen below. this actually uses the same execution environment as the one we run
uv run main.pyfrom, so we need to for e.g. install the qr code package in this case as well -python_agent_prompt = hub.pull("langchain-ai/python-agent") react_agent_prompt = hub.pull("langchain-ai/react-agent-template") instructions = python_agent_prompt.messages[0].prompt.template react_agent_prompt = react_agent_prompt.partial(instructions=instructions) tools = [PythonREPLTool()] llm = ChatOpenAI(model="gpt-4o", temperature=0) agent = create_react_agent(llm=llm, tools=tools, prompt=react_agent_prompt) agent_executor = AgentExecutor(agent=agent, tools=tools, verbose=True) agent_executor.invoke(input={ "input": "generate 5 qr codes pointing to https://www.udemy.com/course/langchain/ and save to the directory qr_codes/" })similarly, there is a “csv agent”, that uses the pandas dataframe agent underneath. i think it is a subclass of the python repl tool we saw above. it helps us work with csv files. under the hood, it will for e.g. add the result of “df.head()” etc to the prompt. then, based on the llm response, it will perform pandas operations. finally, we get back the result
csv_agent = create_csv_agent(llm=llm, path="assets/episode_info.csv", verbose=True, allow_dangerous_code=True) res = csv_agent.invoke(input={ "input": "which writer wrote the most episodes?" }) print(res)![]()

Tools
“tool calling” - we can use the “bind tools” method on “chat model”. this way, our llm would be equipped with tools
@tool def multiply(a: int, b: int) -> int: """Multiply a and b.""" return a * b llm = ChatOpenAI(model="gpt-4o-mini", temperature=0) llm = llm.bind_tools([multiply]) res = llm.invoke("What is 3 times 4?") print(res)- note - this populates the
tool_callsattribute in the result, which has the list of tools to call according to the llm. now, we need to call the tool and send it back to the llm. i think this is why, we need to use “create tool calling agent”, “agent executor” etc - what we saw till now in earlier sections was “not” tool calling
- it was “react agent”, based on the react paper. it was a nice prompt to handle the reasoning logic for us
- we can argue that with the react prompt, we get some flexibility around the actual underlying prompt, which we do not get when using tool calling. we are not exposed to the underlying implementation of the actual “tool selection” when we use the tool calling feature
Prompting
- predict the next word with the highest probability. it calculates the “probability distributions” of its vocabulary of words
- components of a prompt - “instructions”, “context”, “input data”, “output indicator”
- “instructions” - what the llm needs to do
- “context” - additional information. helps improve the output significantly
- “input data” - the input we want the llm to process
- “output indicator” - signals the llm to output the result. can be explicit or implicit
- “zero shot prompting” - we do not provide any examples, “few shot prompting” - we give a few examples
- “chain of thought (cot) prompting” - by google. involves breaking down the problem into smaller steps. this allows the responses to be more accurate. additionally, the idea is we use techniques like “few shot prompting” to provide examples of how to break down the problem, and then ask the llm to do the same
- “react prompting” - reasoning-enacting-reasoning-enacting. it is basically “chain of thoughts” combined with “actions” (e.g. calling tools i think)
LLM in Production
- in the react agents for e.g., we saw we were using llm as a reasoning engine. this means it involves multiple calls to the llm, that too in a sequential manner. this can be long running / slow. there are tricks like using different kinds of caching to speed the address these issues (not discussed here)
- “context window” - because of the limitations in context window length, the react agent cannot take a “lot of steps”. it is also a good thing - too many steps results in issues like “lost in the middle”
- “probabilities” - let us say that the probability of the next right answer is 0.9. this can compound quickly - e.g. 0.9 6 times is 0.53
- “hallucinations” - techniques like rags reduce hallucinations
- “fine tuning” - fine tune the llm for e.g. for the tools at its disposal
- “pricing” - we pay for the tokens we send to and receive from the llm. so, we can reduce this by for e.g. reducing the context we send (by storing it in a vector database and only retrieving the relevant context), by using semantic cache, etc
- “llm guard” - e.g. llms have access to a lot of tools, databases etc. this safeguard helps us protect from scenarios where elevated access with hallucinations can for e.g. wipe out our data
- carefully view the terms of the llm provider. do they use our data for training purposes? how long do they retain the data for? also, these might be different for the customer solution they have vs the apis they expose
- another solution for the above is self deploying open source models - either we manage the gpus etc ourselves, or we outsource this to cloud providers like aws
Langchain Token Limit Handling
- llms have token limits. there are multiple strategies to handle this that langchain supports
- “stuff chain” - we send all documents to the llm as is, and it summarizes them for us
- “map reduce chain” - we first create summaries for each of the documents. this can be done in parallel. this is the “map” phase. finally, we create the final summary by collecting all of them and calling the llm. this is the reduce phase -
chain = load_summarize_chain(llm, chain_type="map_reduce") chain.run(docs) - “refine chain” - similar to the “fold left” function in functional programming. we summarize the first document, then the summary + second document, then the summary + third document, and so on
Langgraph
- it makes building agentic applications easier - we often need complex control logic when building agentic applications, e.g. call a tool with a specific prompt based on the state. langgraph was built separate from langchain to help create such complex flows
- “langgraph studio” - to work with langgraph agents. it spins up the local studio server which we can play with in the browser
- “langgraph platform” - for deploying and scaling langgraph applications, and therefore paid
- “agent” - langchain was good, when we had the flow fixated by the developers. agents are flexible, as the flow is determined by the llm
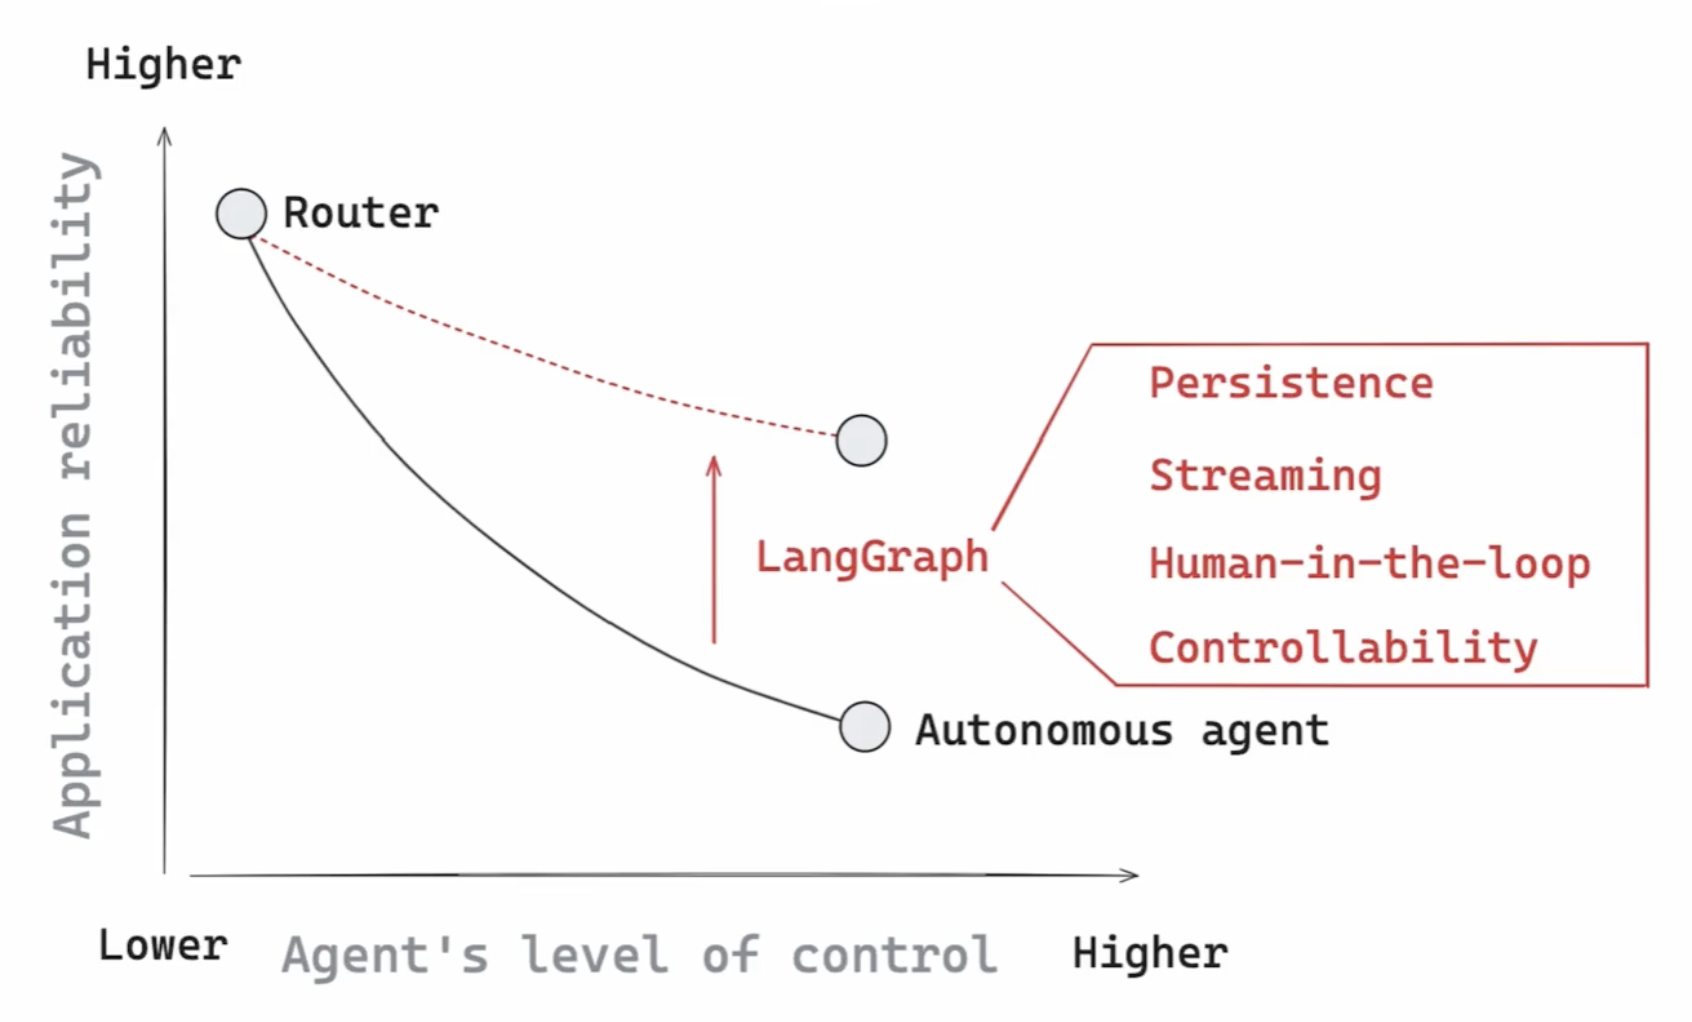
- there are different kinds of agents - based on this “amount of control”. we can have “router agents” (where it will for e.g. pick between two steps), or fully autonomous agents, where the llm can pick its own set of steps
- now, as we make the agent more autonomous, the application reliability decreases. and langgraph helps solve this pain point, using things like persistence, human in the loop, etc
![]()
- “graph” - the nodes are the steps, and the edges the transitions between them
- we need to define “state” - it is what gets passed around in the graph
class State(TypedDict):
  graph_state: str
each node receives the state and overwrites its values
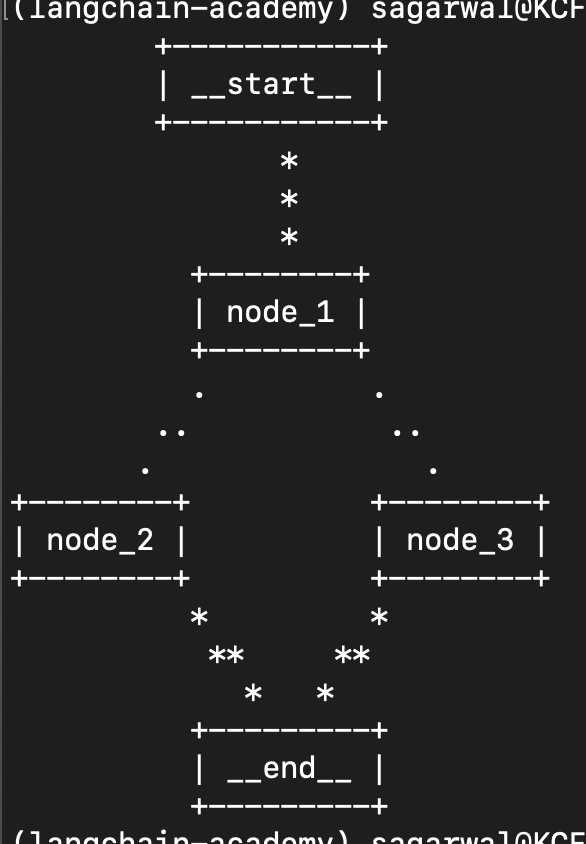
def node_1(state): return {"graph_state": state["graph_state"] + " i am"} def node_2(state): return {"graph_state": state["graph_state"] + " happy!"} def node_3(state): return {"graph_state": state["graph_state"] + " sad..."}- “edges” - how we connect the nodes. we can have normal edges (always go from node a to node b) or conditional edges (return the next node based on some logic). we demonstrate the conditional edge below. notice how we explicitly define the possibilities using
Literaldef decide(state) -> Literal["node_2", "node_3"]: return random.choice(["node_2", "node_3"]) finally, we build the graph and even print it in the terminal in ascii format as follows -
builder = StateGraph(State) builder.add_node("node_1", node_1) builder.add_node("node_2", node_2) builder.add_node("node_3", node_3) builder.add_edge(START, "node_1") builder.add_conditional_edges("node_1", decide) builder.add_edge("node_2", END) builder.add_edge("node_3", END) graph = builder.compile() print(graph.get_graph().draw_ascii())![]()
finally, we can
invokethis (just like in langchain) with the initial state. we will see happy and sad randomlyprint(graph.invoke({"graph_state": "i am shameek, and"})) # {'graph_state': 'i am shameek, and i am sad...'} # {'graph_state': 'i am shameek, and i am happy!'}- langchain studio setup - first, added the json file “langgraph.json” below. note - my project was created using uv
{ "graphs": { "1": "./1.py:graph" }, "env": "./.env", "dependencies": ["."] } - then, just run
langgraph dev. it will automatically open the studio in langsmith for us. it is a ui where we can easily visualize the graph, call the graph with the initial state, see the different runs under “threads”, etc![]()

Router Agent
till now, we were simply overwriting the state. in this example however, we would like to append to the messages list. so, we can use a built in “reducer”. langgraph already provides the reducer to handle appending chat messages
from typing import TypedDict, Annotated
from langchain_core.messages import AnyMessage
from langgraph.graph.message import add_messages

class State(TypedDict):
  messages: Annotated[list[AnyMessage], add_messages]
in fact this is so common, that the above code snippet can be replaced with the following. this already has the messages attribute, and we can add more attributes to it as needed -
from langgraph.graph import MessagesState

class State(MessagesState):
  pass
we create an llm and bind it with tools. assume we only use a simple multiply tool for now
def multiply(a: int, b: int) -> int: """Multiply a and b. Args: a: first int b: second int """ return a * b tools = [multiply] llm = ChatOpenAI(model="gpt-4o-mini", temperature=0) llm_with_tools = llm.bind_tools(tools) def tool_calling_llm(state: State) -> State: return {"messages": llm_with_tools.invoke(state["messages"])}- now, remember - when we simply call “invoke” on the llm, it will respond with either a tool call, or the natural language response
- so, based on the llm response, we would want to either call the tool it responded with, or simply return the response
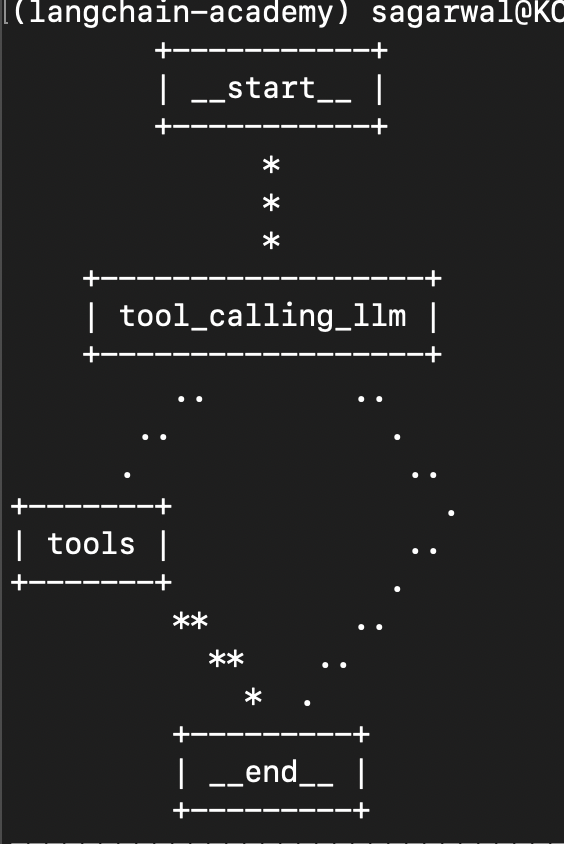
the
ToolNodeis a node that can help handle invocation of the tools. so, we need to pass it the list of tools as well, while thetools_conditionis a conditional edge that routes to either the tools node or the end nodetool_node = ToolNode(tools) builder = StateGraph(MessagesState) builder.add_node("tool_calling_llm", tool_calling_llm) builder.add_node("tools", tool_node) builder.add_edge(START, "tool_calling_llm") builder.add_conditional_edges("tool_calling_llm", tools_condition) builder.add_edge("tools", END) graph = builder.compile() print(graph.get_graph().draw_ascii())![]()
- example 1 - no tool call -
result = graph.invoke({"messages": [HumanMessage("hello!")]}) for message in result['messages']: message.pretty_print()![]()
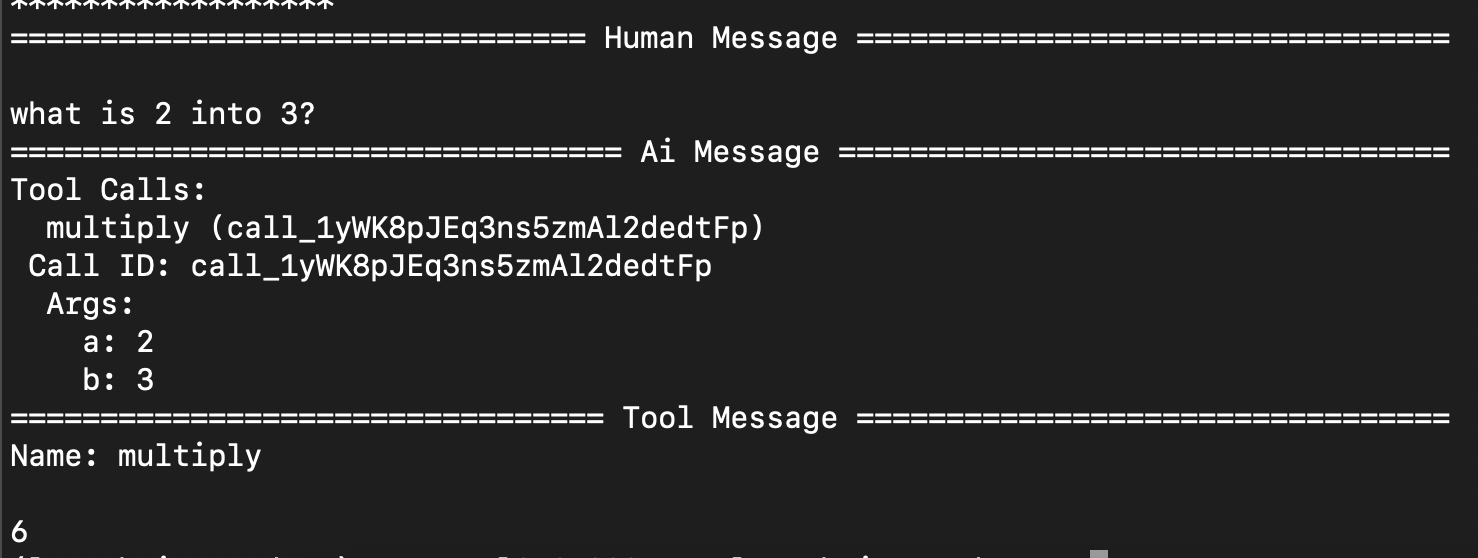
- example 2 - tool call -
result = graph.invoke({"messages": [HumanMessage("what is 2 into 3?")]}) for message in result['messages']: message.pretty_print()![]()

React Agent
- now, to turn this into a “react agent”, instead of returning the response from the tool directly to the user, we direct the tool response to the llm again
- additionally, we have a loop now, where the llm can keep calling the tools, until it arrives at a final answer
- note - we can do things like setting a maximum number of iterations etc
- react agents have three parts -
- “act” - let the models call tools
- “observe” - pass the tool output back to the llm
- “reason” - reason about the tool output and decide for e.g. to call another tool or return the final answer
- first, we add multiple tools now -
tools = [multiply, add, divide] next, we modify the
tool_calling_llmto add the system prompt below as well -system_prompt = [SystemMessage("you are a helpful assistant tasked with performing mathematical operations.")] def tool_calling_llm(state: State) -> State: messages = system_prompt + state["messages"] response = llm_with_tools.invoke(messages) return {"messages": response}- finally, now we make the edge to route the response of the tool back to the llm, instead of the end node like here
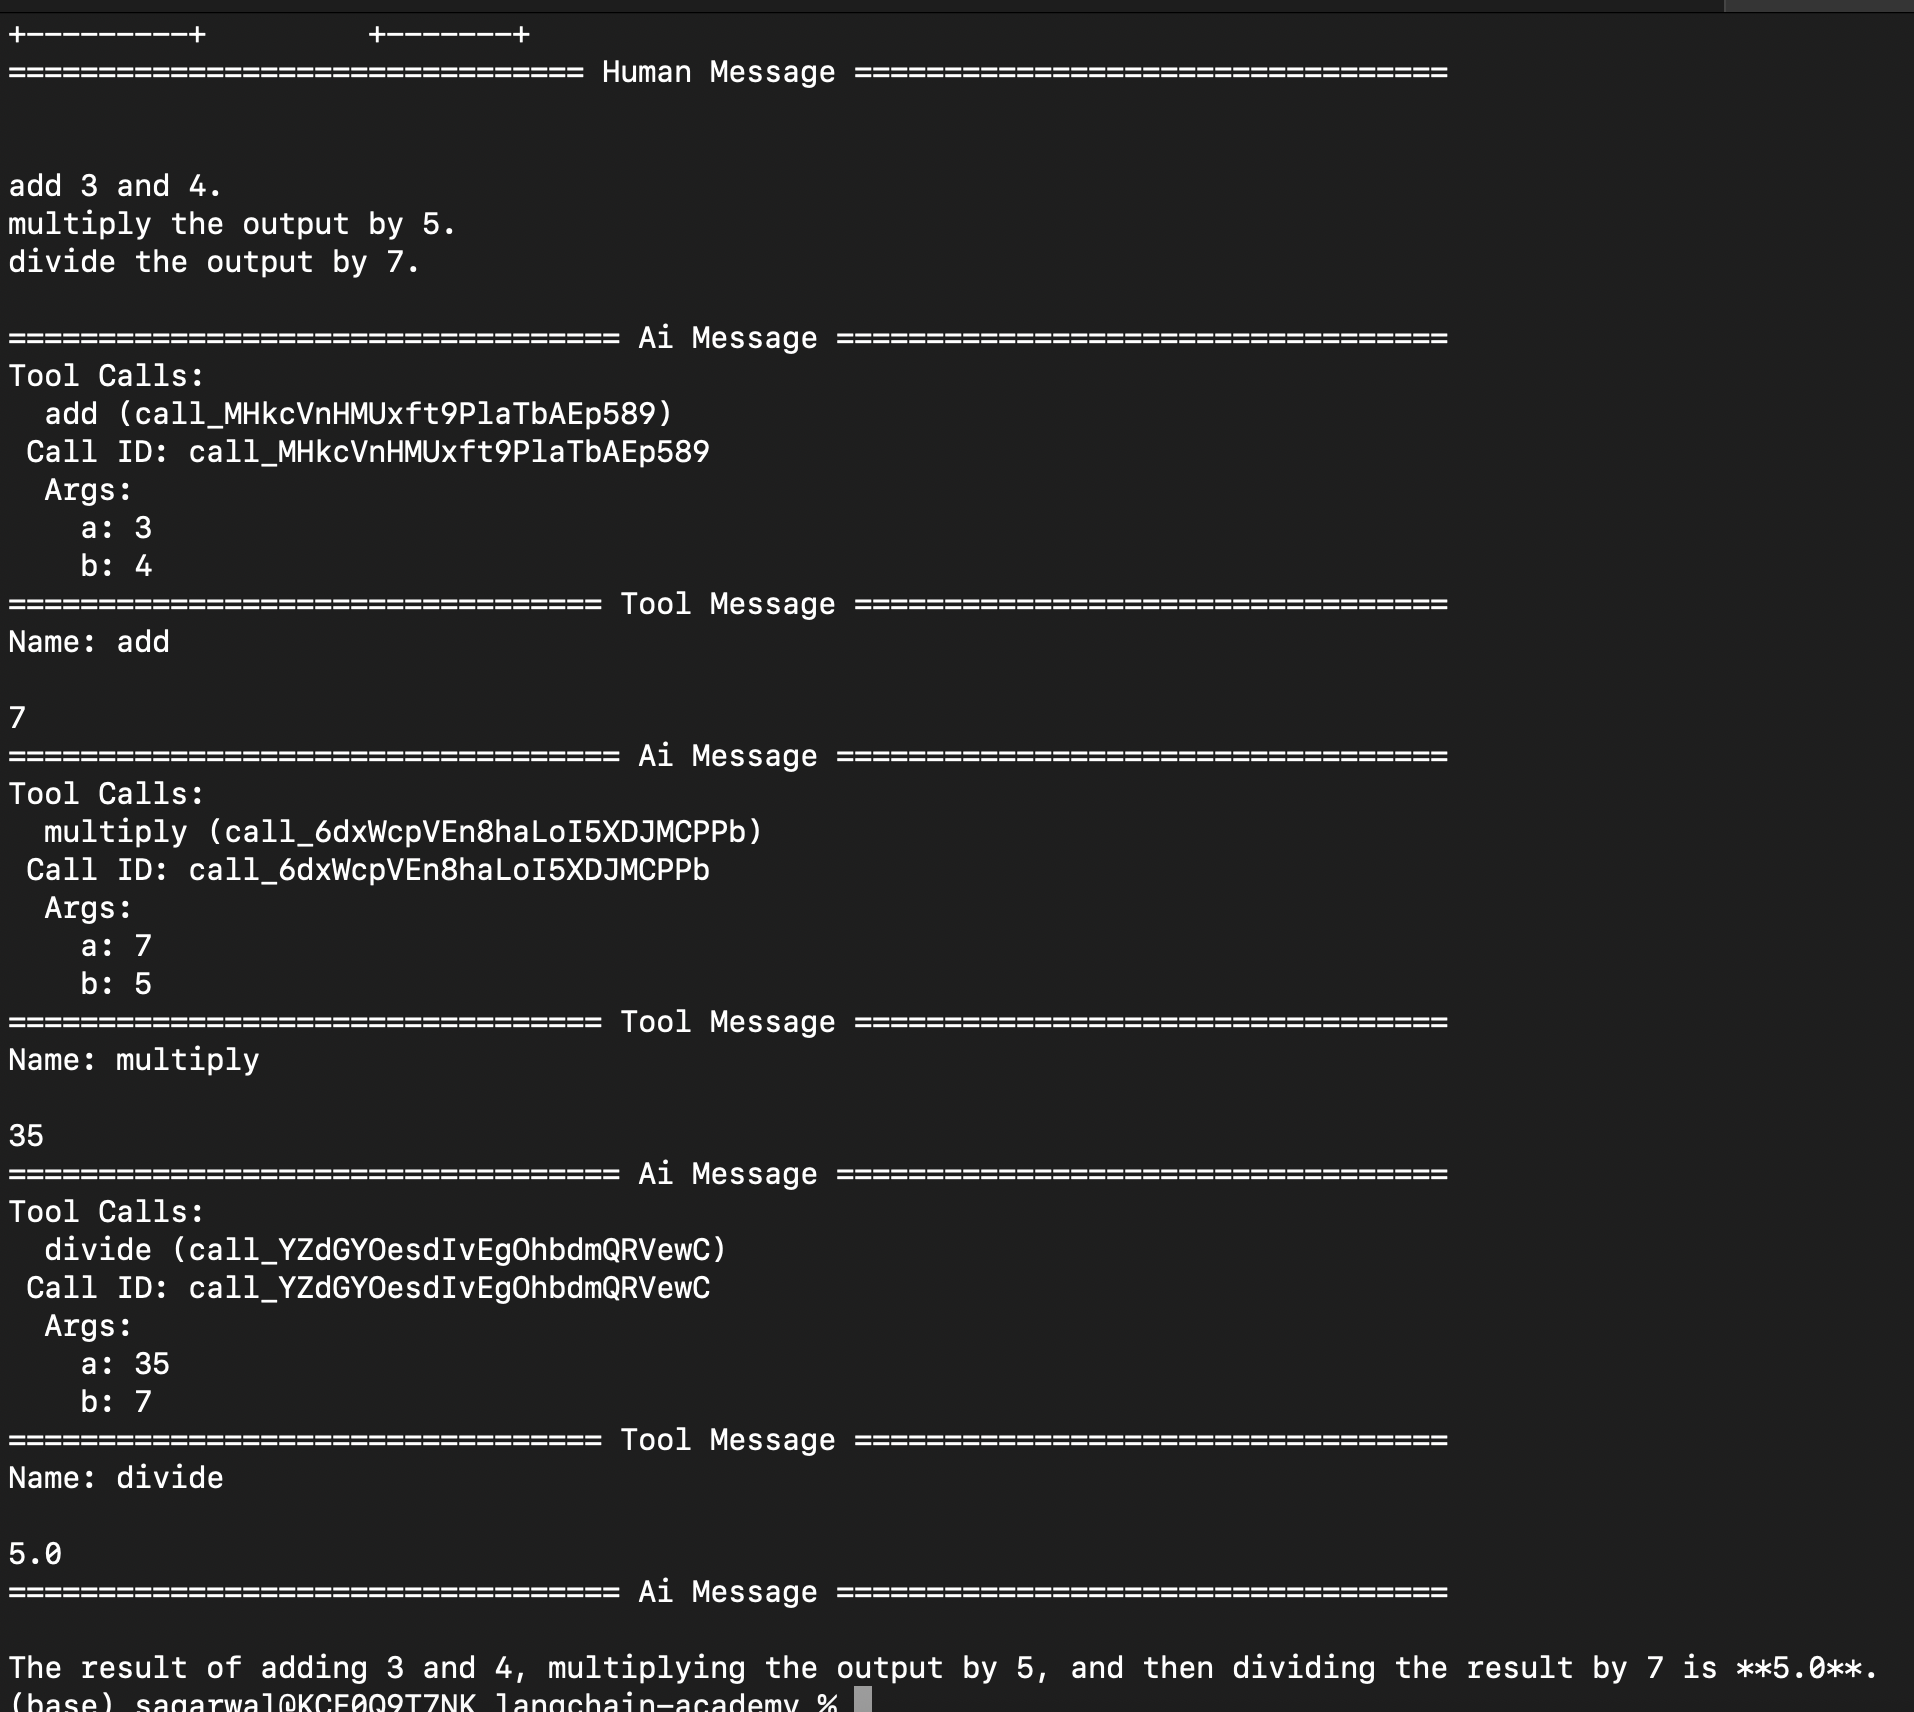
builder.add_edge("tools", "tool_calling_llm") now, here is an example of using these tools at once -
prompt = """ add 3 and 4. multiply the output by 5. divide the output by 7. """ result = graph.invoke({"messages": [HumanMessage(prompt)]}) for message in result['messages']: message.pretty_print()![]()
Persistence
now, the current solution we saw above does not have persistence. look at below example -
print(graph.invoke({"messages": [HumanMessage("sum 3 and 4")]})['messages'][-1].content) print(graph.invoke({"messages": [HumanMessage("multiply that by 2")]})['messages'][-1].content) # The sum of 3 and 4 is 7. # Could you please provide the number you would like to multiply by 2?- this is happening because the state is limited to a single invocation of the graph
- so, we can use “checkpoints” to save the graph state after each step
- “memory saver” is the “check pointer” that uses memory to save the graph state. we need to do the below to add it -
from langgraph.checkpoint.memory import MemorySaver # ... memory = MemorySaver() graph = builder.compile(checkpointer=memory) - this saves the state of the graph at each invocation
- along with in memory, langgraph supports different databases like sqlite, postgres, etc out of the box as well
finally, we invoke the graph as follows -
config = {"configurable": {"thread_id": "1"}} graph.invoke(initial_state, config) # removed excess for brevity # The sum of 3 and 4 is 7. # The result of multiplying 7 by 2 is 14.- note - the second invocation output state will contain the messages from the first invocation as well
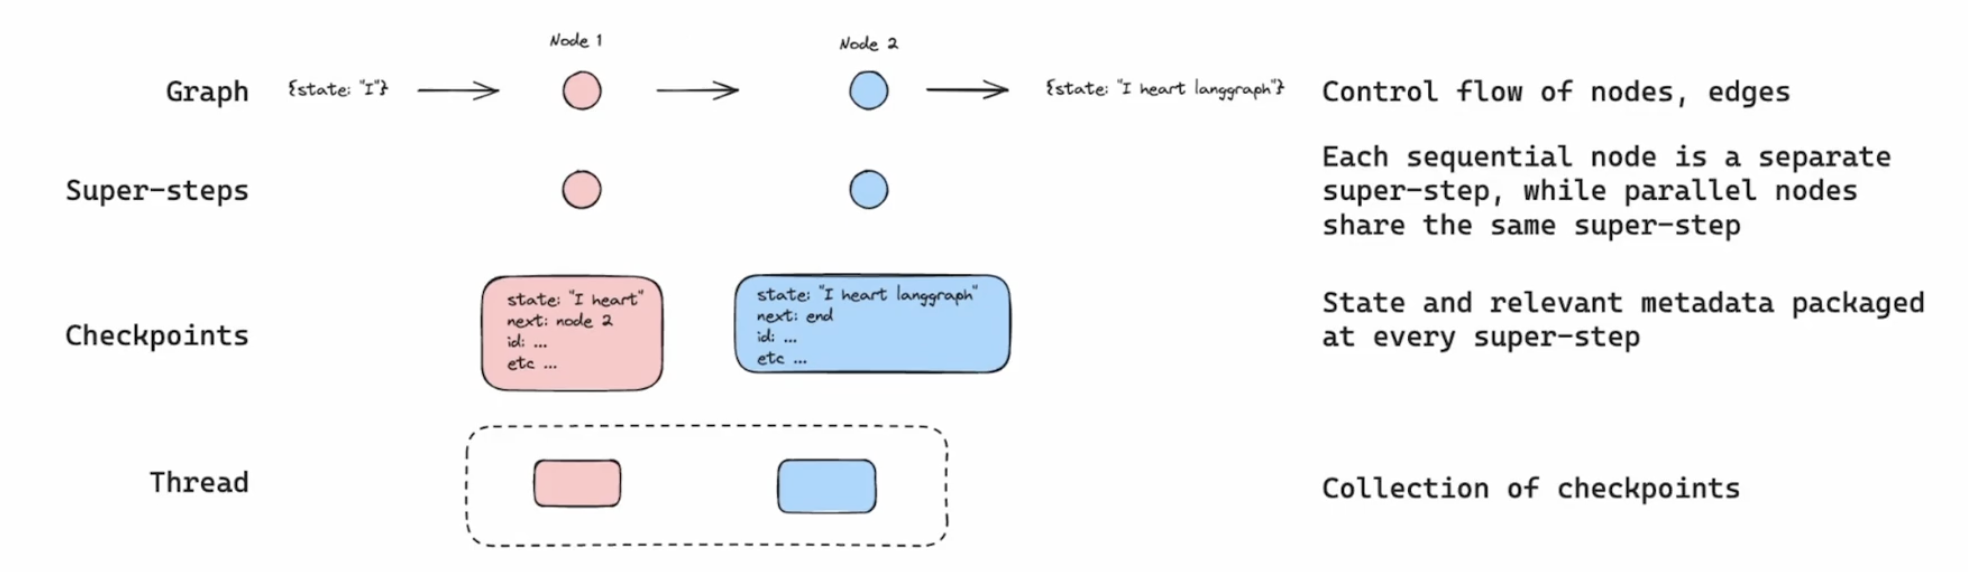
- my understanding - each time, we run a node / set of nodes in parallel, it is called a “super step” in langgraph
- now, at each super step, the state / checkpoint is saved by our persistence solution
- each “thread” will basically have its own collection of checkpoints. this will allow us with features like “time travel” and “rollbacks”
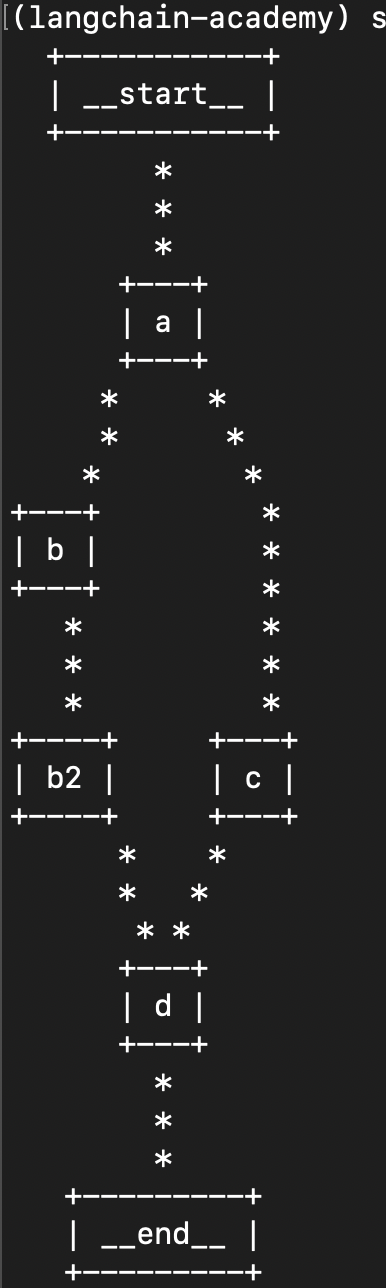
- further understanding what a “step” is in case of parallelization - in the case below, e.g. one parallel branch is b and b2, while another parallel branch is c. here, all of the three nodes - b, b2 and c form a step. my initial understanding was that b and c form a step, and b2 is a separate step. that is wrong
builder.add_edge(START, "a") builder.add_edge("a", "b") builder.add_edge("a", "c") builder.add_edge("b", "b2") builder.add_edge(["b2", "c"], "d") builder.add_edge("d", END)![]()
State and Memory
- memory is a central component in building agentic applications. users often expect agentic applications to remember previous interactions
- when we define the langgraph “state graph”, we define the “state schema”. all nodes are expected to communicate using this
- we used “typed dict” till now. issue - it is not type safe at runtime. so, we can use “pydantic” models instead. it has the concept of “validators” that we can use for validating keys of our state
- by default, langgraph just overwrites the value of the state, when we return it from our nodes
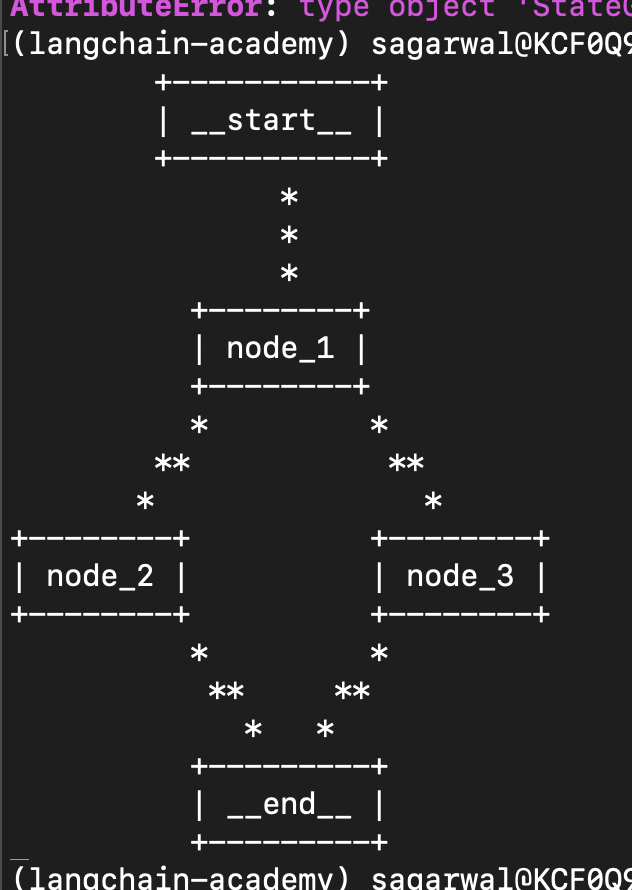
assume we have the following branching in our graph i.e. node 1 calls node 2 and node 3 together
class State(TypedDict): fruits: list[str] def node_1(state: State) -> State: return {"fruits": ["apple"]} def node_2(state: State) -> State: return {"fruits": ["banana"]} def node_3(state: State) -> State: return {"fruits": ["cherry"]} builder = StateGraph(State) builder.add_node("node_1", node_1) builder.add_node("node_2", node_2) builder.add_node("node_3", node_3) builder.add_edge(START, "node_1") builder.add_edge("node_1", "node_2") builder.add_edge("node_1", "node_3") builder.add_edge("node_3", END) graph = builder.compile() print(graph.get_graph().draw_ascii())![]()
now, observe the error we see when invoking it
graph.invoke({"fruits": ["mango"]}) # langgraph.errors.InvalidUpdateError: # At key 'fruits': Can receive only one value per step. # Use an Annotated key to handle multiple values- now, langgraph is confused as to which state update it should accept - node 2s or node 3s. additional note - langgraph calls nodes running in parallel as a “step”, as we saw here
so, for situations like these, we need a “reducer”, to tell langgraph about how it should update the state. we use “annotated” from “typing” for this.
class State(TypedDict):
  fruits: Annotated[list[str], lambda a, b: a + b]

# ...

print(graph.invoke({"fruits": ["mango"]}))
# {'fruits': ['mango', 'apple', 'banana', 'cherry']}
recall the
add_messagesreducer we discussed here. we already saw how it handles concatenation. however, it has some more features. the “id” parameter is optional in a message. first, if we add a new message with the same id, it will simply overwrite the existing message. second, if we add a “remove message” with the same id, it will delete that message from the listmessages = [ HumanMessage("how are you?", id="1"), AIMessage("I am fine, thank you!", id="2") ] print(add_messages(messages, [HumanMessage("what is your name?", id="1")])) # [HumanMessage(content='what is your name?', id='1'), # AIMessage(content='I am fine, thank you!', id='2')] print(add_messages(messages, [RemoveMessage(id="1")])) # [AIMessage(content='I am fine, thank you!', id='2')]- consideration - adding a lot of history can for e.g. lead to high token usage. so, when we saw for e.g. persistence, we can use this technique to clear up our message history a bit. we can add for a “filter” node to the mix, to retain only for e.g. the last 2 messages -
def filter_messages(state: MessagesState): delete_messages = [RemoveMessage(id=m.id) for m in state["messages"][:-2]] return {"messages": delete_messages} - “filtering messages” - another trick could have been to not touch the langgraph state at all. we could instead while calling
llm.invoke, call it with a subset of the messagesdef tool_calling_llm(state: MessagesState) -> MessagesState: return {"messages": llm_with_tools.invoke(state["messages"][-1:])} - “trimming messages” - langgraph exposes the
trim_messagesfunction to us. instead of us doing it manually like above, it has sleek functionality like -- “number of tokens” - trim such that the total tokens do not exceed this limit
- allow or not allow “partial” messages i.e. parts of a message till the token limit we specified above is reached
- “strategy” - e.g. give preference to the latest messages
- here is an example of using it. note how we need an llm to calculate the number of tokens as well -
messages = trim_messages( state["messages"], max_tokens=100, strategy="last", token_counter=ChatOpenAI(model="gpt-4o"), allow_partial=False, ) - we have seen trimming / filtering of messages. now, we will produce a “running summary” of the messages. imagine we have our langgraph graph with persistence configured to allow us invoking it multiple times. now, for e.g. once we have 5 messages or more, we call the llm with the existing summary in the state and these 5 new messages. then, the llm will return the new summary to us, which we use to update the state with. we can have this summarization logic at the end of our graph, so that before the next invocation, we would have the summary ready. now, in the next run, we will use the “remove message” technique to only pass the last 2 messages and the summary to the llm
Streaming
- the streaming can be done via
streamorastreamin langgraph (i believe the latter is asynchronous) - we replace
invokewith these methods, e.g.graph.stream({"messages": [...]}, stream_mode="values") - there are different “streaming modes” to choose from. some of them are -
- “values” - will return the value of the whole state every time. e.g. invoke it
- “updates” - will only return the node name and the update returned by this node
- my understanding - the streaming we talked about above was from langgraph perspective. that is why we were talking about state, updates, etc
- recall that llms too support streaming for the typewriter effect. this can be used via
astream_events. we can call this on the graph too. however, remember - it is different from the langgraph streaming we saw above - there is maybe more to this, skipping for now with a general understanding
Human in the Loop
- we might want to have a “human approval” before proceeding with the next steps in the agentic workflow - e.g. writing to a database
- three use cases for “human in the loop” - “approval” (e.g. above), “debugging” (rewind the graph to avoid any issues), “editing” (modify the graph state)
- e.g. we reuse the graph we built here, and use
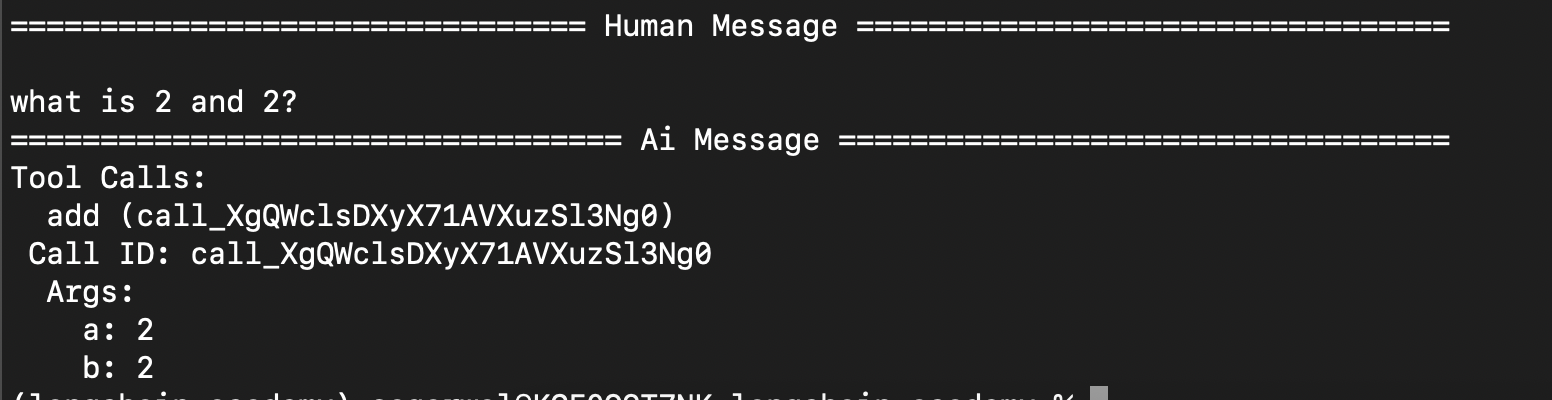
interrupt_beforebefore thetoolsnode. its like taking an approval before calling any tool. note - we can useinterrupt_afteretc as wellgraph = builder.compile( interrupt_before=["tools"], checkpointer=memory ) now, we use streaming when invoking the graph. notice how our program terminates after the tool call ai response
config = {"configurable": {"thread_id": "1"}} messages = [HumanMessage("what is 2 and 2?")] for event in graph.stream({"messages": messages}, config=config, stream_mode="values"): event["messages"][-1].pretty_print()![]()
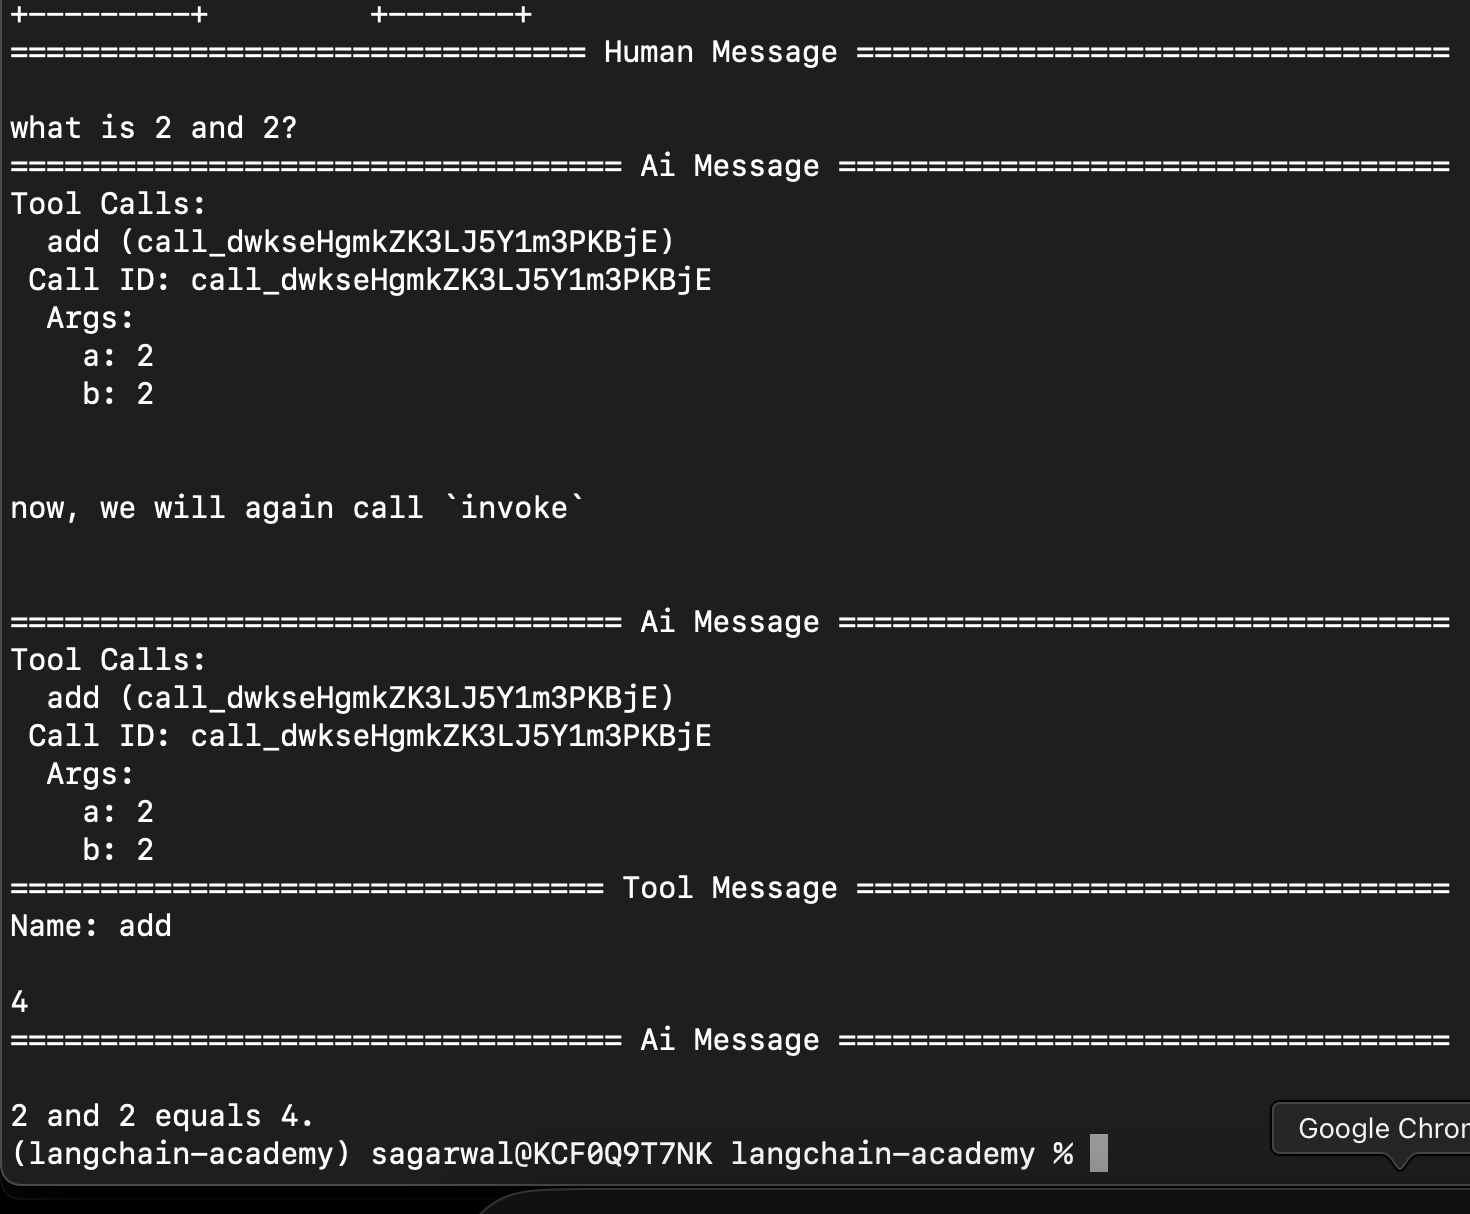
we can resume from where we left off by using the below. its the same call, but we pass none for the state, since we had already passed it in the earlier call. it starts again from where it left
for event in graph.stream({"messages": messages}, config=config, stream_mode="values"): event["messages"][-1].pretty_print() print("\n\nnow, we will again call `invoke`\n\n") for event in graph.stream(None, config=config, stream_mode="values"): event["messages"][-1].pretty_print()![]()
- when the execution paused, we could also for e.g. update the state using
graph.update_state - in langgraph studio, adding interrupts etc can be easily done using the ui
- one neat trick - we can often add a dummy node that does nothing (notice the pass), and then update the state “as that node” -
def human_feedback(state: MessagesState):
  pass
# ...
builder.add_node("human_feedback", human_feedback)
# ...
graph = builder.compile(
  interrupt_before=["human_feedback"],
  checkpointer=memory
)
# ...
user_input = input("tell me how you want to update the state: ")
graph.update_state(config, {"messages": user_input}, as_node="human_feedback")
Dynamic Breakpoints
- we saw in human in the loop how we paused execution of the graph before / after a node
- but, we can also do this dynamically, while the graph is running
- we raise a “node interrupt” to achieve this -
def step_2(state: State) -> State: if len(state['input']) > 5: raise NodeInterrupt(f"received input that is longer than 5 characters") - the idea would be for e.g. to update the state and then resume the execution, already seen here
Time Travel
- at any point, when for e.g. the graph is paused due to a breakpoint, we can view the state of the graph
- at this point, we can call
graph.get_state()to get the current state snapshot graph.get_state_history()to get a list of the list of snapshots, etc- each set of sequential nodes form a “super step”. parallel nodes run in the same “super step”
- “checkpoints” wrap the state and relevant metadata at every super step
- “replaying” - we can rerun our agent from any of its steps
- when we do
graph.stream(None, { thread_id }), we continue from where we left off - however, when we do
graph.stream(None, { thread_id, checkpoint_id }), we replay from the checkpoint - note - we “replay”, not “rerun”. the graph knows that it has been already executed, so it just moves through
- now, we can also perform “forking” - we can provide a different input from a certain step, using for e.g.
graph.update_state({ checkpoint_id, thread_id }, state). this way, we would have different runs from the same checkpoint - now, think like this - using techniques of add reducer we saw here, we can for e.g. update and remove messages, and then for e.g. perform forking from a certain point of our execution to explore different paths
- also, as we call
update_statethis way with forks, we do not get rid of the previous checkpoints, we just keep adding to the history
Subgraph
- “subgraphs” - manage different states in different parts of the graph. it helps with modularity
- how does this work - “overlapping keys” - the parent graph will have the combined state from all of its subgraphs. the subgraphs will communicate with the parent graph using its own subset of keys
- an additional concern - how to handle the state of the parent graph when some subgraphs mutate the same piece of state? - using reducers
- here is how we add a subgraph to a parent graph -
entry_builder.add_node("question_summarization", qs_builder.compile()) entry_builder.add_node("failure_analysis", fa_builder.compile()) - additionally, we can have different inputs and outputs in graphs. this is useful in subgraphs for better semantics
qs_builder = StateGraph(
  QuestionSummarizationState,
  output_schema=QuestionSummarizationOutputState
)
Map Reduce
- helps with parallel processing, if the task can be decomposed in that manner
- e.g. i will try to calculate sum of squares of a list of numbers. the different mappers will try calculating the squares, while the reducer will sum them up
- to call the same node multiple times in parallel dynamically, we use
Sendin the conditional edge, which basically receives the name of the next node and the input to that node - note - for this to work, i had to use
["calculate_square"]instead of"calculate_square"inadd_conditional_edges - above, we saw how with send, each mapper gets its own input
- now, to combine the updates to the state that these separate map processes make, we use for e.g. the
addreducer in this case. this way, all the squares are concatenated
class State(TypedDict):
  numbers: list[int]
  square_numbers: Annotated[list, operator.add]
  sum: int

# generate a random list of numbers
def generate_random_list(state: State) -> State:
  return {"numbers": random.sample(range(1, 10), 5)}

# generate mapper functions for each number in the list
def generate_squares(state: State) -> State:
  return [Send("calculate_square", {"number": number}) for number in state["numbers"]]

# calculate the square of the number
# note - it returns a list, as list concatenation is done by our reducer
def calculate_square(state) -> State:
  return {"square_numbers": [state["number"] ** 2]}

# sum all the squares in the list
def calculate_sum(state: State) -> State:
  return {"sum": sum(state["square_numbers"])}


builder = StateGraph(State)

builder.add_node("generate_random_list", generate_random_list)
builder.add_node("calculate_square", calculate_square)
builder.add_node("calculate_sum", calculate_sum)

builder.add_edge(START, "generate_random_list")
builder.add_conditional_edges(
    "generate_random_list",
    generate_squares,
    ["calculate_square"]
)
builder.add_edge("calculate_square", "calculate_sum")
builder.add_edge("calculate_sum", END)

graph = builder.compile()
print(graph.invoke({}))
# {'numbers': [9, 6, 4, 5, 2], 'square_numbers': [81, 36, 16, 25, 4], 'sum': 162}
Long Term Memory
- “short term memory” - this is “thread scoped”. we store the memory within a single chat session. this is the “checkpoints” we saw earlier
- “long term memory” - there can be some things like user preferences, which get stored across chat sessions, for a better user experience
- short term memory is implemented using “checkpoints”, while long term memory is implemented using “storage”
- the idea - using our conversations, we update the long term memory. some examples -
- we maintain a todo list in our long term memory. we make updates to it using our conversations
- our earlier chats are used as “few shot prompts” to improve the llm responses
- the updating of long term memory can also happen either as part of our usual flow (con - increased latency for frontend users), or as a separate background process
in langgraph, i the long term memory is called “memory store”, and it is used to store and retrieve information “across threads”, unlike the checkpoints we saw earlier
from langgraph.store.memory import InMemoryStore store = InMemoryStore()- memory store terminology and analogy - “namespace” (directory), “key” (file name), “value” (file content)
user_id = "1"
namespace = (user_id, "profile")
key = str(uuid.uuid4())
store.put(namespace, key, {"name": "shameek", "age": 26})
retrieving the information -
print(store.search(namespace)) # returns a list of all items in the namespace print(store.get(namespace, key)) # returns the item with the key in the namespace- in this example, we will save information about a user to kind of a “user profile”
- we will personalize the responses based on the user profile
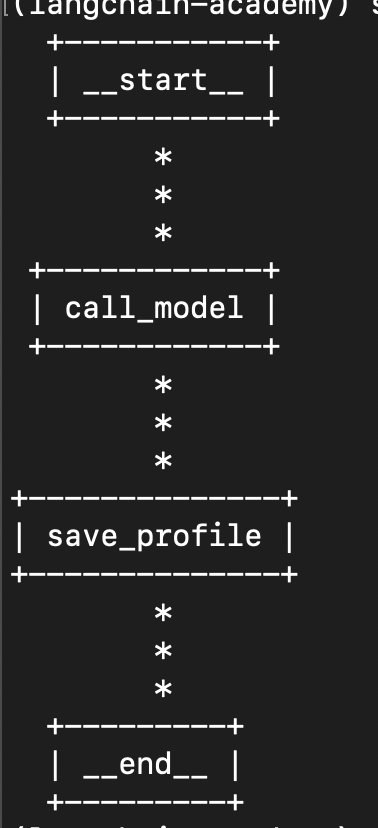
- our graph will now look like this -
![]()
in
call_model, we will first fetch the user profile from our store, and then add it to the prompt. note how unlike usual, we also receive the config and store as parameters along with state in our node. this helps us access the user id and add / retrieve information from the storemodel_prompt = """ You are a helpful assistant. You have the following information about the user. Use it to personalize your responses. {profile} """ def call_model(state: MessagesState, config: RunnableConfig, store: BaseStore) -> MessagesState: user_id = config["configurable"]["user_id"] namespace = (user_id, "memory") profile = store.get(namespace, "profile") profile = profile.value if profile else None prompt = model_prompt.format(profile=profile) response = model.invoke([SystemMessage(prompt)] + state["messages"]) return {"messages": response}- i created this simple class for saving user profile information -
class UserProfile(BaseModel):
  name: str
  location: str
  hobbies: list[str]
  goals: list[str]
  likes: list[str]
  dislikes: list[str]
similarly, the
save_profilewill look as follows. we first extract the user profile from the store, and then extract -profile_prompt = """ You are a helpful assistant that generates user profile. Review the chat history carefully. Extract information about the user like name, location, hobbies, goals, likes, dislikes. Merge any new information with existing profile. Existing profile: {profile} """ def save_profile(state: MessagesState, config: RunnableConfig, store: BaseStore) -> MessagesState: user_id = config["configurable"]["user_id"] namespace = (user_id, "memory") profile = store.get(namespace, "profile") profile = profile.value if profile else None prompt = profile_prompt.format(profile=profile) response = ( model .with_structured_output(UserProfile) .invoke([SystemMessage(prompt)] + state["messages"]) ) store.put(namespace, "profile", response) return state- when we have a complex pydantic model with multiple nested structures, the “with structured output” call to llm we rely on, to generate the user profile fails
- in this case, we can use a library called “trust call”
- apart from helping with complex schemas, trust call also will not generate the entire schema from scratch, which will be inefficient
- we are generating the entire schema every time in the above code we saw. trust call however, will only generate the updates, and then apply these updates to our schema
example of a code snippet using trust call. i am only adding the portion that gets replaced. notice how we also pass it the existing schema. -
def get_profile(config: RunnableConfig, store: BaseStore) -> UserProfile: user_id = config["configurable"]["user_id"] namespace = (user_id, "memory") profile = store.get(namespace, "profile") return profile.value if profile else UserProfile() # ... def save_profile(state: MessagesState, config: RunnableConfig, store: BaseStore) -> MessagesState: extractor = create_extractor( model, tools=[UserProfile], tool_choice="UserProfile" ) profile = get_profile(config, store) response = ( extractor .invoke({ "messages": [SystemMessage(profile_prompt)] + state["messages"], "existing": { "UserProfile": profile.model_dump() if profile else {} } }) ["responses"][0] ) user_id = config["configurable"]["user_id"] namespace = (user_id, "memory") store.put(namespace, "profile", response) return state- trust call is basically seeing our schema as a tool, hence the syntax. this is probably how structured outputs work internally as well, though it is abstracted away from us
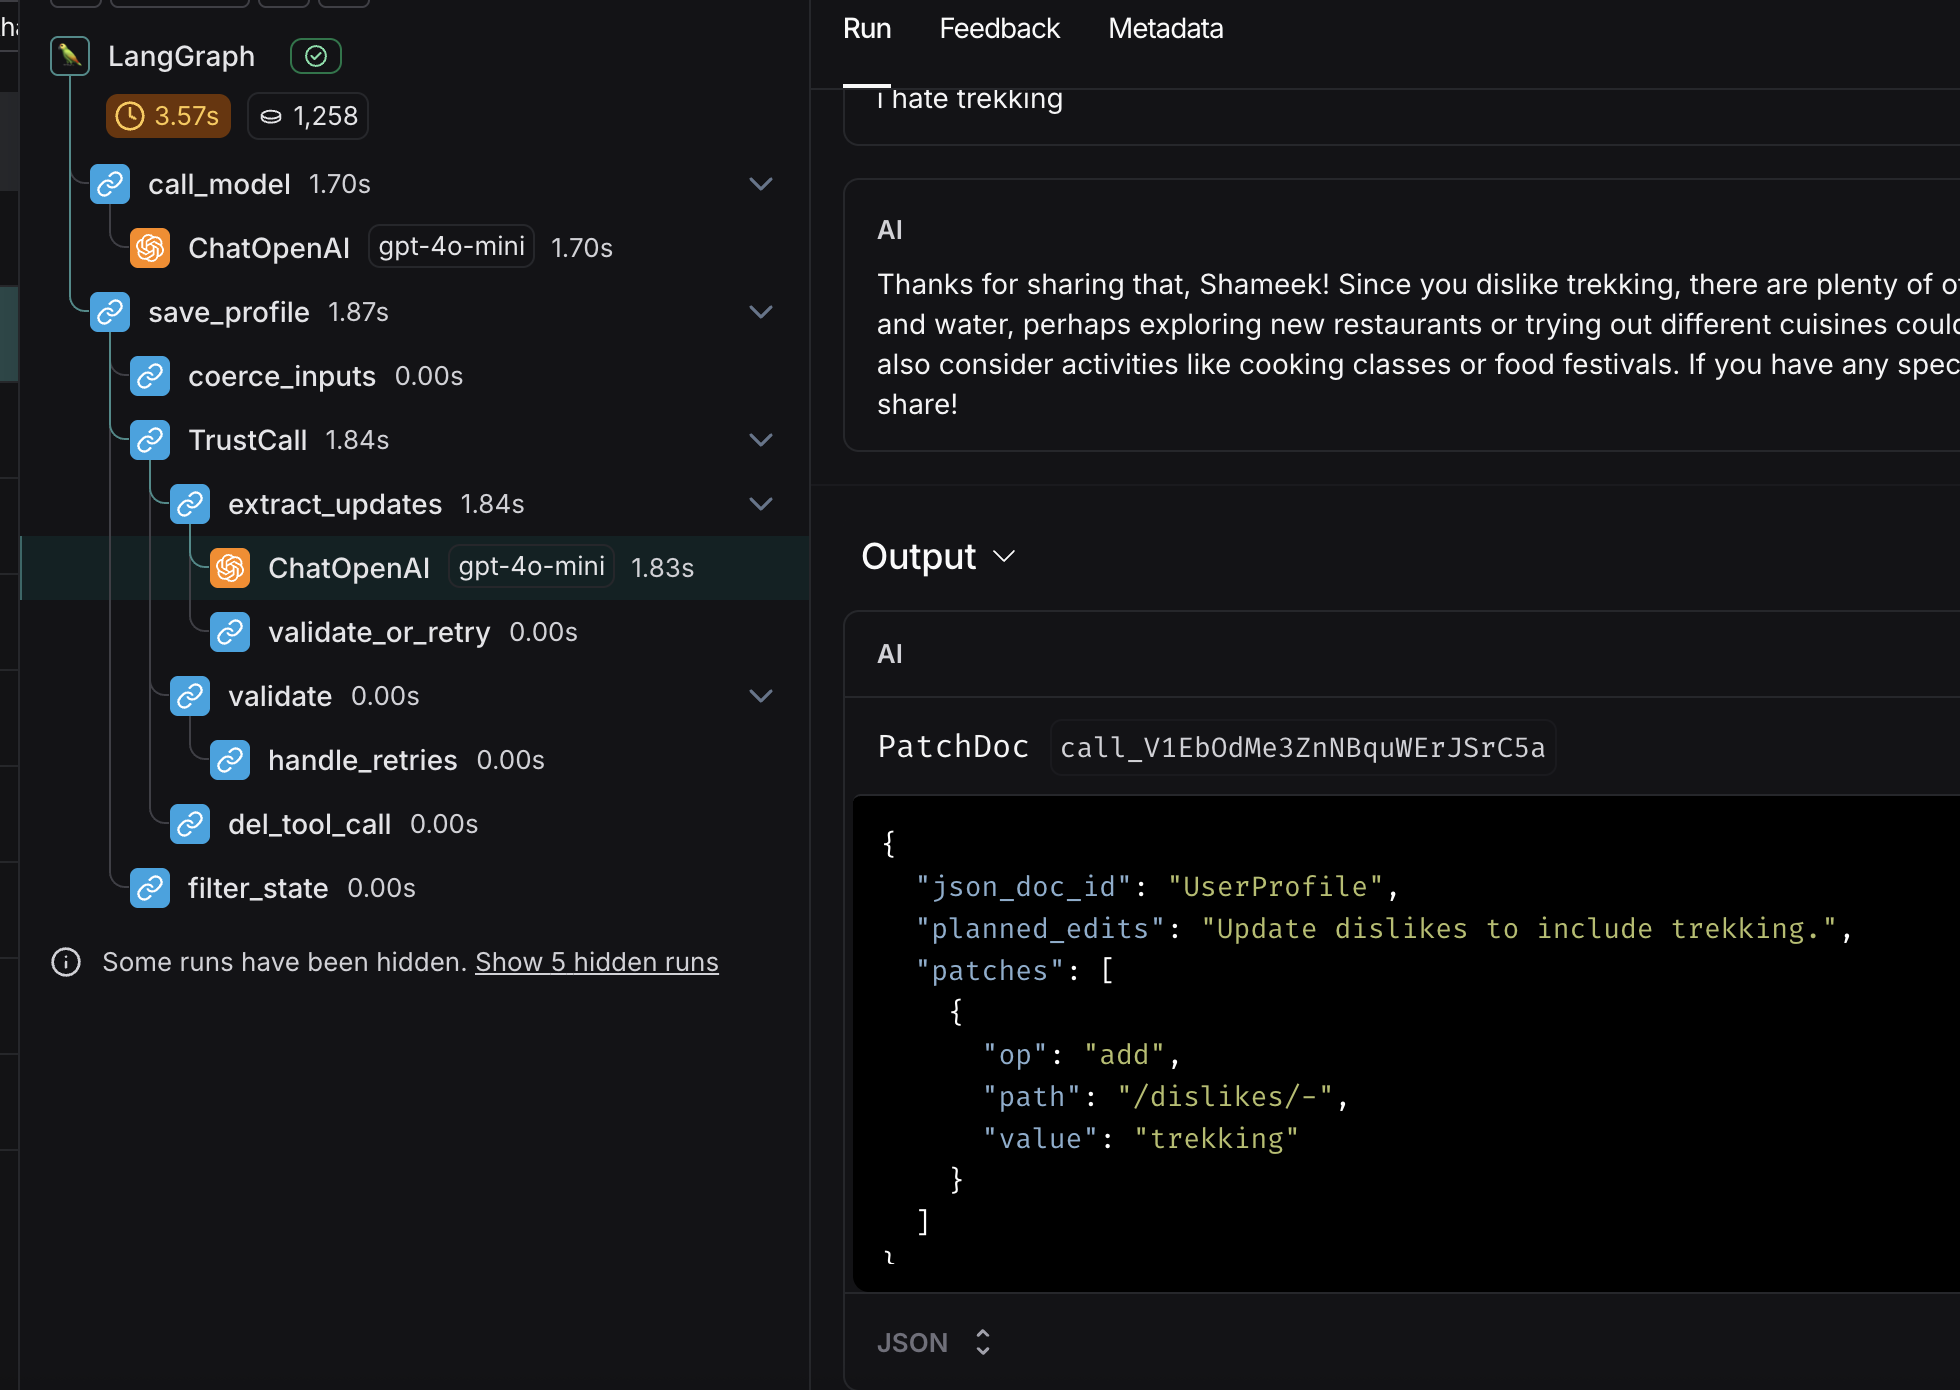
- all of these would be very clear when poking around in the langsmith ui. it shows how the model now only returns the diff, while the
- notice the output from the ml - the “patch doc”. that is the magic. it asks to add a dislike, instead of returning the whole schema. also observe the number of calls made by trustcall to be able to merge the schema
![]()
- what basically happens underneath - it will validate, catch the errors, patch the errors and again validate. this loop helps trust call handle complex schemas
- now, we saw the case of one document, e.g. user profile. but, what if we wanted to handle a “collection of documents”? so basically, a collection gets sent to llm, and it returns the updates and inserts to make to the collection. this has been described here, skipping it for now
Langgraph Basics
we model our llm solutions using graphs via langgraph. this is called “flow engineering”. langgraph helps us build reliable agentic solutions. it fits in the second last row below i.e. “state machine”, since autonomous solutions (last row) are not quite production ready, due to hallucinations etc -
step logic decide the next step to take which steps are available code developer developer developer llm call agent - single call developer developer chain agent - multiple calls
e.g. rag - embeddings and llm calldeveloper developer router agent agent - no cycles developer state machine agent agent - has cycles developer autonomous agent agent agent
Reflection Agents
- “reflection agent” - the llm learns from its past actions, thus allowing it to improve over time
- imagine we want to generate a tweet that can blow up. we feed the draft version to this llm to improve upon
- we write a tweet generation chain. my understanding - we are using “messages state”, which has a key called messages. this gets injected to the prompt template. this is how the history gets sent to the llm -
generation_system_prompt = """ You are a helpful assistant that generates tweets. If critiques are provided, use them to revise the tweet. """ generation_prompt_template = ChatPromptTemplate( [ SystemMessage(generation_system_prompt), MessagesPlaceholder(variable_name="messages") ] ) generation_chain = generation_prompt_template | llm - similarly, we write a reflection chain -
reflection_system_prompt = """ You are a helpful assistant that grades a tweet. Generate recommendations for making the tweet viral. """ reflection_prompt_template = ChatPromptTemplate( [ SystemMessage(reflection_system_prompt), MessagesPlaceholder(variable_name="messages") ] ) reflection_chain = reflection_prompt_template | llm - now, this is how we define the nodes for the two. note how we wrap the response of the reflection chain using a “human message”. this tricks the llm into thinking that the feedback is from a human
class State(MessagesState): pass def generation_node(state: State) -> State: return {"messages": generation_chain.invoke({"messages": state["messages"]})} def reflection_node(state: State) -> State: res = reflection_chain.invoke({"messages": state["messages"]}) return {"messages": HumanMessage(content=res.content)} - finally, we define the graph structure. we use a conditional edge to limit the number of reflections. note - we could also have used an llm in the edge, which is what makes langgraph so powerful
def should_reflect(state: State): if len(state["messages"]) < 12: return "reflection_node" return END builder.add_node("generation_node", generation_node) builder.add_node("reflection_node", reflection_node) builder.add_edge(START, "generation_node") builder.add_conditional_edges("generation_node", should_reflect, ["reflection_node", END]) builder.add_edge("reflection_node", "generation_node") graph = builder.compile() - finally, we can invoke the graph with an “initial state” as follows -
response = graph.invoke({"messages": [HumanMessage(content="about langgraph")]}) print(response["messages"][-1].content) - visualize the graph as follows - run
print(graph.get_graph().draw_mermaid()), paste the contents on mermaid.live
Reflexion Agents
- reflection agents with tools and techniques to incorporate feedbacks correctly
- see the langchain blog for more in depth explanations for these here
- “responder agent” - accepts the topic we want to write about as input. it will generate a response, and then generate critiques about this response and search terms for enhancing it
system_prompt = """ you are an expert researcher. current time: {current_time} {instructions} reflect and critique your answer. be severe for maximum improvement. critique about missing and superfluous content. add search queries for improving the content. recommend search queries to search for more information and improve your answer. """ prompt_template = ( ChatPromptTemplate([ SystemMessage(system_prompt), MessagesPlaceholder(variable_name="messages") ]) .partial(current_time=lambda: datetime.now().isoformat()) ) - note how in the prompt, the current date and time is injected using the lambda
- we write the following schemas for getting structured outputs from the llms. it is nice how we prompt the llm using the descriptions of the fields -
class Reflection(BaseModel): missing: str = Field(description="what is missing from the response?") superfluous: str = Field(description="what is superfluous in the response?") class Answer(BaseModel): response: str = Field(description="content on the question or topic") reflection: Reflection = Field(description="reflection on the response") search_queries: List[str] = Field( description="1-3 search queries to improve the response" ) - now, this is what the responder chain and node look like. when we do
llm.bind_tools(tools=[Answer], tool_choice="Answer"), we tell it to output in the format ofAnswerschema, and also call the toolAnswer. this is why, we will later see that we change the name of the tool toAnswer. i am not sure about why it is this way, but the two things happening simultaneously was important to get this to workresponder_chain = ( prompt_template | llm.bind_tools(tools=[Answer], tool_choice="Answer") ) def responder_node(state: MessagesState) -> MessagesState: res = responder_chain.invoke({"messages": state["messages"]}) return {"messages": res} - “revisor agent” - gets run multiple times to improve the answer. because of how we structured our prompts and classes, few changes are needed, e.g. adding the citations field and adding the instructions to the prompt
instructions = """ revise the previous response. add missing content and remove superfluous content. add citations to the bottom of your answer. citations do not count towards the word limit. use the following format for citations: - [1] https://example.com - [2] https://example.com """ class Revision(Answer): citations: List[str] = Field( description="citation links to add to the bottom of your answer" ) revisor_chain = ( prompt_template.partial(instructions=instructions) | llm.bind_tools(tools=[Revision], tool_choice="Revision") ) def revisor_node(state: MessagesState) -> MessagesState: res = revisor_chain.invoke({"messages": state["messages"]}) return {"messages": res} - next, we add the tavily search tool, and create the tool node with this tool. advantage of using the inbuilt
ToolNode- it will automatically check if the last message is a tool call, and if so, it will invoke the tool and return the response to the llm. also, we make use of “batching” of this tool, to make the searches in paralleltavily_search = TavilySearch(max_results=3) def run_search_queries(search_queries): """search the web for the given search queries""" print(f"reached: {search_queries}") return tavily_search.batch({query: {"query": query} for query in search_queries}) tools = [ StructuredTool.from_function(run_search_queries, name=Answer.__name__), StructuredTool.from_function(run_search_queries, name=Revision.__name__) ] tool_node = ToolNode(tools) - finally, we construct the graph as follows. note the condition we place of how we want to continue or not from the revisor -
builder = StateGraph(MessagesState) def revisor_loop(state: MessagesState) -> MessagesState: tool_count = sum(isinstance(msg, ToolMessage) for msg in state["messages"]) print(f"Tool count: {tool_count}") return END if tool_count > 2 else "tool_node" builder.add_node("responder_node", responder_node) builder.add_node("revisor_node", revisor_node) builder.add_node("tool_node", tool_node) builder.add_edge(START, "responder_node") builder.add_edge("responder_node", "tool_node") builder.add_edge("tool_node", "revisor_node") builder.add_conditional_edges( "revisor_node", revisor_loop, ["tool_node", END] ) graph = builder.compile() graph.get_graph().draw_mermaid_png(output_file_path="reflexion.png") - finally, invoke it using streaming as follows -
question = "write about ai powered soc. mention good startups in this space. keep it within 200 words."
messages = [HumanMessage(question)]

for event in graph.stream(input={"messages": messages}, stream_mode="values"):
  event["messages"][-1].pretty_print()
Agentic RAG
- based on three papers - self rag, corrective rag and adaptive rag
- the idea is that after we fetch the documents from the vector store, we want to critique these documents. we want to add new information if the documentation fetched is incorrect / not enough from for e.g. the web. finally, we want to continue with the prompt augmentation and forward it to the llm
- after the rag implementation, we also want to have a reflection on the final answer we generate as well
- i am not adding the implementation for now, it felt straightforward once you know concepts of rag etc
- add implementation references here if needed
React Agent with Langgraph
- in the earlier days, we needed “react agents” and prompts. but now, llm providers have the idea of “function calling” as well. each llm provider has its own way of implementing this functionality, which is abstracted away from us. we are basically offloading the task of choosing the tool to call to the llm vendor, and we do not need to handle the parsing etc on our end
- first, we define some tools -
@tool def triple(num: int) -> int: """ param num: The number to triple. returns: The tripled value. """ return num * 3 tavily_search_tool = TavilySearch(max_results=3) tools = [tavily_search_tool, triple] - then, we simply bind these tools to the llm, and create a node for it -
llm = ChatOpenAI(model="gpt-4o-mini", temperature=0) llm.bind_tools(tools) system_prompt = """ you are a helpful assistant. you can use the given tools to answer the question. """ def reasoning_agent_node(state: MessagesState) -> MessagesState: return {"messages": llm.invoke([SystemMessage(system_prompt), *state["messages"]])} - “tool node” - if the last ai message was a tool call, it will execute the tool call. this is why this tool node also needs to be provided the list of tools like the llm, so that it can actually call the tool, and finally forward it back to the reasoning llm
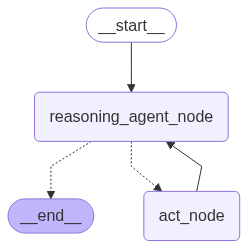
act_node = ToolNode(tools=tools) - next, we build the graph. notice how based on the response from the reasoning agent, we direct either to the tool node or the end node
def call_tool(state: MessagesState): if len(state["messages"][-1].tool_calls) > 0: return "act_node" return END builder = StateGraph(MessagesState) builder.add_node("act_node", act_node) builder.add_node("reasoning_agent_node", reasoning_agent_node) builder.add_edge(START, "reasoning_agent_node") builder.add_conditional_edges( "reasoning_agent_node", call_tool, ["act_node", END] ) builder.add_edge("act_node", "reasoning_agent_node") graph = builder.compile() graph.get_graph().draw_mermaid_png(output_file_path="react_agent.png") - finally, this is how our graph looks like -
![]()
- when i call the graph like this, i see both, first tavily and then the triple tool being called -
message = """
what is the most popular number between 1 and 10?
cite some popular surveys to back your answer.
multiply this number by 3 and output the final number.
"""

for event in graph.stream({"messages": [HumanMessage(message)]}, stream_mode="values"):
  event["messages"][-1].pretty_print()
Asynchronous Execution
- simultaneous execution of nodes in parallel / super step