- formerly called “swarm”
- all of the agentic frameworks use “async io”
- async io is very “lightweight” - it does not involve threads at an os level, nor does it involve spawning multiple multiple processes / programs. so, being lightweight means that we can have thousands of these at a time
- its good for io bound tasks - e.g. waiting on api calls made to llms
- basic version -
async def do_some_processing() -> str:
  return "done!"

result = await do_some_processing()
- when we define a function using async, it is called a “coroutine”
- when we call a “coroutine”, it does not run immediately. instead, it returns a “coroutine object”
- when we call await on a coroutine object, it “schedules” it for execution on the “event loop”
- an “event loop” can only execute one coroutine at a time, it is not like multithreading
- e.g. if the coroutine is waiting for an api call to return, the event loop can switch to another coroutine that is ready to run
- now for e.g. for multiple coroutines -
results = await asyncio.gather(
  do_some_processing(),
  do_other_processing(),
  do_yet_more_processing()
)
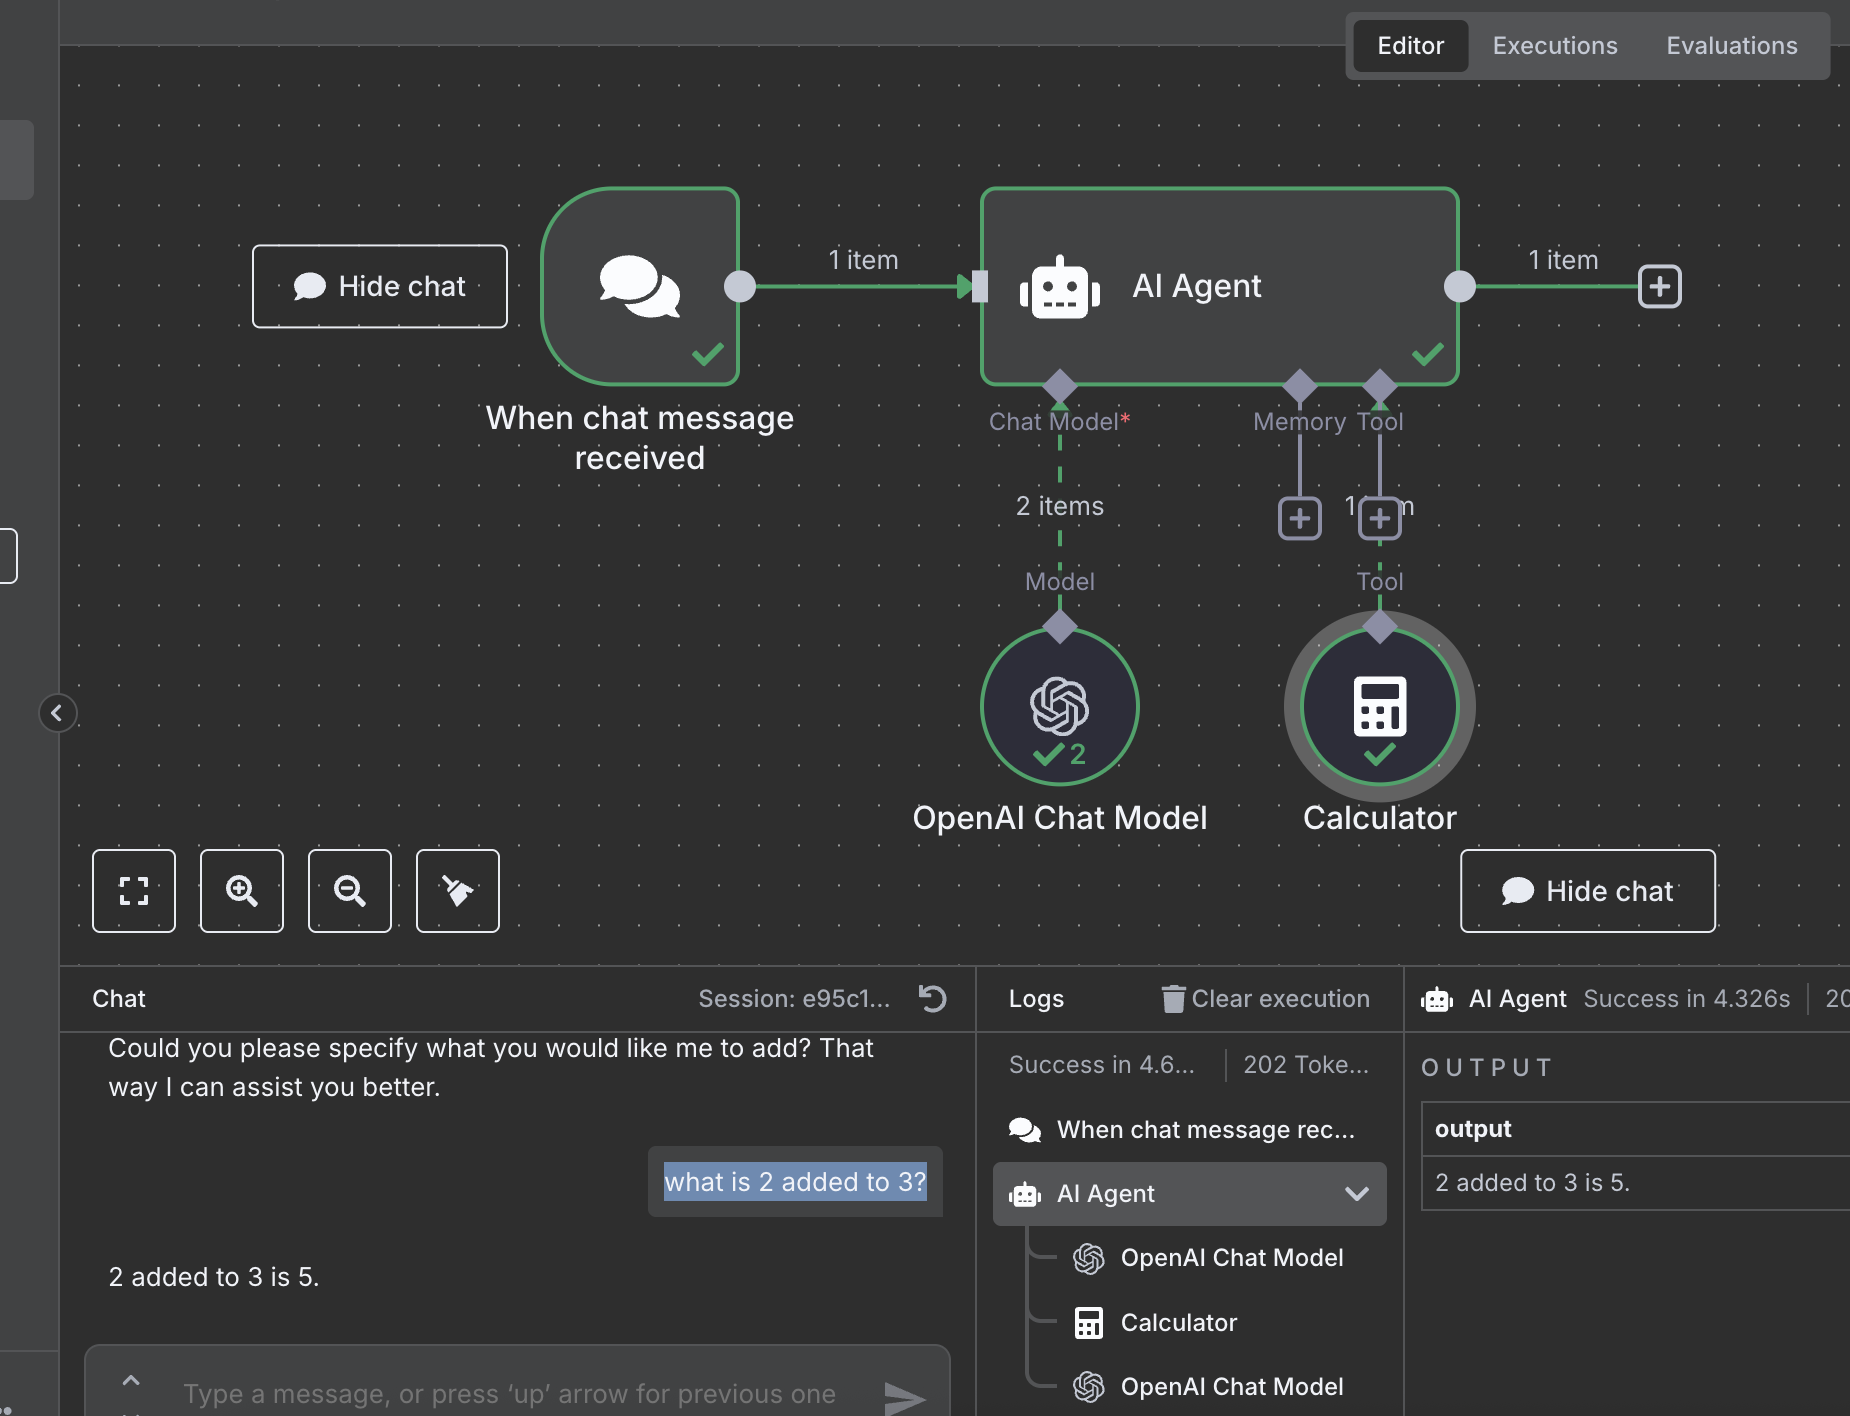
- “openai agents sdk” - not a framework, and so not opinionated. it is lightweight
- each agentic framework has its own terminology
- “agent” - wrapper around llms, solve a specific purpose
- “handoffs” - interaction between agents
- “guardrails” - checks to ensure that the agent does not do something it should not
- first, we create an instance of the agent. think of instructions like a system prompt. this is now a specialized agent for a specific task
agent = Agent(name="Jokester", instructions="You are a joke teller", model="gpt-4o-mini")
- finally, we call “runner.run” to run the agent
result = await Runner.run(agent, "Tell a joke about Autonomous AI Agents")
print(result.final_output)
- additionally, we use “trace” to keep a log of all the interactions. it helps us look into open ai’s monitoring tools
with trace("Telling a joke"):
  result = await Runner.run(agent, "Tell a joke about Autonomous AI Agents")
  print(result.final_output)
- vibe coding tips -
- they tend to be too verbose, so prompt it to be concise
- they tend to use old apis, be explicit about using latest apis by for e.g. specifying the current date
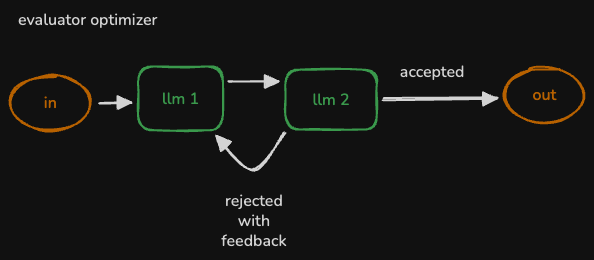
- verify using for e.g. 2 llms - evaluator optimizer
- generate small pieces of code, instead of generating the entire code at once using the llm. if you have trouble breaking down the problem into smaller pieces, use an llm to do that!
- variety - ask it to generate multiple solution, and then pick the best one
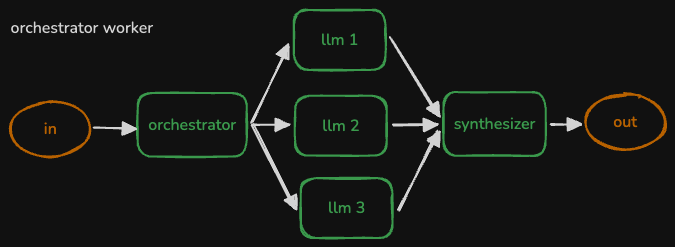
- example of calling multiple agents at once -
results = await asyncio.gather(
  Runner.run(agent1, "Task 1"),
  Runner.run(agent2, "Task 2"),
  Runner.run(agent3, "Task 3")
)
- how i was using gemini instead of gpt via openai agents sdk -
GEMINI_BASE_URL = "https://generativelanguage.googleapis.com/v1beta/openai/"
google_api_key = os.getenv('GOOGLE_API_KEY')
gemini_client = AsyncOpenAI(base_url=GEMINI_BASE_URL, api_key=google_api_key)
gemini_model = OpenAIChatCompletionsModel(model="gemini-2.0-flash", openai_client=gemini_client)

agent = Agent(
  name="Jokester",
  instructions="You are a joke teller",
  model=gemini_model
)
- using tools - we first define the tool to use and simply use the decorator like so. it derives the description of the tool from the function docstring, automatically parses the function signature, etc
from agents import function_tool

@function_tool
def send_email(body: str):
  """ send out an email with the given body to all sales prospects """
  # ... some code to send outreach emails ...
- now, we can also convert an agent into a tool! one technique if you think about it - wrap the
Runner.run call in a function and use the function_tool decorator described above. method two is more concise -sales_tool = sales_agent.as_tool(tool_name="sales_agent", tool_description="write a cold sales email")
- this is how we specify the tools available to an agent -
agent = Agent(
  name="SalesAgent",
  instructions="You are a sales email writer",
  model=gemini_model,
  tools=[sales_tool]
)
- what we are basically doing is, the agent / llm decides when to call the tool, and the tool is basically another agent / llm
- till now, we saw agents using other agents as tools. but in “handoffs”, agents basically delegate tasks to other agents that specialize in that task
- in case of tools - it is like a request response cycle i.e. the agent calls the tool (which might be an agent), and after the response, the agent uses that response to continue its work. but in case of handoffs, the agent passes the control altogether to the other agent
- now, an agent tells the other agents about what it does using handoffs -
emailer_agent = Agent(
  name="email manager",
  instructions=instructions,
  tools=tools,
  model=gemini_model,
  handoff_description="convert an email to html and send it"
)
- now, just like we used tools, we can use handoffs to tell the agent about the other handoffs it can use -
sales_manager = Agent(
  # ...
  handoffs=[emailer_agent]
)
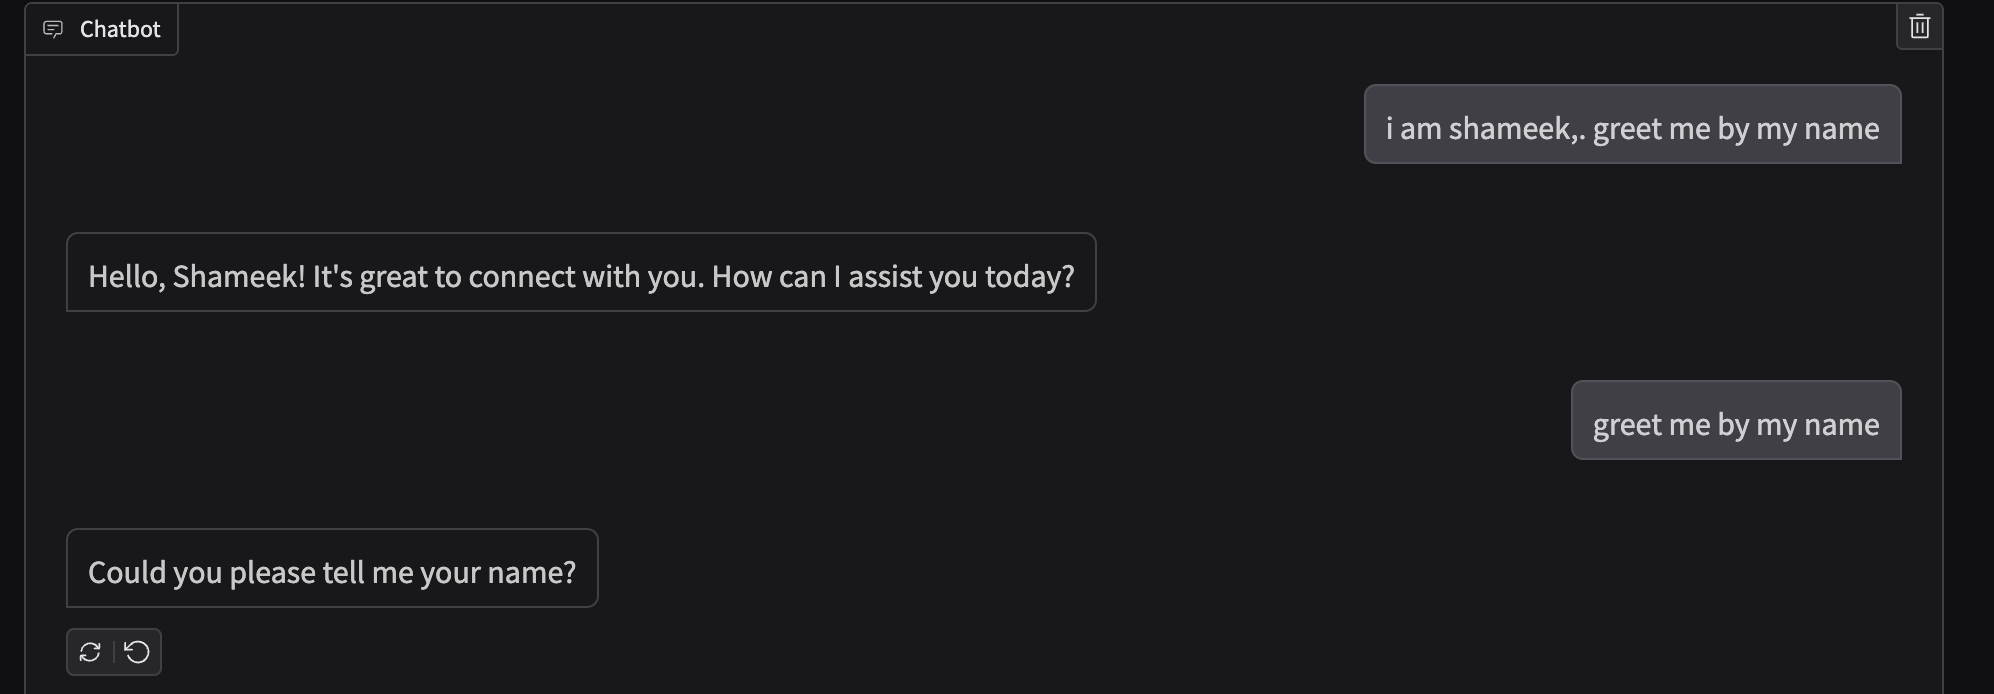
- “guardrails” - we can have input guardrails running on the initial input, or output guardrails running on the final agent outputs
- like tools, we use decorators to achieve this
- the guardrail receives three parameters - the context, the agent using the guardrail and the message
- now, in this example, we use yet another agent to help us validate the input. note how we use “structured outputs” for this agent - we use pydantic and tell the output format to the agent by using
output_type. then, using the input guardrail, we send this agent the input (and the context etc) to verify the image validityclass NameCheckOutput(BaseModel):
is_name_in_message: bool
name: str
guardrail_agent = Agent(
name="name check",
instructions="check if the user is including someone's personal name in what they want you to do",
output_type=NameCheckOutput,
model="gpt-4o-mini"
)
@input_guardrail
async def guardrail_against_name(ctx, agent, message):
result = await Runner.run(guardrail_agent, message, context=ctx.context)
is_name_in_message = result.final_output.is_name_in_message
return GuardrailFunctionOutput(output_info={"found_name": result.final_output},tripwire_triggered=is_name_in_message)
- additional note - add comments to fields in the base model to help the agent understand the output format
- critical learning - remember that llms are good at predicting the next token. so, if our use case for e.g. can have a “reason” field, we should have that field added to the structured output type first. this forces the llm to think through its decision first, and then fill out the other fields that we actually need
- also, these pydantic objects can be nested for complex output types
- “hosted tools” that come with openai -
- “web search tool” for searching the web
- “file search tool” for retrieving information from vector store
- “computer tool” for automating tasks like screenshots, clicking, etc
- below is an example of using the web search tool. i believe we force it to use the tool by using
tool_choicesearch_agent = Agent(
name="search agent",
instructions=INSTRUCTIONS,
tools=[WebSearchTool(search_context_size="low")],
model=gemini_model,
model_settings=ModelSettings(tool_choice="required"),
)
- “langchain” - an abstraction framework - makes switching between gpt, claude, etc easier, makes architectures like “rag” easier, supports ideas like “memory” (and keeping it in ram or database), solidifying good prompt practices, etc. langchain also has its own declarative language called “lcel” (langchain expression language)
- while it does support tools etc, it predates the “agentic ai” explosion. and that is where “lang graph” comes in
- “lang smith” - helps with monitoring of lang chain and lang graph applications
- lang graph itself too has different components - “framework” (what we will use), “studio” (no code solution) and “platform” (hosted environment for deploying agentic ai applications)
- “agent workflows” in lang graph are “graphs” or “trees”
- “state” - current snapshot of the application, that is shared across the whole application. they are “objects”
- “nodes” - they are like “functions”. they have the agent logic. they receive the state and return the updated state
- “edges” - determine which node to run next. they too are “functions”. they can be “conditional” or “fixed”
- this is how lang graph works - we first lay down the whole graph, and then we run it
- “state” is immutable - it returns a new state object, instead of modifying the existing one
- when we return the new state, lang graph calls the “reducer function” to update the existing state
- why - this way, lang graph can concurrently run multiple nodes and combine the state, without them overwriting each other
- an example of type hints and annotations -
def shout(text: Annotated[str, "something to be shouted"]) -> str:
  print(text.upper())
  return text.upper()

shout(text="hello")
- my understanding - lang graph wants us to specify the reducer for the field of this state, using annotations like this
- now, lang graph already ships with a default reducer called
add_messages, which just concatenates the new list with the existing listfrom langgraph.graph.message import add_messages
from langgraph.graph import StateGraph
class State(BaseModel):
messages: Annotated[list, add_messages]
- note - creating the “graph builder”. note - we are not instantiating the state class, we are just passing its structure to the graph builder
graph_builder = StateGraph(State)
- now, we create a node and add this node to the graph -
def first_node(old_state: State) -> State:

    reply = f"{random.choice(nouns)} are {random.choice(adjectives)}"
    messages = [{"role": "assistant", "content": reply}]

    new_state = State(messages=messages)

    return new_state

graph_builder.add_node("first_node", first_node)
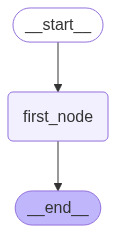
- next, we create edges between the nodes. we have a simple graph with just one node -
graph_builder.add_edge(START, "first_node")
graph_builder.add_edge("first_node", END)
- finally, we need to compile the graph -
graph = graph_builder.compile()
- we can view the graph as follows -
display(Image(graph.get_graph().draw_mermaid_png()))
- now, we can use it as follows -
state = State(messages=["hello world"])
result = graph.invoke(state)
result

# {
#   'messages': [
#     HumanMessage(content='will this work?', additional_kwargs={}, response_metadata={}, id='8e3b81a9'),
#     AIMessage(content='zombies are moody', additional_kwargs={}, response_metadata={}, id='ff11210b')
#   ]
# }
- slight note - understand how we just pass it a string, but it wraps using the “human message” and “ai message”. that is just how the inbuilt
add_messages reducer works - and this sort of structure eludes to the fact that we can use this reducer for chat applications as well (which is what we do next)
- also note - the messages is also getting reset every time. if we were to invoke it again, messages will have 2 and not 4 items. every time we call
graph.invoke, we loose out on the previous messages - what happens is basically is that first, our input is added to the messages state, and then, the result of invoking the node in our graph is added to the messages state
- “super step” - an invocation of the graph is called a “super step”. each super step therefore involves a series of calls to agents, tools, etc
- now, understand that every new user message leads to a fresh invocation of
graph.invoke - flow - user asks something, graph is invoked resulting in a super step, and the user asks again, and the cycle continues
- now, the intermediate state after each super step is saved using “checkpoints”
- lang smith setup - it asks us to add some environment variables -
1
2
3
4
| LANGSMITH_TRACING="true"
LANGSMITH_ENDPOINT="https://api.smith.langchain.com"
LANGSMITH_API_KEY="..."
LANGSMITH_PROJECT="lang-graph-getting-started"
|
- creating tools in lang graph. this is an example of a tool for web search that ships with lang graph. note how we invoke it using
invokefrom langchain.agents import Tool
from langchain_community.utilities import GoogleSerperAPIWrapper
serper = GoogleSerperAPIWrapper()
tool_search = Tool(
name="search",
func=serper.run,
description="useful for when you need more information from an online search"
)
- creating a custom tool is not much different -
def push(text: str):
  """Send a push notification to the user"""

  requests.post(
      "https://api.pushover.net/1/messages.json",
      data={
          "token": os.getenv("PUSHOVER_TOKEN"),
          "user": os.getenv("PUSHOVER_USER"),
          "message": text
      }
  )

tool_push = Tool(
    name="send_push_notification",
    func=push,
    description="useful for when you want to send a push notification"
)

tool_push.invoke("Hello, me")
- adding the tools to the the llm. bts, this is that complex json we create, which helps the llm understand what tools are available, and how to use them
tools = [tool_search, tool_push]

llm = ChatOpenAI(model="gpt-4o-mini")
llm_with_tools = llm.bind_tools(tools)
- next, we create the chat node and add it to the graph. the magic here is how we interact with the llm with the right json format etc (of role and content), and how the add_messages reducer abstracts it away from us
def chatbot(state: State):
  return {"messages": [llm_with_tools.invoke(state["messages"])]}

graph_builder.add_node("chatbot", chatbot)
- next, we will also add the nodes for the tools. think like this - first we bound it to the llm, so that the llm knows when to call the tools. this is the part which helps us actually invoke the tools
graph_builder.add_node("tools", ToolNode(tools=tools))
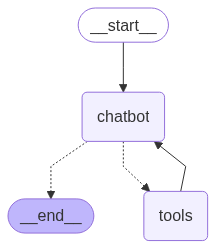
- finally, we add the edges. my understanding - recall how we only want to call the tool if the model tells us to do so, hence the conditional edge. but, we always do want to call the llm again with the response from the tool and hence the fixed edge. finally, there is a dotted line to end node as well, maybe because the llm will keep calling the tools until it decides to stop. e.g. in our case, we can ask for a notification of the top news, and it would use both search and notification tools to do so before ending
from langgraph.prebuilt import tools_condition

graph_builder.add_conditional_edges( "chatbot", tools_condition, "tools")

graph_builder.add_edge("tools", "chatbot")
graph_builder.add_edge(START, "chatbot")
graph_builder.add_edge("chatbot", END)
- now, we start using this ia gradio. however, notice how it has no memory yet. each “super step” led to the resetting of the messages state
def chat(user_input: str, history):
  result = graph.invoke({"messages": [{"role": "user", "content": user_input}]})
  return result["messages"][-1].content

gr.ChatInterface(chat, type="messages").launch()
- this is because the state we manage is for invocation / “super step”. we use “checkpoints” for this. just perform this step when “compiling” the graph -
from langgraph.checkpoint.memory import MemorySaver

memory = MemorySaver()

graph = graph_builder.compile(checkpointer=memory)
- now, our chatbot node gets all the state, from the previous super step as well
- note - using the below config, we can for e.g. separate memories. e.g. if we were to change the thread id, we would get a separate instance of the memory -
config = { "configurable": { "thread_id": "1" } }

def chat(user_input: str, history):
    result = graph.invoke({"messages": [{"role": "user", "content": user_input}]}, config=config)
    return result["messages"][-1].content

gr.ChatInterface(chat, type="messages").launch()
- we can get all the state at any point -
graph.get_state(config) - even more, we can get all the history of the state -
list(graph.get_state_history(config)). now, this allows us to do things like “time travel” using a particular snapshot id - again, switching from in memory to sql database e.g. sqlite is also pretty straightforward
- asynchronous lang graph -
await tool.arun instead of tool.runawait graph.ainvoke instead of graph.invoke
- tiny issues with async and notebooks - notebooks already run an event loop, and we are ourselves trying to run one as well. we cannot run event loops within event loops, and “nest asyncio” fixes this for us very easily
import nest_asyncio
nest_asyncio.apply()
playwright - browser automation, like a successor to selenium. why use such tools - if we just use tools like beautiful soup, we just get the server side content. but with playwright, it can execute the javascript to paint the page to then actually get the content. “headless mode” - is where the browser just runs in the background, without us ever seeing it- now, langchain makes “tools” for navigation, clicking, etc available to us, so that we do not have to write tool wrappers over playwright ourselves
from langchain_community.agent_toolkits import PlayWrightBrowserToolkit
from langchain_community.tools.playwright.utils import create_async_playwright_browser

async_browser =  create_async_playwright_browser(headless=False)
toolkit = PlayWrightBrowserToolkit.from_browser(async_browser=async_browser)
- playing with these tools can be done as follows. it will open a browser window, navigate to the url, and then display its contents -
tools = toolkit.get_tools()
tool_dict = { tool.name: tool for tool in tools }

await tool_dict.get("navigate_browser").arun({"url": "https://www.cnn.com"})
text = await tool_dict.get("extract_text").arun({})

import textwrap
print(textwrap.fill(text))
- note - we can also use
TypedDict instead of BaseModel for state. the difference is we will use state["messages"] instead of state.messages - for a complicated example using lang graph, let us look at the evaluator optimizer workflow. here is how we can use custom logic for edges - e.g. if our worker thinks that it needs to use a tool, we can route it to the tools node. otherwise, we can kick in the evaluator workflow. similarly, the evaluator can decide whether to end the workflow or route it back to the worker
def worker_router(state: State) -> str:
  last_message = state["messages"][-1]

  if hasattr(last_message, "tool_calls") and last_message.tool_calls:
      return "tools"
  else:
      return "evaluator"

def route_based_on_evaluation(state: State) -> str:
  if state["success_criteria_met"] or state["user_input_needed"]:
      return "END"
  else:
      return "worker"

# ...

graph_builder.add_conditional_edges("worker", worker_router, {"tools": "tools", "evaluator": "evaluator"})
graph_builder.add_conditional_edges("evaluator", route_based_on_evaluation, {"worker": "worker", "END": END})
- “model context protocol” - anthropic describes it as usb-c of agentic ai
- its a protocol - a standard way of sharing “tools”, “resources” and “prompts”
- mcp is not about building tools - it was already very easy as we saw here, it is about sharing them easily
- “mcp host” - the overall agentic app we have written, which runs these tools
- “mcp client” - live inside the mcp host we described above. they help connect to the “mcp server”. each mcp server has a corresponding mcp client on the mcp host
- “mcp server” - provides the tools, resources and prompts
- misconception - usually, we download and run the mcp server ourselves. it is rare to have the mcp servers running remotely elsewhere. these are also called “managed / hosted mcp servers”, and are rare
- there are two different “transport mechanisms” for mcp servers -
- “stdio” or “standard input output” - the mcp client spawns a different process in our computer, and communicates with it using stio
- “sse” or “server sent events” - uses http events and streams the results (recall the typewriter effect!)
- now, if we are using managed mcp servers, we have to use the sse transport mechanism, but otherwise, we can use either
- in the below example, we use “fetch”, which runs a headless playwright browser
- “parameters” - a command that we can run in the command line to spawn an mcp server
- so below, we create an mcp client, spawn the mcp server and collect the tools this mcp server provides
- a timeout of 60 seconds can be used, as the default of 5 seconds can be low at times
fetch_params = {"command": "uvx", "args": ["mcp-server-fetch"]}

async with MCPServerStdio(params=fetch_params, client_session_timeout_seconds=60) as server:
  fetch_tools = await server.list_tools()

fetch_tools
- we see that the tool has a description like this - “Although originally you did not have internet access, and were advised to refuse and tell the…”. llms are usually told that they do not have internet access, but this tool engineers have already fixed the description etc to help the llm understand that it can now use this tool to search the web
- note - the node version of playwright has many more tools available for us to use -
playwright_params = {"command": "npx", "args": [ "@playwright/mcp@latest" ]}
# ... rest stays the same
- reading and writing from a file system, but only within the specified path -
sandbox_path = os.path.abspath(os.path.join(os.getcwd(), "sandbox"))
files_params = {"command": "npx", "args": ["-y", "@modelcontextprotocol/server-filesystem", sandbox_path]}
- now, a full blown example. we pass mcp servers instead of tools to the openai agent -
instructions = """
You are highly capable at browsing the internet independently to accomplish your task,
including accepting all cookies and clicking 'not now' as
appropriate to get to the content you need. If one website isn't fruitful, try another.
Be persistent until you have solved your assignment.
"""

async with MCPServerStdio(params=files_params, client_session_timeout_seconds=60) as mcp_server_files:
    async with MCPServerStdio(params=playwright_params, client_session_timeout_seconds=60) as mcp_server_browser:
        agent = Agent(
            name="investigator",
            instructions=instructions,
            model="gpt-4.1-mini",
            mcp_servers=[mcp_server_files, mcp_server_browser]
        )
        with trace("investigate"):
            result = await Runner.run(agent, "Find a great recipe for Banoffee Pie, then summarize it in markdown to banoffee.md")
            print(result.final_output)
- explore the different mcp servers e.g. at here - https://mcp.so/
- note - using an mcp server is as safe as installing a package. so, do due diligence like verified publisher etc
- making our own mcp server. we create a new file, say “account_server.py”. note how we first instantiate fast mcp, and then we use the annotation
mcp.tool to create it -from mcp.server.fastmcp import FastMCP
from accounts import Account
mcp = FastMCP("accounts_server")
@mcp.tool()
async def get_balance(name: str) -> float:
"""Get the cash balance of the given account name.
Args:
name: The name of the account holder
"""
# ...
# ...
if __name__ == "__main__":
mcp.run(transport='stdio')
- we can use our mcp tool as follows. we just need to run our file using uv -
params = {"command": "uv", "args": ["run", "accounts_server.py"]}

async with MCPServerStdio(params=params, client_session_timeout_seconds=30) as server:
    mcp_tools = await server.list_tools()
- note - even memory can be treated as a tool. and the idea is that we have different kinds of memory for different use cases
- but always remember - even these tools and memories help do just one thing - add context to the prompt. so, we need to think about the context, and not the prompt